
Create a small lunch sack-style container with
three
different tab-into-slot fold-down flap profiles,
then add decorative panels and
numbers for
a fun can't-wait-'til-Christmas activity.

Place religious advent messages, winter time activities,
service ideas, or small treats or toys inside
each sack.
Pin 1 thru 12 for the "Twelve Days of Christmas count down
(or 1 thru 24 for the full December countdown)
to a ribbon clothesline strung on a
wall.
Accent front panels and flaps provide scope for
your favorite Christmas
prints.
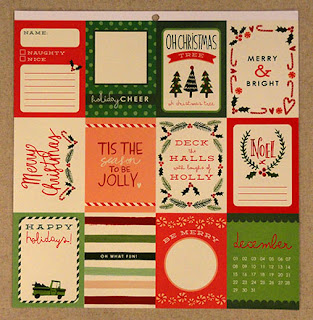

The paper inspirations for the set pictures here were created
using DCWV Christmas card stock stacks,
"Hand-Painted Christmas" and
"Merry Memories".


1. Identify and cut the shapes for the quantity of sacks
for your selected length of activity period. For each sack,
cut one "front" that includes the flap tab slot, plus one "back",
with matching flap accent, plus a pair of top and base panels.
NOTE: if you are using the panel sheet from
DCWV "Hand Painted Christmas" stack, use rotary cutting equipment
or scissors to cut them apart on their division lines.
 2. Prepare the "front" sack panel by bending on the perforations as shown.
(side perforations are "mountain" "valley" "mountain; bottom is bent back;
triangle side bottom tab is bent back; diagonal lines are "valley").
3. Prepare the front panel in identical fashion,
plus fold the flap as "mountain" fold.
 NOTE: if you are preparing multiples (12 or 24, etc.),
construction efficiency will be increased with
an "assembly line" approach where all of one operation
is completed at one time. For example, shown here, all the
front panels were prepared, and then all the back panels.
 4. Line up and join the front and back at one side seam.
Take care to match top edges, and bottom of lower tab
with bottom panel perforation line, opposite.


 . . . working downward toward the bottom and up under the
gusset folding . . .


 9. Layer front accent panel and base accent.
Position and attach to sack front, centered side to side,
and slot to bottom.
 10. Test the sack's close-ability by curling the top flap
to insert tab into slot.


for your selected length of activity period. For each sack,
cut one "front" that includes the flap tab slot, plus one "back",
with matching flap accent, plus a pair of top and base panels.
NOTE: if you are using the panel sheet from
DCWV "Hand Painted Christmas" stack, use rotary cutting equipment
or scissors to cut them apart on their division lines.

(side perforations are "mountain" "valley" "mountain; bottom is bent back;
triangle side bottom tab is bent back; diagonal lines are "valley").
3. Prepare the front panel in identical fashion,
plus fold the flap as "mountain" fold.

construction efficiency will be increased with
an "assembly line" approach where all of one operation
is completed at one time. For example, shown here, all the
front panels were prepared, and then all the back panels.

Take care to match top edges, and bottom of lower tab
with bottom panel perforation line, opposite.

5. Bend to form the sack panels into a tube,
align, and complete the second side seam.

NOTE that the symmetrical shape of the sack will allow for
pressing the sack flat on table top surface where direct fingertip
pressure can be applied along the side seam.

6. Bend the bottom side triangle tabs toward the center, then bend
front bottom flange inward, back bottom flange inward as
the top layer. Glue together all layers that touch.
Square up, then apply pressure to achieve maximum attachment.
NOTE that it may be helpful to place sack bottom flat on table top,
then reach hand inside and press against bottom tabs.

7. To facilitate flat storage, press the sack to flatten.
Place front side down, then begin at opening end to press sides
and side "gusset" folds flat . . .

gusset folding . . .

. . . and finally folding the bottom toward the back and pressing all
layers as flat as possible.

8. Position and attach flap. NOTE that flap design edges of front
and accent shape should line up exactly,
with a slight offset below the top perforation line.

Position and attach to sack front, centered side to side,
and slot to bottom.

to insert tab into slot.

11. Position (centered) each number onto the round "badge" shape
and glue in place. Arrange sacks in preferred order, then attach appropriate
badge to the flap. Insert the tab into slot to help identify the spacing.

12. Finish your sacks set according to the way you have decided to display
or make them work. The suggested method is to clothesline clip each
to an appropriately-sizes length of ribbon which is attached temporarily
to a prominent wall.

Enjoy your completed project.


