Showing posts with label 3d hat. Show all posts

Sunday, January 6, 2019

Top Hat 3D Snowflake Trim Mini

Classic top hat has merest downward taper, 
layered scallop-edge brim (to conceal crown attachment tabs), 
two-part hat band with optional miniature 
snowflake edging shapes, brim "rim" ring. 
Measures approx. 2.5" tall x 4.125" diameter brim. 
Sized to fit the "Snowman 3D Ball Head" design. 
Or use as a table decoration, invert as treat container, etc. 

ASSEMBLY: 1. Identify and cut the shapes:
A crown main hat shape
B brim top shape   C brim bottom shape
D brim interior shape   E rim trim
F hat band (cut 2)
G snowflake trim (cut 8;
NOTE this shape has been modified at base
edge in the final cut file
2. Prepare the crown shape by bending back on
all panel, tab and flange perforation lines,
except bend the bottom narrow tabs forward.
3. Form the crown into a tube to bring the straight
edge to overlap the flange opposite, to perforation
line, and complete the side seam.
4. Bend the top tabs inward, the octagon "lid"
down into position, adjust to match up lid edges
with tab perforations, and glue in place
all around.
5. Position and attach the inner brim shape to
the underside of the lower brim shape, taking care
to line up the scallop edges as precisely as possible.
6. Position and attach the trim shape to
the face side of the upper brim shape, taking care
to line up the scallop edges.
7. Bend the crown bottom tabs inward, then . . . 
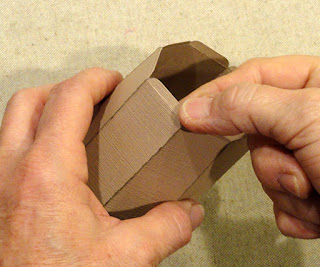
. . . fit the upper brim assembly over the tabs
until inner octagon straight edge  "seats" 
at the perforation lines.
Bend tabs back and attach to upper brim underside.
8. Position the lower brim assembly back-to-back
with the attached upper brim (recess of interior
shape allows for tabs to sit between top and
bottom brims), taking care to match up the outer
scallop edge AND the inner octagon straight edges,
and attach in place.
9. Prepare the hat band shapes by bending
back on perforation lines.
If using the bands without the snowflake trim,
fit and attach the band at crown base with
perforation bends aligned with corresponding
corners of crown.
NOTE that both lead ends should line up
at a bend angle.
10. If incorporating the snowflake trim units,
position and attach each behind the upper band edge,
centered, and . . .
. . . with the upper edge of the base
extension aligned at the straight band upper edge.
Here is the complete hat with band and snowflakes.


Sunday, June 14, 2015

Uncle Sam 3d Hat Box Assembly Guide

Zippy little top hat that looks just as if
grand ol' Uncle Sam has just arrived for a visit!
This 3d hat box is assembled as separate hat and inner box.
Approx. size is 3" tall by 5.25" diam. (base).
Great as part of your patriotic or July 4th decor,
or fill the box with goodies or a gift card
as a special and unique gift for July birthday
or service personnel thank you.

ASSEMBLY:
1. Identify and cut the shapes.
A crown (front) wedge with attached top          and star accent
B separate crown wedges (5)
C brim circle and under-brim circle
D brim rim ring
E stripe and star panel shapes (6 ea.)
F base box shape (bottom with connected        sides

2. Prepare the front/top and side wedge shapes by folding top or top tabs back, side tabs back, horizontal perf lines slightly forward.

3. Prepare to join by lining up the straight left edge of first separate wedge with the right front wedge's right edge perforation lines as shown.

Working first with the bottom "strata" only, apply adhesive to the bottom tab, overlap the corresponding straight edge, adjust so that bottom edges and perf lines line up, and glue in place.

4. Repeat the lining up of middle strata perf line and straight edge and glue in place. Repeat for the top strata perf line and straight edge and glue in place. This completes one seam.

Repeat this process to join 5 wedges to the front wedge/top shape in a series or row.

5. Join the remaining free wedge end tabs to the straight edge of the front wedge following the same joining process as before. Fold the top down into position with straight edges lining up at corresponding perf lines at top of each wedge, and glue tabs in position.

6. Insert the bottom tabs end of the crown through the upper crown circle opening (face side should upward toward crown) to the depth where the tab perforation lines match with the crown edge.


7. Fold the tabs back or outward and glue each securely to the crown circle underside. Make sure that the crown perforation lines remain "seated" exactly at the crown inner cut edge.


8. Apply adhesive to the underside (non-face side) of the second brim circle, then position it over the underside of the attached brim circle, line up outer circle edges, and glue in place securely.

(This will hide the crown connection tabs.)


9. Prepare each stripes accent shape by bending the top of stripes forward slightly at the tiny perf cut on each stripe and at the horizontal perf line near the bottom of the shape.

Position, align and attach one accent stripes shape so that the top of the stripes line up at the top of the crown edge, with side edges and seam crest also lined up. Repeat for all six shapes and sides.


10. Prepare each stars panel shape by folding slightly forward along the horizontal perforation line.

Position, adjust and glue each panel in place, with panel bottom edge at the joint angle between brim and crown, sides lined up at wedge panel edges, and top overlapping the bottom portion of the stripes shape. 

Repeat to attach all 6 star panel shapes.


11. Position and attach the large star accent shape at the crown's front panel.


12. Apply adhesive to the underside of the brim rim ring, then slip over the top of the hat assembly, align curved edges as precisely as possible, and glue in place.


13. Prepare the base box shape by folding back at the center's hexagon perforation lines. Also fold side panel edge tabs back, and top panel edge tab back.


NOTE the finger holes that will allow the base box to be pulled away from the hat top after it is inserted. These should be pressed back slightly, but NOT folded (no perf lines included).


14. Fold two adjacent sides into position so that the left panel straight edge overlaps to align at the corresponding tab perf line. Glue the edge over the tab as shown.

Repeat for all six seams in similar manner.


15. Fold the top opening tabs back to the interior cavity and glue in place.


16. Insert the base box or vessel into the crown's opening to close the box . . .


. . . and slide together until the bottom of the base box is flush with the underside of the brim.


Here is the finished product.


Sunday, March 8, 2015

Bunny (New) Canister Character Assembly Guide


Whimsical character for Easter or springtime decorating
or to use as a gift container has been revised
(from the original Crystal Light, paper-covered container)
to include the card stock shapes to build the canister
to which the decor shapes are attached.
Dimensional hat is built with ears attached.
Underneath the brim is a flange that fits into the top
of the canister as the container's lid.

CONSTRUCTION:
1. Identify and cut the shapes:
A. canister
NOTE that this image shows the older version that used a Cyrstal light plastic canister; updated cut file substitutes a rectangle, 2 hollow and 1 whole rim
B. lower hat brim
C. lower brim flange
D. Upper brim
E. front crown segments (with ear slots)
F. crown segments
G. hat band - front
H. hat band - back
I. body and body base
J. head, head base, and muzzle
K. ears and inner ears 
L. face features
M. carrot layers
N. dimensional bowtie with knot shape


2. Build the canister. At left, you can see the finished canister. See the steps to build it described in the scarecrow canister character assembly tutorial (steps 2 through 6) , then return to this post for the remainder of the Bunny canister character project. 


3. Pre-assemble head/muzzle, bow tie, ears, carrot and carrot top units. (See bow tie assembly in step 5 below)
4. Position remaining facial features onto face/muzzle. Apply glue to the vertical center only of head and body backside. Only the center portion will touch and attach because of the canister's rounded shape. Align the straight top or bottom head/body edges with canister top/bottom straight edges.

Attach the bow tie and assembled carrot.


5. Assemble the bow tie by bringing the side bow edges to overlap at the center (take care to keep bows "loopy" and not flattened), then glue these layers and hold until secure.

Wrap center strip over front and under to back, then glue end in place. Glue contrast knot shape over front at center.


6. Begin hat assembly by folding upper tabs back and gluing in place. Leave the end fold-over tab un-folded until step 7, next.


7. Form flange strip into a ring, bringing ends together. Insert "tab" end between front edge and back tab until straight edge aligns with the single perforation of the tab. Hold in place with end tab enclosed between flange front and back tab surfaces.


8. Insert flange tabs into slots of lower bring. NOTE that brim slots form andoval, with longer slots at center front and center back. Take care to insert matching size tabs into appropriate slots.


9. Carefully work the tabs fully through so that flange is snug against backside. Fold tabs outward and glue in place.


10. Begin crown assembly by folding each segment (2 with slots for front, 6 regular segments) on perforations. Fold lower edge tabs outward, all others backward.


11. Join the first two segments by applying glue to tabs of the first (at right), and overlapping corresponding straight edges of the second. Align and join the bottom tab and edge, then the top tab and edge while also joining the centers. Take care to align segment perforations to be in a straight line.


12. Continue joining segments to complete front half. There will be a regular segment as the center front, a slotted segment on each side of center, then one more regular segment (mine is added to the right of the assembly half shown).

13. Complete the back half in the same manner, with 4 regular segments.


14. Align and join crown halves by joining tabs under corresponding straight edges in similar manner to other segment joining. It may be necessary to get the back half mostly "aligned" before gluing the front half. Work quickly so that glued edges can still be adjusted if necessary.

 15. Identify the FRONT of the crown (regular segment between slotted segments). Remember where the FRONT is for placement of the front hat band strips and for alignment of upper and lower brims in step 17. Insert upper brim octagon opening over completed crown, then slide brim down until edge aligns with tab perforations of crown assembly.


16. Fold tabs back and glue securely in place. 


17. Fold the small front hat band at end perforations, then position and glue in place on the front segment. Repeat this process for the longer, back/sides hat band segment, aligning the perforation folds with the segment "seams".


18. Prepare ears. Glue pink inner ear in place, centered. Fold ear into a boxed pleat on perforations (center perfs as "valley" folds, side perfs as "mountain" folds). Bring the side creased edges together, apply glue near the bottom and hold until glue is secure.


19. Insert the "tab" end of ear through crown segment slot.


20. Fold tab outward and glue securely in place.  Repeat the insertion step for the other ear.


21. Add a little glue behind the base of the ear to attach it to the crown (just at or below the hat band area).

22. Position the upper assembly BRIM over the lower assembly BRIM, taking care to align the fronts: upper front is where the small band section is; lower front is where the widest flange tab and slot are. Glue securely in place. 


23. Finish the assembly by sliding the hat/ears onto the canister by inserting the flange oval into the oval opening of the canister.


AND WITH THAT, YOU ARE FINISHED!


Watch for more canister designs
in this series from SnapDragon Snippets.
At the time of this posting, these designs are already available
through the Silhouette America online store:
3d snowman wrap for canister, 3d leprechaun canister wra