
Raised hexagon wreath base provides platform
for
eight folded stars with 24 sprigs swirling
in outer and inner "rings".
Two
layers of fir fringe shapes also swirl
from behind wreath base. Make a
wreath -
like the raffia-colored sample shown
(or use a more traditional
greens combination) -
by attaching
hanging "loop" & ribbon to back.

To use as ring centerpiece,
center a large
pillar candle (up to 4" diam. base)
or the "candle stand 3 inch
pillar" separate design.
Spritz with spatter paint or ink,
add decorative
berry sprigs if desired.
ASSEMBLY: 1. Identify and cut the shapes:
A platform wedges (8)
B main wreath base (NOTE some of "finger openings"
have been eliminated in the final version)
C platform support strips (8)
D & E lower & upper edge fringe (8 ea)
F sprig shapes (24)
G folded star strips (shown in 1 set of 8)
H opt. hanger (2 to be layered)
Not shown: corner fringe lower & upper (8 ea)

 3. For each support strip,
apply adhesive to the separate-panels half
backside . . .

 Apply pressure all along for a good sturdy strip.


 . . . bend tabs outward and glue undersides
(actually face of strip paper) to the backside of base.


 7. Working in a counter-clockwise direction,
add the second and remaining wedges in the
same fashion, bending the previous wedge outward
to keep it out of the way.


 . . . reposition so that straight edge aligns at the
tab perforation, and apply pressure to achieve
a firm joint.
 NOTE that it may prove helpful to insert a
"press-against" surface under the wedges
(and between the support strips), such as
the eraser end of this new pencil)
to help complete the seam.
Repeat the inner seam joining for all wedges.
 10. Join the top platform face extensions
by applying adhesive . . .


 . . . use the finger access openings to
apply pressure to join the tab all along
its length.
 NOTE that it will also be helpful to insert
a blade "press against" surface such as
the blade end of this spatula tool to assist
in attaching tab ends.
Repeat for all 8 tabs.

 NOTE that a 'T' is cut into the "TOP" fringe shapes
(this one showing from shape's backside for
visibility to camera).
The top fringe shape is also slightly narrower
outer to inner edge.




A platform wedges (8)
B main wreath base (NOTE some of "finger openings"
have been eliminated in the final version)
C platform support strips (8)
D & E lower & upper edge fringe (8 ea)
F sprig shapes (24)
G folded star strips (shown in 1 set of 8)
H opt. hanger (2 to be layered)
Not shown: corner fringe lower & upper (8 ea)

2. Prepare the platform support strip by
bending back on the center line perforation,
bending edge tabs forward.

apply adhesive to the separate-panels half
backside . . .

. . . then folding and attaching to the opposite
half as shown. Tabs should remain unattached.


3. Bend the strips into a reverse 'C' as shown,
with the cut edges "seams" outward.

4. Bring tabs together to insert the tab ends
through the corresponding slots of the base, then . . .

(actually face of strip paper) to the backside of base.

Place the base on flat surface and apply finger
pressure to the tab areas until a good, flat
connection is completed.

5. Prepare the wedge shapes as shown,
bending back on all horizontal perforations.

Also bend back the upper and lower side tabs.
NOTE that the center extension is NOT a tab,
and is not bent back. It contains two small dash
guidelines that may be helpful later in the assembly,
but do not fold.

6. Begin the attachment of the wedges by
positioning the first wedge narrow end tab
at one of the 8 inside angles of the base,
fitting it snugly between the angles, with
flange tab perforation line exactly at the
base edge, and gluing in place.

add the second and remaining wedges in the
same fashion, bending the previous wedge outward
to keep it out of the way.

8. As the final wedge is being placed, bend the side
tabs back . . .

. . . and flex the tab side to arrange it under
the first wedge straight edges.
The assembly should now have 8 wedges in place,
with the straight side edge of each overlapping
the tab side edge of adjacent wedge.

9. Bend neighboring wedge edge out of the way
to apply adhesive to the inner tab, then . . .

tab perforation, and apply pressure to achieve
a firm joint.

"press-against" surface under the wedges
(and between the support strips), such as
the eraser end of this new pencil)
to help complete the seam.
Repeat the inner seam joining for all wedges.

by applying adhesive . . .

. . . then positioning each wedge so that
the straight edge overlaps to the perf dash
guidemarks, then apply pressure to join.

11. Apply adhesive (we recommend a quick-grab
glue such as "Fabri-Tack) to the lower, outer tabs,
one or two at a time, then wrap the adjacent wedge
edge over to align its straight edge at tab perf line.
Complete all 8 tab seams.

12. Flip wreath assembly back side up to
apply glue to the outer flange tab, bend it
into position, then . . .

apply pressure to join the tab all along
its length.

a blade "press against" surface such as
the blade end of this spatula tool to assist
in attaching tab ends.
Repeat for all 8 tabs.

13. Prepare the edge fringe ALL shapes by adding
some upward curl to the strips by rolling them over
a rod tool while applying careful pressure.

(this one showing from shape's backside for
visibility to camera).
The top fringe shape is also slightly narrower
outer to inner edge.

14. Layer a pair of bottom and top fringe shapes
with back and side straight edges aligned
and glue the inner "solid" portions together.
Repeat to produce 8 total paired shapes.

15. Identify the cut dash guidemarks at the
ends of the fringe shapes.
These will assist with consistent base edge
positioning.

Apply adhesive to the face side "solid" area,
then position each fringe shape under one edge
of the wreath assembly, adjusting base edge
to align at the guide dash marks, with
ends centered between angles of base.

16. Prepare "corner" fringe pairs in the same
manner as for the longer fringe pairs.
Position one at each wreath angle, to fill in
the gap between longer fringe strips. . .

. . .centering at angle, and adjusting so that
the outer tips are approximately even
for a smooth visual transition around wreath,
and glue in place.

17. Curl each sprig shape.

18. Note the three 'x' marks on each top surface
of the platform wedges . . .

. . . then position and attach the stem-end punch hole
of a sprig shape over an 'x', working from left
to right as shown in this frame, with the sprigs
arching over the wreath edge.
19. Repeat the sprig position and attaching
a trio of sprigs on each wedge, aiming at the
same angle orientation for each wedge
to create a consistent pattern around wreath.

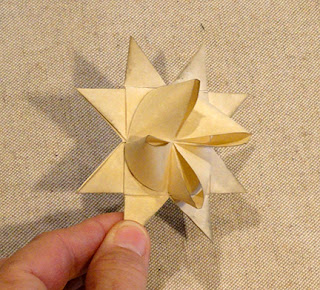
20. Prepare 8 folded stars by using the cut strips
and following the tutorial steps presented here.
Complete steps 1-19.

21. Experiment with a "dry fit" arrangement of
8 stars, placing one approximately at the
wreath angles. . .

. . . but adjusting as necessary
for even spacing, as well as "spinning" the star
tips to avoid the neighboring tips while covering
the sprig stem end punch holes as much as possible.

Glue each star into position
(it may be helpful to use a glue such as Fabri-Tack.)

22. Prepare the optional hanger by
layering and attaching the pair of shapes.

23. Position and attach the hanger under one
octagon edge of the wreath base, using the
dash cut guidemarks on the hanger to align
at the edge.

24. Complete the optional decoration of your wreath.
The sample wreath includes:
a) brown paint or ink spattering to give the
wreath a more blended appearance
b) ribbon loop through the hanger
c) cut sections of a winter berry stem
(this one came from JoAnn Fabrics)
with sprigs stem ends hot-glued and placed
under edges of stars on inner and outer
wreath curves.

Here is the completed wreath.


