The February panel design for the new for 2014 banner quilt series is
"FLOURISHED HEART WITH KEY".

It is now available as a cut file
from SnapDragon Snippets
through the Silhouette America online store.
The printed pattern version is also available for mail order purchase
from hearthsewnpatterns.com .
 SILHOUETTE DIGITAL CUTTER USERS:
Construction for this applique quilt features fusible applique with machine stitched edge finish. This tutorial will share a minimum of illustrated steps. For a thorough construction tutorial, please refer to January Calendar Graphics tutorial on this blog.
CONSTRUCTION
1. Prepare the appliques as fusible shapes, using "sewable" paper-backed fusible web. My recommendation is Heat N Bond Lite.
PRINT PATTERN USERS:
a. Set up a light box or make a reversed image photocopy of the applique shapes then trace these reversed shapes onto the paper side of the fusing product. Consider grouping the shapes by the color/fabric they will be cut from, in an efficient and close cluster.
b. Quick-cut the shapes or cluster out (leave a margin beyond the traced lines). For larger shapes (hearts) "hollow out" the center of the shape to reduce excess fusing stiffness in the final quilt top, leaving a 1/4" fusing margin INSIDE the traced line.
c. Follow fusing product specifications to iron/fuse the traced shape sections to the backside of the appropriate fabrics.
d. Carefully cut out each shape exactly on the traced lines. Remove paper backing.
a. Purchase and download the cut file.
b. Arrange the shapes for "cluster" cutting by fabric being used. Select all of cluster shapes to determine the fabric cut section required (add 1" or so to overall dimensions to provide a 1/2" margin on all sides of shape or cluster).
c. Cut fusing rectangle to determine size, fuse to backside of appropriate fabric, load on cutting mat.
d. Prepare the final "send to Silhouette" layout on the cutting mat image, adjust blade settings, etc., then send to cutter. When shapes are cut, carefully remove from mat using spatula tools.
2. Prepare center panel. Cut fabric rectangle 11.25" x 15.875" (includes 1/4" seam allowances on all edges). Fold in half lengthwise to find vertical centerline; finger crease through center. Unfold.
3. Position appliques, centered, on the panel, measuring from upper cut edge:
3/4" to highest swirl edge; 5.25" to largest heart center "valley" position. Refer to cover photo or download thumbnail to position all shapes.
 DIGITAL CUTTER USERS:
Consider using the "complete flourished heart" layout included in the download file to cut a positioning guide. Since this combined shape is larger than a regular 12x12 cardstock sheet, you may need to rotate the design to fit the cutting mat on-screen, as shown in the page layout here.
 Position this "stencil" over the center panel, secure in place with tape. Use temp marking tool to trace positions, then remove and place applique shapes according to markings.
 4. "Dry fit" all shapes, make adjustments as necessary, then fuse in place. NOTE: to avoid the possibility of smaller shapes (circles) becoming loose during handling, fuse and edge-stitch larger shapes first. After these are stitched, position and fuse circles, then complete edge stitching. Likewise, it may make sense to position and fuse hearts and complete edge stitching before positioning and stitching swirl shapes.
5. Cut "February" lettering panel: 11.25" x 4.125. Refer to illustrations and descriptions for "January Calendar Graphica" tutorial, Step 6, to position and fuse the letters in place.
 6. Complete edge-stitching, then position, fuse and edge-stitch any remaining appliques. Join lettering and center panel.
7. Layer with backing and batting, smooth layers and secure with pins or basting.
NOTE: For a more contemporary and "flag"-like appearance, I have used drapery-grade flannel as my batting. It would be difficult to hand-quilt through, but machine quilting is very easy.
Complete machine quilting at panel edges, in-the-ditch at narrow border seam, 1/4" echo beyond outer border seams, around.
 8. Trim excess layers as quilt top edges are "true-ed" to square. . . .
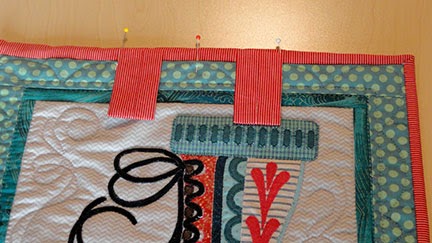
Prepare and complete binding, hanging sleeve and tabs. Refer to January Calendar Graphica tutorial, Steps 13-23 for more information on these tasks.
2. Prepare center panel. Cut fabric rectangle 11.25" x 15.875" (includes 1/4" seam allowances on all edges). Fold in half lengthwise to find vertical centerline; finger crease through center. Unfold.
3. Position appliques, centered, on the panel, measuring from upper cut edge:
3/4" to highest swirl edge; 5.25" to largest heart center "valley" position. Refer to cover photo or download thumbnail to position all shapes.
Consider using the "complete flourished heart" layout included in the download file to cut a positioning guide. Since this combined shape is larger than a regular 12x12 cardstock sheet, you may need to rotate the design to fit the cutting mat on-screen, as shown in the page layout here.
5. Cut "February" lettering panel: 11.25" x 4.125. Refer to illustrations and descriptions for "January Calendar Graphica" tutorial, Step 6, to position and fuse the letters in place.
7. Layer with backing and batting, smooth layers and secure with pins or basting.
NOTE: For a more contemporary and "flag"-like appearance, I have used drapery-grade flannel as my batting. It would be difficult to hand-quilt through, but machine quilting is very easy.
Complete machine quilting at panel edges, in-the-ditch at narrow border seam, 1/4" echo beyond outer border seams, around.
Prepare and complete binding, hanging sleeve and tabs. Refer to January Calendar Graphica tutorial, Steps 13-23 for more information on these tasks.
WATCH FOR THE REST OF THE SERIES
OF CALENDAR GRAPHICA
BANNER QUILTS!


