
Dimensional numeral 4 is built as lid and base,
then joined (enclosing a pellets or equiv.
weight packet so it will stand
upright).
Accent shapes decorate the front,
including divided front panel with
"JULY" letters
on the tall forward arm, and a trio of stars
on the
short back arm.
A small punch-hole bracket on the lower panel helps hold
the
optional twine wrapping in place.
Measures approx. 8.5" tall x 5"
wide x 1.25" deep.
ASSEMBLY: 1. Identify and cut the shapes.
This layout shows the LID front,
overlay accent shapes
(including the "JULY" letters and stars),
the add-on tie tab shape, & the 4 boxing strips


 3. The two rounded ends with punch hole (to accept
the twine tie at end of assembly) will be placed
together back-to-back, EXCEPT the add-on tab
is first inserted upward from the underside of
the accent shape, with the extension end being
attached to the underside to fill in the pop-up up
tab's opening.
Position the add-on tab as described, glue
rounded tips together with edges matched,
and glue the add-on extension to the underside
of accent shape.


 6. Position and attach the LID top tab to the top
of the '4' shape.


 The matching symbol cutout will identify the
next strip and its end edge that will be attached
in place.
 Overlap the straight end of strip 2 over the corresponding
end tab of strip 1 and attach.

 11. Locate and identify the end tab symbols
the show which strips should be joined
(refer to the illustrations at end of step 5),
then continue to position and attach strip segments
until . . .


This layout shows the LID front,
overlay accent shapes
(including the "JULY" letters and stars),
the add-on tie tab shape, & the 4 boxing strips

This layout shows the BASE main shape
and the 4 boxing strips.

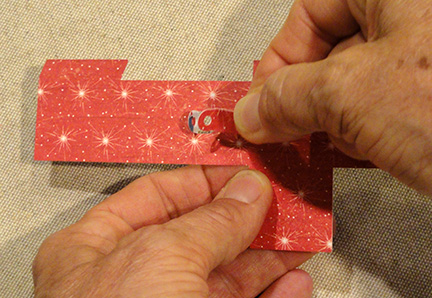
2. Prepare the accent lower shape by
bending the pop-up tie tab with punch hole forward,
also preparing the add-on tab by bending the rounded
"top" portion back in mirror image of the pop-up tab.

the twine tie at end of assembly) will be placed
together back-to-back, EXCEPT the add-on tab
is first inserted upward from the underside of
the accent shape, with the extension end being
attached to the underside to fill in the pop-up up
tab's opening.
Position the add-on tab as described, glue
rounded tips together with edges matched,
and glue the add-on extension to the underside
of accent shape.
4. Position and attach the upper and lower
accent shapes to the front panel,
noting that main accents are offset slightly
inside the panel edges.
Also insert and attach the JULY letter
shapes in the cutout openings,
and the stars in their corresponding openings.

5. Prepare the LID boxing strips by bending back
all attachment and rim tabs (long sides of strips)
and bending the cross perforation lines to
match the edge angles of the '4' shape.
One way to do this is to lay out the strips . . .

. . . according to the symbol cutouts on
strip end or close-to-end so that they
are continuous . Shown here are
the LID (left) and the BASE (right)
showing the angle/corner where the strips
join up.

NOTE that the TOP tab includes a tiny 'T' cut
to identify it at the top tab.

of the '4' shape.

7. Bend the next segment of the boxing strip
into position to align the perforation edge at
the edge of the '4' shape, and attach in place.

It may be helpful to invert the assembly onto a flat
surface and apply finger-tip pressure along the tab
and seam to achieve a secure attachment.

8. Bend the final strip segment into position and
attach in place.
9. NOTE the lower strip end that has been
attached includes a tiny triangle symbol cutout.

next strip and its end edge that will be attached
in place.

end tab of strip 1 and attach.

10. Bend the strip to align the first segment with
the corresponding straight edge of the '4' shape,
and attach in place as with previous segments.

the show which strips should be joined
(refer to the illustrations at end of step 5),
then continue to position and attach strip segments
until . . .

. . . the final long segment of final strip is ready
to position. At the same time as strip is positioned
and attached, also position and attach the final end tab,
aligned with the lead strip straight edge.

12. Bend back the rim flanges and glue in place
to the backside/inside of the boxing strips.

13. Repeat the assembly process to position
and attach the BASE boxing strips to the reverse
'4' shape, matching symbols in similar fashion
to the LID.

14. Prepare a small plastic bag filled with
"weighted stuffing material" such as the plastic
pellets used for the model to a size that will fit
into the BASE cavity near the 'leg' bottom as shown,
and insert into position. Secure with glue or tape.

15. Assemble (or close) the '4' box by placing
the LID over the BASE, then invert
and press flat to close.

Secure the LID and BASE box edges together
by easing the LID wall away from the BASE
to apply some quick grab adhesive between.
Then . . .

. . . apply pressure to adjust the number form
to its actual shape, pressing side walls in
until they join appropriately.

16. Measure and cut the desired baker's twine
in a length that will wrap around the cross bar
of the '4' at least twice (three strands shown)
then thread the lead ends through the pop-up
tab. Wrap the twine around . . .

. . . the cross bar, then knot the grouped ends
and tie a bow. Trim ends.

Here is the completed July 4 box.


