
Celebrate
the postman’s “special deliveries” with
this round card that has layered
under-lid panel
that bends to prop up the attached postman’s cap.

Inside, attach the double layer sentiment
panel with
“Special Delivery” and envelope to provide the “stop”
for the easel
mechanism.

Decorate hat with included hat band, bill tip,
crown top ring and
and winged heart crest,
then add accent such as purchased leaves &
berries.
Create an extra special card
gift suitable for
Valentine’s Day (or New Baby event) and display.
Card measures
approx. 5” x 5” x 1.375” tall when closed.

Companion “Box 3D Envelope OutlineTuck Flap” design provides
a stylish package for presenting this dimensional
card.

ASSEMBLY: 1. Identify and cut the shapes:
A card base (connected circles with 2 perforations)
B & C interior offset accent shapes
D & E whole circles for front/top and back/bottom
F 'stop' mechanism to hold up front (2-3 to layer in a stack)
G 'stop' decorations: envelope & base, mini heart, word cuts
H & I card front decorations offset plain and scallop circles
J crown ring 10-panel strip
K crown top interior shape (with symbol cut out)
L crown top exterior shape)
M crown bottom interior shape with finger hole cutout
N brim shape with bill extension (2-3 to layer for thickness)
O bill accent P crown top offset ring
Q crown center front crest: wings base, wings, heart
R crown lower front accent
S crown sides/back trim strip accent

taking care to align ALL cut edges as precisely as possible . . .

thick book, until glue has completely dried, for
a significant period of time - up to hours.
(Doing this first in assembly will allow it to be drying
while other assembly progresses.)
 3. Layer and attach the 'stop' panels in the same manner,

taking care to align all cut edges precisely, creating
a thickened 'lip' to hold the top card edge in easel format.
 Press under a heavy flat weight until completely dry.
 4. Prepare the card base by bending at center (short)


perforation as forward/mountain fold, and also bending
at top's long perforation line as forward/mountain fold.
These folds will create the easel effect.


5. Position and attach one of the whole circles
(face side outward) onto the bottom of the card base.

6. For the front of card base, position the other whole circle
over the outward half - beyond the fold perforation -
and attach ONLY the bottom halves.

7. Open the card flat, then position the interior accent circles
over the bottom whole panel and the top panel's lower half, and
attach in place (dry adhesive recommended - or press flat til dry).

This is how the easel effect is created.

8. Position and attach the 'stop' mechanism stack
centered at the lower edge of accent circle.
(Apologies - the half circle accent should be in place.)

9. Prepare the 'stop' decoration accents by layering
the mini envelope outline on top of the whole base, then . . .

. . . position and attach the mini heart over flap.
Position the word cutouts in centered, balanced arrangement
(long letter tails reach to panel edge), adjust, then
attach in place - don't forget the 'dot' for the 'i' in 'Special'.

10. Prepare the hat crown strip by bending back on
all perforations for panel segments and tabs.
Attach eyelet accents into the four holes.
NOTE: the eyelet punch openings for the final cut file
were scaled smaller for medium/small eyelet size.

11. Identify the top tab symbol cutout which marks
the center front.

Form the crown strip into a ring to overlap straight edge
across opposite side tab perforation, and glue seam.

12. Identify the two TOP crown shapes.
The interior shape includes the tiny circle cutout.

13. Bend the top perforations into right angle position, then . . .

. . . invert the ring so top is downward, and apply
adhesive to the underside of the top tabs.

Insert the interior crown top shape into ring and press
downward until it rests against top tabs.

Apply fingertip pressure along edges to secure
tabs attachment to top shape all around.

14. Bend crown bottom tabs outward slightly
and apply glue to the underside, then . . .

. . . insert the bottom shape into the opening and
adjust so that the straight edges of 'disc' align
with the panel edges at tab bends . . .

. . . then bend tabs around shape so that 'disc' edges
rest in the tabs' creases. Insert fingertips into opening
and work around to apply pressure to attach in place.

15. Position (centered)and attach the crown top accent ring
onto crown top face side. Then . . .

. . . position and attach outer crown top shape onto
crown assembly, adjusting so straight edges of
'disc' and ring align as precisely as possible.

16. (NOTE: crown top panel should be in place
before this step, but can be attached after as well.
The sample's brim color is somewhat hidden in
the shadow in this image, below)
With crown assembly bottom down, position
the back five edges to align with the back straight
edges of the brim/bill stack from Step 2, and
attach in place. Quick grab glue such as the Fabri-Tack
clear adhesive shown is recommended, for secure hold.

17. Position the crown lower accent strip first end so
that it extends approx. 3/8" beyond the center-side
bend of crown and attach in place. Then . . .

. . . bend the strip around the back half and bend strip
to conform to the crown panel shapes and corners
as it is glued in place, until . . .

. . . it extends around to the opposite position from
the starting position. Trim any excess off approx.
3/8" beyond opposite side angle, and re-attach end.

18. Prepare the front crown accent by bending back
slightly on the four tiny perforation lines.
Position accent so center panels align, wrapping
around the front five panels, and attach . . .

. . . with ends overlapping and concealing the accent strip ends.

19. Position and attach the bill accent crescent,
centered on exposed front of brim with edges matched.

20. Assemble the crown crest by centering and attaching
the wings accent over the offset base, then center and
attach the mini heart.

21. Dry fit the crest at upper front panel of crown,
then bend the sides of wings slightly to match.

Position and attach crest at front panel, above
the arch accent.

22. With card base opened flat as shown,
center the completed hat onto front/top panel
and attach in place with quick-grab adhesive.

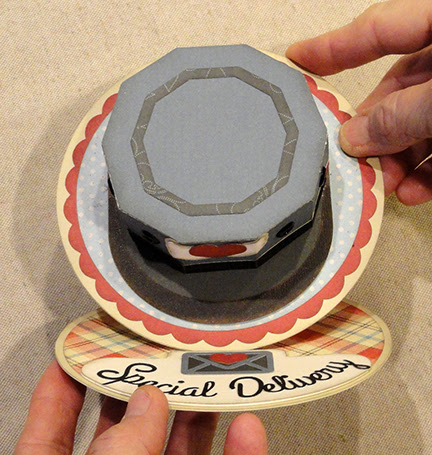
This image shows how the completed card in easel
position will appear, with hat's bill downward.
NOTE: rotating the hat for brim-upward presentation
is also an option to consider.
Add 'purchased' floral leaf sprigs, berries,
blossom, etc., as desired.

Here is the completed card in closed position.

Consider creating the specialty gift box also available
as a separate cut file design, which can hold the hat card
on one side, and loose candy treats on the other . . .

. . . and when box is closed, side panel windows
tease a glimpse of contents to be discovered.


