
Rectangular box has
lid envelope outline decoration
with optional whole base, heart “cancel” stamp
and arch word cut out “Expressly to You”.

Box sides include “gingerbread”
outline decorations,
with side end windows (lined with clear panel)
to allow
viewing of contents inside the main square compartment
and smaller rectangular
compartment.

Box is designed as tray with attached lid
with front flap that tucks
behind front wall,
sized to fit as companion container for
“Postman Cap 3D Easel Card” separate design.
ASSEMBLY: 1. Identify and cut the shapes:
A box base (bottom, sides and front/back)
NOT SHOWN: side flanges left & right to attach
B box top panel (flap)
C interior compartment (final shape is slightly modified)
D outline 'icing' shapes for walls (2 sides, front, back)
E clear acetate or vinyl window panels (2)
F lid accent envelope shape solid base
G envelope accent outline
H doily flap (final shape is slightly modified)
I "Expressly to You" word cut.
J & K heart 'cancelled' stamp with overlay

2. Prepare the main box base shape by bending back on
all panel and tab perforation lines.

onto their corresponding sides, front and back panels.


3. Prepare the add-on side flanges by bending back
on the long perforation lines. Position and attach
the long tab behind the side wall, at top margin above
window openings, and secure in place as firmly as
possible. Strong adhesive such as Fabri-Tack is recommended,
using weights or clamps to hold in place until fully dry.
(Side flanges will be stressed as they are bent inward/outward.)

4. Prepare the clear window panels by affixing
double-sided adhesive such as the 1/8" Kool Tak
tape shown, along edge, then . . .
 . . . position and attach, centered over inside face

of side panels, to cover window area.
(NOTE: attached side flange tabs should already be in place.)
 5. Form the base into a tray by bending walls and

tabs inward to bring straight side edge to overlap
corresponding tab to perforation line, and attaching.

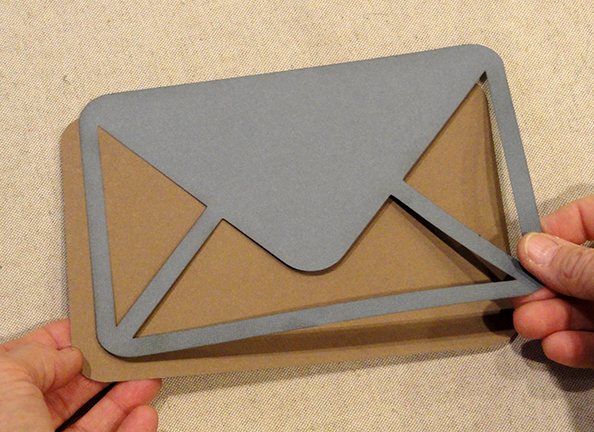
6. Prepare the lid decoration by layering the envelope
outline and base shapes and attaching.
Also layer the separate heart onto the 'cancelled'
stamp base and attach.

Position and attach the doily flap centered along top
edge of envelope assembly, then . . .

. . . arrange the cancel stamp and word arch
as desired, and attach in place.
7. Prepare the LID shape by bending back along
flap tab (front) and back flange.
Position and attach envelope accent assembly,
centered, onto LID panel.
(Recommended to press these shapes under
a heavy flat object such as a thick book until dry,
if using liquid adhesives.)

8. Position and attach the back flange behind
the back wall of the base tray, using strong adhesive
and weighting or clamping to ensure strong bond.

9. Prepare the compartment shape by bending
back on all panel and tab perforation lines.
(NOTE: the final cut shape has been modified.)

10. Bend adjacent sides into position to align
and join the two corner seams.

11. Apply adhesive to the front and back walls, and bottom panel,
then insert and position the compartment into the box base
interior so that right edges abut right box wall, front
and back compartment walls attach to box front and back walls.
Apply pressure to ensure attachment to walls and bottom.

12. To close the box, bend side wall flanges inward
at right angle, and bend lid downward . . .

. . . until front flap flange can tuck inside front wall.

The window clear panel features allow the contents
of the box side and . . .

. . . main compartments to be viewed,
even when the box is closed.

Select and insert desired contents.
This image shows the Postman 3D Easel Card
being placed inside. Conversation hearts (approx. 7 oz.)
fill the compartment.

Here's the side view showing easel card . . .

. . . and candy treats inside.


No comments:
Post a Comment