Showing posts with label gift tag. Show all posts

Saturday, December 4, 2021

Scottish Piper Gift Tag

Representing the Twelfth Day of Christmas, 
this piper in traditional Scottish attire creates a gift tag 
that can be attached to a container for the final gift. 
Tiny details are composed on figure’s silhouette 
(which shows thru as leggings). Then the assembly is attached 
to offset tag base which includes top center punch hole 
for ribbon or twine attachment. 
Tag measures approx. 3.25” wide x 6.75” tall 
when completed. 
Pairs well with separate design 
“Box Thistle Ring 3D Round Divided with Lid”. 

ASSEMBLY: 1. Identify and cut the shapes:
A offset figure tag base (for sturdiness cut extra 1-2 layers)
B figure silhouette (shows through as legs)
C tartan sash
D glengarry cap assembly (streamers base, cap, tassle,
brim trim, medallion circle
E face base with right side/nose overlay
F neck with eye contrast underlay (head)
G jacket sleeves and bodice
H sporran assembly: base contrast, "tassels" overlay, 
cantle medallion
I skirt assembly top, middle and base layers
J boots assembly: boot, cuff contrast, ribbon flashes
K bagpipes assembly: bag base with squeakers & knuckles,
mouthpiece and knuckle
L bag overlay
M hands
2. Prepare and assemble components:
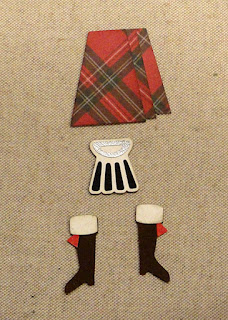
skirt three layers, sporran three layers,
boots three shapes, by gluing together
into their respective assemblies as shown . . .
. . . here.
3. Assemble the bagpipe bag base with squeaker
knuckles attached, mouthpiece with knuckle
attached. NOTE the bag overlay should be
positioned and attached at this stage also.
4. Position the eye contrast partial head shape
behind the main head shape so that upper round
and side edges align, and attach. Next . . .
. . . position and attach the neck shape behind
the main head shape, below the eye contrast shape,
so that straight edges abut, and neck side edges
align with head side edges, etc. Finally . . . 
. . . position and attach head half side over head base
where side curved edges align. Position . . .
. . . and attach the hair shape along top of head assembly.
5. Assemble the glengarry cap by layering and
attaching the cap shape over the cap/flashes base,
then attach rim accent and tassel accent,
and finally place the medallion circle to the flashes
side of middle, overlapping the brim trim very slightly.
(See step 6F for assembled shape.)
6. Assemble the components onto silhouette:
A) boots, skirt and sporran on top of skirt;
NOTE: please pay attention to the description
MORE than the images here - - -
B) position and attach bagpipes base 
(with bag main shape in place -
NOT as shown in this image) but leave
narrow neck end of bag unattached at this point;
C) sleeves shape OVERLAYING the bag of pipes assembly 
(this image wrongly shows jacket sleeve under the bag) . . .
. . . then place the jacket bodice on top of sleeves
shape where it matches the silhouette,
and swing the left sleeve wrist area over
the bodice shape as shown here - attach only sleeves
(figure's) right side and bodice, leaving wrist
area of left sleeve unattached 'til later.
D) place tartan sash across assembly and under
the unattached left sleeve and bag narrow neck 
as shown;
E) position and attach the head/neck assembly
over silhouette where shape edges align;
F) position and attach cap.
G) position mouthpiece on top of assembly,
with top end centered under nose where
implied mouth should be, and angling so that
the knuckle aligns on top of the knob of bag shape,
and glue in place;
H) position hand shapes abutted at ends of
respective sleeve shapes, with finger/knuckle
ends overlapping the mouthpiece pipe
to suggest they are covering wind holes
of instrument.
7. Position and attach the completed
silhouette shape on top of the offset
base shape, with even margin around
the edges of figure - except where
the base shape arches between pipes.
8. Arrange and attach ribbon/twine cockade
decoration at punch hole end as desired.


Tuesday, August 24, 2021

Nordic Star Cross Stitched Tag

Cross stitch embroidery is completed on the doubled 
hole-punched scalloped tag panel, then it is 
sandwiched with optional stitching buffer layer, 
frame accent, frame front and whole back layers in 
a sturdy keepsake gift tag for Christmas or winter giving. 
Add oblong reinforcement ring accents on front and back. 
If desired, hand pen a contrast ink message 
at top of tag, or use the provided plaque shape 
to pen or stamp a name or greeting. 
Measures approx. 2.625” wide x 3.75” assembled. 

ASSEMBLY: 1. Identify and cut the shapes:
A cross stitch hole punch layer (2 for stability)
B buffer back layer for stitching panel
C front "contrast" frame panel
D front accent panel
E solid back accent panel
F slot "ring" reinforcements (2)
G sentiment plaque or print & cut panel
2. Prepare the stitching panels by poking out any
cut waste (chad) shapes that remain following cutting
and removal from cut mat. A useful tool for this is
a standard paper clip that is un-bent.
3. Layer and attach together the two stitching panels,
taking extra care - here and throughout - to align
all cut edges as precisely as possible.
Press the glued-up panel unit under a flat heavy object
such as this thick book, or equivalent - or place
a second heavy object on top of the book - to help
the panel stack dry flat, minimizing warping or
curling caused by liquid adhesive. 
4. Assemble the stitching supplies, including choice
of star color 6 ply floss, tapestry needle size 24/26.
5. Study the chart below to understand how multiple
stitches in rows are stitched efficiently across,
completing right slant stitches of the 'X' stitch first,
then at the end of the row, reversing the process
to complete left slant stitches. This is essential
to create a uniform front appearance, with neat back.
6. Cut a 30-36" length of floss from the skein, then
separate one at a time two plies from the length.
7. Line up all four ends of the two plies, forming looped
length . . . 
. . . then smooth along the length away from ends
to refine the loop end. Thread the loop end through
the eye of the needle. (Ends can likewise be threaded
through eye, but double ply loop is sometimes easier.)
Pull loop through to leave a 5-6" tail at cut ends.
8. Working from a printed copy or referring to the design
chart on screen, locate the lower left star point 'X' stitch
(left-handed stitchers may wish to reverse this). 
 NOTE it is easiest to work the design from bottom to top.)
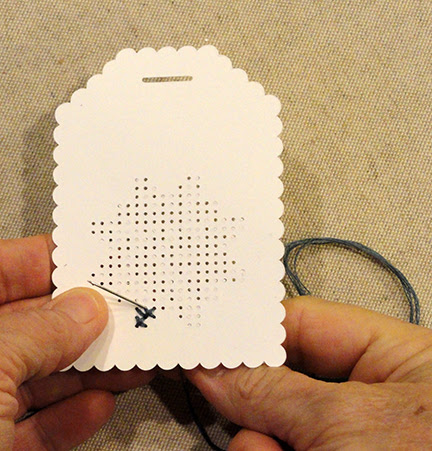
A. Insert the needle from back to front in the top left
position of the 'X' set of four holes . . . 
. . . and pull thread through to front, leaving
a short loop on backside.
B. Insert the needle again into lower right hole
to complete the first right slant . . . 
. . . and pull the thread through within pulling
the loop on backside.
C. Pass needle and thread through the loop . . .
. . . and pull up to tighten loop flat against backside.
(This is the anchor-on process.)
9. If this was a regular row with multiple stitches,
the right slant stitches would be completed across
the row, followed by the left slant stitches returning.
The star point is a single stitch, so the needle is inserted
UP through the hole above the immediately-previous 
down-insertion, and thread pulled through completely.
Complete the left slant stitch by inserting needle tip
into the bottom left hole of the 'X', and pull thread through.
10. Move up to next row, to insert needle through
top left hole of first set of four holes that will hold
the 'X' at beginning. Complete the two right slant
stitches of that row, then . . . 
. . . move back to the left to complete the two
left slant stitches that complete the 'X' stitches.
11. Move up to the next row as for the second row,
and complete the first three right slant stitches,
THEN jump across the space to work the mirror image
"right half" right slant stitches of this third row . . . 
. . . but at the end of row, instead of returning back
with completing left slant stitches, move downward
to complete the second and first rows . . . 
. . . of the bottom right star point, adapting where 
needle is inserted as needed.
After working down, return to left end of
row three to complete the left slant stitches.
12. Move up to complete the fourth rows, adding
the "floating" single stitches as ends . . .
. . . jumping
across (on backside of work) as needed to complete
both halves of stitching according to the chart.
13. As the thread on the needle gets used up,
work the final stitch that is possible while leaving a few
inches to manipulate needle, ending with needle
to the backside.
Slide the needle under several stitch backs . . .
. . . pull needle through fully, then trim the thread
next to the panel surface. Re-thread and continue.
14. Tie on as described earlier, then continue to follow
chart to complete the rows in same manner.
Here is the completed stitching panel.
15. Position and attach the buffer layer onto
backside of stitched panel, aligning outer edges.
NOTE: this layer provides a bit of depth around
the raised stitching.
16. Position and attach the "contrast" (sample has
this panel matched to stitching panel) frame panel
over stitching panel ensemble.
17. Position and attach the contrast front frame
panel with outer edges and slot matched.
18. Position and attach solid back panel
on backside of assembly.
19. Position and attach the reinforcement accents
onto front and back of assembled tag. 
20. Prepare sentiments panel with penned
of stamped words, or follow prescribed procedure
for printing and cutting the "winter wishes" panel.
Position and attach between top of frame and
bottom of reinforcement ring.
21. If desired, decorate with ribbon and tied twine.