
Representing
the Twelfth Day of Christmas,
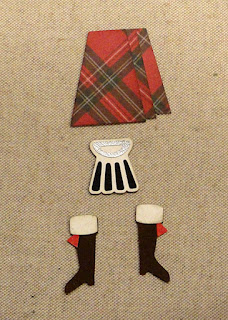
this piper in traditional Scottish attire creates a gift tag
that can
be attached to a container for the final gift.
Tiny details are composed on
figure’s silhouette
(which shows thru as leggings). Then the assembly is
attached
to offset tag base which includes top center punch hole
for ribbon or
twine attachment.
Tag measures approx. 3.25” wide x 6.75” tall
when completed.
Pairs well with separate design
“Box Thistle Ring 3D Round Divided with Lid”.
ASSEMBLY: 1. Identify and cut the shapes:
A offset figure tag base (for sturdiness cut extra 1-2 layers)
B figure silhouette (shows through as legs)
C tartan sash
D glengarry cap assembly (streamers base, cap, tassle,
brim trim, medallion circle
E face base with right side/nose overlay
F neck with eye contrast underlay (head)
G jacket sleeves and bodice
H sporran assembly: base contrast, "tassels" overlay,
cantle medallion
I skirt assembly top, middle and base layers
J boots assembly: boot, cuff contrast, ribbon flashes
K bagpipes assembly: bag base with squeakers & knuckles,
mouthpiece and knuckle
L bag overlay
M hands

skirt three layers, sporran three layers,
boots three shapes, by gluing together
into their respective assemblies as shown . . .
 . . . here.
 3. Assemble the bagpipe bag base with squeaker
knuckles attached, mouthpiece with knuckle
attached. NOTE the bag overlay should be
positioned and attached at this stage also.
 4. Position the eye contrast partial head shape
behind the main head shape so that upper round
and side edges align, and attach. Next . . .
 . . . position and attach the neck shape behind
the main head shape, below the eye contrast shape,
so that straight edges abut, and neck side edges
align with head side edges, etc. Finally . . .
 . . . position and attach head half side over head base
where side curved edges align. Position . . .
 . . . and attach the hair shape along top of head assembly.
 5. Assemble the glengarry cap by layering and
attaching the cap shape over the cap/flashes base,
then attach rim accent and tassel accent,
and finally place the medallion circle to the flashes
side of middle, overlapping the brim trim very slightly.
(See step 6F for assembled shape.)

6. Assemble the components onto silhouette:
A) boots, skirt and sporran on top of skirt;

NOTE: please pay attention to the description
MORE than the images here - - -
B) position and attach bagpipes base
(with bag main shape in place -
NOT as shown in this image) but leave
narrow neck end of bag unattached at this point;
C) sleeves shape OVERLAYING the bag of pipes assembly
(this image wrongly shows jacket sleeve under the bag) . . .

shape where it matches the silhouette,
and swing the left sleeve wrist area over
the bodice shape as shown here - attach only sleeves
(figure's) right side and bodice, leaving wrist
area of left sleeve unattached 'til later.

D) place tartan sash across assembly and under
the unattached left sleeve and bag narrow neck
as shown;

E) position and attach the head/neck assembly
over silhouette where shape edges align;


with top end centered under nose where
implied mouth should be, and angling so that
the knuckle aligns on top of the knob of bag shape,
and glue in place;
 H) position hand shapes abutted at ends of
respective sleeve shapes, with finger/knuckle
ends overlapping the mouthpiece pipe
to suggest they are covering wind holes
of instrument.
 7. Position and attach the completed
silhouette shape on top of the offset
base shape, with even margin around
the edges of figure - except where
the base shape arches between pipes.
 8. Arrange and attach ribbon/twine cockade
decoration at punch hole end as desired.

No comments:
Post a Comment