
(NOTE this cut file requires 12x12 cutting capacity
for largest shapes.)
Decorative ornament to hang from tree branch,
chandelier,
holiday swag or on a display hook stand on shelf or table.
Jolly old
Elf is fashioned as an eight-faceted sphere,
fit together at the middle, with
show-thru eye “dots”,
add-on beard and mustache which fit around 3/8” stem
diameter
painted wooden mushroom plug nose
(a substitute circle nose can
replace the wood plug.)

Traditional cone hat has brim “fur” strip with added
tassel ball
attached at top. (Add fur or batting to outer surface
of brim for
realism.)
A reinforced hexagon tube adds structure and strength
in tandem with
interior dome octagon disc.
Add hanger loop by passing cord or twine on long
doll needle –
attached to a multi-layer “stop” bottom button –
through dome
centers and out through top of hat cone
and tassel ball. Completed ornament
measures
approx. 6.25” (not including top tassel) x 3.875” diameter.
ASSEMBLY: 1. Identify and cut the shapes:
A sphere upper shape with nose and eye cutouts*
B sphere lower shape with nose cutout
C sphere collar reinforcement
E interior support post tube F post strut supports
G hanger loop "stop" button (4 to stack and glue for thickness)
H beard I mustache J eye liner (show-thru) shape
K hat cone L hat rim "fur" strip
Also shown: nose painted mushroom button, hat tassel ball
*NOTE that the cut file contains alternative upper wedge sections
which allow front three wedges to represent face color,
and back/side 5 wedges to represent hair color.

2. Prepare the face area of upper sphere if desired by
inking or rouging cheek areas as shown.

perforations for sections, side tabs or wedge tabs.
 Take particular care at the pointed end of each wedge
segment to "pinch" the fold all the way to the tip.
 Also take care at the wedge side tabs to pinch
the perforation all the way to the tip.
 4. Join the first seam by overlapping the straight lowest
unconnected edge over the adjacent side tab to perf line,
and glue this segment of seam.

perf line and glue, then . . .
 . . . align and glue the final top segment of the first seam.
 5. Repeat step 4 for each of the remaining side seams,
except . . .
 . . . for each of completing the final seams, align
and join the three edges of the end seam first.
 . . . then complete the second-to-final seam and . . .
 . . . the final four-segment seam at practically
the same time. NOTE that it may be easiest to join
the top pointed segment first, then work downward . . .


7. Position the eye "liner" contrast shape behind
the eye cutout circles at the front of the upper dome.
Take care that the nose insertion hole is not covered.
 7. Prepare the sphere reinforcement collar by bending
the edge tabs downward. Also, insert a tool through
the hexagon opening at the center to allow the post
to insert through collar.

8. Prepare the post tube shape by bending back on
all the long perforation lines, as well as end tabs
and hex "covers".

9. Form the post shape into a tube to bring the straight
long edge to overlap the edge flange, to perforation line
and glue in place.

NOTE that the post can be flattened to allow fingertips
to press along the flange seam.

10. Bend the tabs in at first end, then bend the hexagon
end "cover" into position to close the end, while
adjusting the shape of post into its regular hexagon
configuration.

11. Prepare the "strut" interior supports by interlocking
the slot ends, then . . .


the post tube, with the "legs" of the 'X' positioned at
two adjacent wall segment angles
(with one skipped between), as shown. Then . . .

. . . push the strut assembly into tube completely . . .

. . . so that the end tabs can be bent down into
perpendicular position, and end "cover" hex glued
on top to close the post tube.

13. Insert one post end into the center hex opening
and push approx. halfway through.

14. Next, position the collar/post assembly at the upper
dome opening, with nose cutout tab aligned with
the front of dome (and nose circle cutout) . . .

. . . and ease the collar into the opening so that
the tab bends align at . . .

. . . the first perforation line. Glue in place.

15. Place the two spheres together, with front "faces"
together, then ease the bottom sphere into the top sphere.

The two sphere halves should be pushes together so that
the upper "face" bottom edge will align at first perf ilne.
Before pushing fully into position, apply glue next to
perf line, then push into final position.

If the spheres lose shape, or additional pressure needs
to be applied from inside, consider inserting a rod-like
tool such as this thin dowel through nose hole and
push where needed.

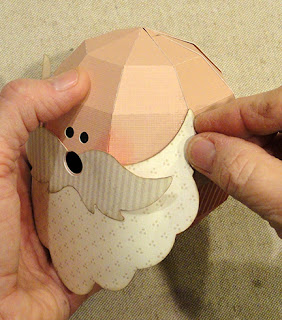
16. Add back curl to the beard from center outward
on both halves. Then . . .

. . . do the same thing to the mustache shape.

17. Apply glue to the front of sphere (upper) on each
side of the nose circle opening, then . . .

. . . center beard with nose opening cut edges aligned,
and glue in place to front sphere facet only.
18. Repeat to glue the front portion of mustache
to beard.

19. Bend the side tip edges of beard back slightly,
then position tip at top of next-to-face facet back
perforation line as shown, with beard tip swung
upward so that tip is at or near top of facet, as shown,
and glue in place. Repeat for the opposite side.
20. Add "spiral" back curl to the cone shape,
which means run press the card stock shape
between rod tool and thumb in usual manner,
except pivot the tool from narrow end of cone shape
so that more distance is traveled along the wider
curved edge - more shaping along bottom edge
than is added near top.
DO NOT bend at the side perforation line -
this is a GUIDELINE for gluing the seam,
not a bend.

Also, "pinch" at each of the short dash lines along
wider edge, so that the cone will correspond more
closely with the octagonal edges of the sphere.

21. Form the shape into a cone to overlap straight side
edge along the perforation guide line, and
glue the seam.

NOTE that it may be helpful to insert a press-against
tool inside and behind the seam (either from the top
opening or inside the cone as desired) in order to
get the seam secured.

22. Prepare the brim "fur" strip by bending back on
all perforations for segments, top flanges and bottom
tabs as shown.

23. Glue each of the top edge flanges back into
position behind the strip. Allow to dry thoroughly.

24. Form the band into a ring to overlap and join
the side seam.

25. Slide the fur ring over the top of the cone and
slide down into position . . .

. . . at the bottom edge of the cone.
Bend the tabs to the inside of the cone, apply
adhesive to the underside of each tab, then bend
in and attach to the backside of the cone.

26. Prepare the "stop" button by layering and attaching
each of the button cut shapes into a stack, taking care
that thread holes and outer edges align as
precisely as possible. Press flat and allow to dry.

27. Prepare to finish the Santa sphere by cutting
a 30-36" length of soft twine (sample uses no. 5 perle cotton)
or gold ornament string,
and threading ends through the button holes, then
sliding the button to the center to line up ends as shown.
28. Thread the twine ends through the large eye of
a 5-6" long doll needle.
NEEDLE THREADING TIP:
A. Cut a 6-7" length of heavy thread such as
button hole twist.
B. Fold in half to form a loop.
C. Thread the loop through the doll needle
to create a "needle threader" loop.

D. Insert twine ends through loop approx. 1/2"-1".

E. Gently but firmly pull the thread loop back through
the needle eye which will also pull the twine through.

29. Insert the doll needle through the bottom gap
where wedges points may not fully come together.
Direct the needle up through the center of the post
inside the sphere (near center of interlocked strut
supports), and out through the top wedges gap.
NOTE this is a bit tricky and may require some fishing
about and patient time.

30. Insert the needle through the cone hat from
bottom up and out the top as shown.

31. Finally, pierce the needle through the center
of the pompom ball and draw needle and twine
through completely. (The following images show
the remaining manipulations of hanging twine with
needle removed; however, there remains one final step
(no. 36) where needle can help "bury" the thread ends,
so leave it on if possible, or re-thread later.)

32. Slide the hat and pompom down so that hat
sits onto head properly with cone seam toward back,
and pompom is snug against cone open top.
Release tension . . .

. . . just enough to allow quick-grab glue to be applied
along/under hat brim edge without showing . . .

. . . then press the hat into position and hold firmly
until securely in place.
NOTE that the brim rim should be approx.
a scant 1/8" above the second octagon wedge bend.

33. Move the pompom slightly out of the way to
apply glue to cone top rim, then reposition
and hold in place until secured.

34. Apply glue neatly to the stem sides of painted
mushroom nose button, then position and insert
stem end into cut out hole, and secure in place.

35. Cut/tear a strip of "faux fur" slightly wider than
card stock fur strip face, with slightly long length
for overlap, then center top-to-bottom and
position in place (with seam position at back),
and glue in place.
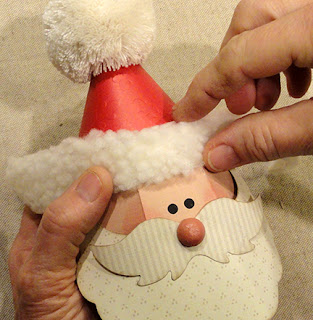
If necessary, tuck any excess width at top down to wrap
behind the fur strip upper rim and glue on place.

36. As desired, either create a hanging loop with
excess twine at top above pompom. Or
use twine to attach a decorative hanging hook
as with the sample project. Once twine is
tied to hook, re-insert needle point back down
and through pompom and draw twine fully through.
Clip off excess twine - thus, "burying the ends".

Here is the completed ornament showing
hook attached at top.

No comments:
Post a Comment