
Seasonal paper prints and color scheme of sample
show a giant bow for Christmas decorating or
as a gift package embellishment.
Change colors and prints for varied needs.
High-impact dimensional bow decoration features two loop sizes
at sides top and bottom, with smaller four-point loops
with
optional “stripes” overlays, and center “knot” loop.
Double-point streamer ends
complete the design at bottom.
Offset overlays for large loops and streamers
provide
extra scope for coloration choice.
Bow measures approx. 11.4” wide x
14.25” tall
x 2.25” deep when fully assembled.
ASSEMBLY: 1. Identify and cut the shapes:
A large lower loop left & right strips with overlay accents
B larger (slightly narrower) upper loop left & right strips
with overlay accents
C streamers left and right with overlay accents
D middle small loops
E middle small loop "stripe" accent overlays
F center "knot" loop strip
G middle loops positioning base
H main foundational positioning and attachment
bend-over base

curl to the center portions of the main upper and lower
loops and accent loops.
 2. Identify the lower loops by locating the end "bite" notch.
 Then apply adhesive to the end, no further up strip
that inward edge of positioning punch hole.
 Place the corresponding end of accent strip over main
loop strip . . .
 . . . and align ends of main loop and accent loop,
adjust so that the accent strips are positioned
at center of main strips with offset margin at sides,
and glue together.
(Attach accent to main loop at both ends.)
NOTE: this attachment can only be completed when
loops are in their curved state and positions.
 3. Position each accent streamer shape on top of
corresponding left or right base streamer,
align angled cut top (narrow) ends and bottom
double-point ends as shown, and glue together.
 4. Align top ends as shown and glue together within
approx. .5" to top end cut edge.
 5. Add back curl to each of the center loop strips
and "stripe" accent loop strips.
 6. Bend each component slightly forward along end
perforation lines. Overlay "stripe" shape on whole shape,
align ends and alignment square symbol cutouts
and glue base and overlay ends together -
ONLY at ends.

position one end of loop assembly #1 on top of the base
with square symbol holes aligned, and glue the end in place.
8. Curl end #2 around so that it aligns under the first
and glue end in place.
9. Repeat for the remaining three loops so that ends of
all four loops are attached to "arms" of the base
in an 'X' formation (see step 15 to view completed X unit).

between end tab perf lines.
 11. Begin final assembly by becoming familiar with
the straight edges of the "upper" edge of LOWER loops
indicated here by pointing finger, then position end #1 . . .

. . . over the bend-over base backside so that
punch holes align and so that the straight edge extends
parallel from center slot (bow ends include a slightly offset
edge shape that echoes the slot), and glue in place.
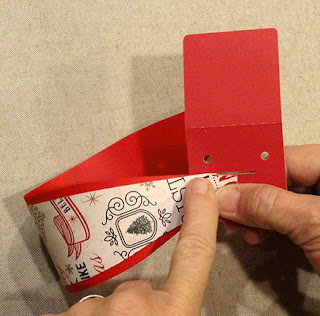
image from end #1, align punch holes, slot offset, etc.,
and glue in place.

 Also, check to make sure that the wrap-over fold
13. Select an UPPER loop assembly, then repeat steps 11 & 12
to position and attach it above the LOWER loop on same side.
NOTE the straight edges that extend parallel to slot
should touch and abut to each other.
of base can fold over properly, and make adjustments
if necessary to allow it to do so.
 14. Repeat the previous few steps to position and
attach the LOWER and UPPER large bow loops
onto the other side of the wrap-over base.
15. Position the 'X' stripe loops unit over the large loops
unit to align slots. Use quick grab "sturdy" glue such as
"Fabri-Tack or hot melt to attach in place.

the center slot through ALL layers, then repeat
to curl the knot strip and insert second end tab
through slot. On the backside . . .
 . . . of assembly, press the tabs outward and glue
in place.
 On front side, add a small amount of quick grab glue
deep under the loop edge near tab perf on both sides
to assist the knot in nestling down fully into position.
 17. Position the streamers joined unit face side down
behind the large LOWER loops assembly (with
wrap-over flap of base in unfolded position extending
away from the bow assembly. Align the straight top
streamers edge under the 'line' between knot tabs,
and glue in place.
 18. Bend the base plain panel into position to cover
the ends of streamers and glue in place.
 Here is the completed bow.

No comments:
Post a Comment