
Tall front wall with snowflake window cut
outs and
back plain wall with handle cut outs have multiple layers
to stack for
thickness, joined with tabs and slots
to thickened square base and low side
walls.

your own stamped or penned
label or sentiment,
or the included “lords leapin’ word cuts to present a gift
for the Tenth Day of The Twelve Days of Christmas
themed giving.

Number 10 tag
is also included to hang
from the tote’s handle cutouts.
Designed to hold a “designer” 12 oz. soda pop bottle
(with approx. 2.5625” diameter).
May easily hold other packaged loose treats.
Tote measures approx. 10.5” tall x
3” wide x 2.75” deep
when completed and closed.
ASSEMBLY 1. Identify and cut the shapes:
A front panel with snowflake cutouts (3 to layer for thickness)
B front panel inner layer with bottom connection panels
C front panel offset accent
D back panel (3 to layer for thickness)
E back panel inner layer with bottom connection panels
F front panel offset accent
G & H side wall panels (6-7 layers to stack for thickness)
I floor panel (6-7 layers to stack for thickness)
J ten number with tag base
K front panel banner with "lords leaping" word cuts
L slot and tab layer quantity test shapes

2. Determine the quantity of side panels and floor panel
so that when layered and glued together the tabs
fit snugly into the slots of front and back panels.
With tabs cut from the exact paper card stock,
stack and fit into the test slot panel as shown.
If 6 layers does not fit, eliminate one interior layer
and re-test. Whichever quantity fits as desired should
be used as the number to cut for A and D shapes in
the above list.

3. NOTE that the sample project uses
a different face paper stock than the interior layers.
Work quickly through the next layering steps.
Layer and glue together the three back (shown here)
or front layers into one slack, taking care that all
cut edges are as precisely aligned as possible,
taking particular care with the multiple slot edges,
here and throughout any other shapes that are
stacked and glued together.

or back panel, aligning BOTTOM notched edges as
accent is centered, with remaining edges retaining
even offset margin at side, top and handle opening edges.


5. On backside of back panel assembly stack, position
the interior panel with corresponding edges aligned
precisely, including slots, but with bottom and side bottom
connector panels kept free.
Place the stack on a flat work surface, then press flat
under an adequately-sized heavy flat object, such as
this wood plank, several thick book volumes, or
other equivalent object, and leave in place until
the liquid glue is completely dry. This may require
several hours or overnight. Pressing flat will assist
to minimize or avoid warping or curling of glued-up stacks.

 7. Layer and assemble the two side wall stacks . . .
6. As mentioned previously, repeat the process of
layering front cutout panels, front interior panel with
connector bottom panels, and offset accent shape
and glue together. Press under flat weight until dry.

. . . as well as the floor panel stack using
the determined quantity of shapes to fit
through the test slot.


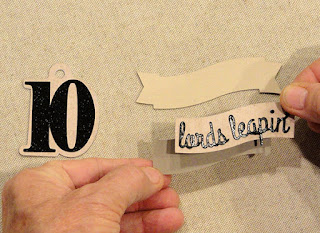
8. Position and attach the number 10 welded numeral cut
onto the tag base. Press until dry
9. Position and attach the optional "lords leapin'" phrase words
(or pen stitch a recipient name, use other word cut outs, or
design stamp, etc.) onto the top banner layer.
Layer the top, middle and bottom banner layers
into a unit, aligning corresponding layers,
and glue together. Press until dry.
the corresponding area at the middle of the snowflake
cutout design, center, and attach in place.


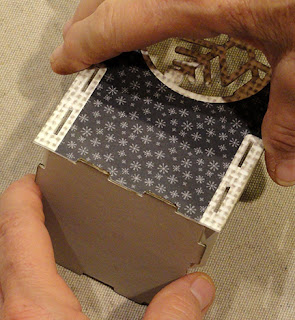 12. Retain the wall in upright position, then apply glue under
11. Apply glue to the floor panel stack thick edges
between tabs plus the side wall edges of tabs,
and also corresponding edges of tabs and thick
edge of front panel, then . . .
. . . position the bottom "floor" panel stack under
the front panel . . .
. . . with notched edges fitted together to interlock
and snack into position. Hold in place (or prop
in upright position) until glue attaches edges.
Allow to dry.
the bottom connector panel then reposition
and attach to upper surface and attach in place.

and tab edges, position and snap together
(NOTE that in the pic below, the connector panel
is folded back out of the way), then position
the back wall panel into perpendicular position
while positioning connector bottom panel onto
floor panel, and hold in place until secure,
propping if necessary.


14. Apply glue to the thick sides and bottom edges
of first wall unit, then . . .
. . . position in place at side of attached front and back
panel assembly, and . . .

into front or back panel slots.
Then finish the side wall assembly . . .
 . . . by flexing the remaining front or back panels
to allow final side wall tabs to snap into slots.
Apply pressure to ensure that all tabs are seated
firmly and completely into slots, then hold or prop
into perpendicular position until glue is secure.
 15. On the inside of side wall, bend the short side
connector flange out of the way to apply glue
behind that flange, then reposition and apply
fingertip pressure to attach flange in place to backside
of side wall.
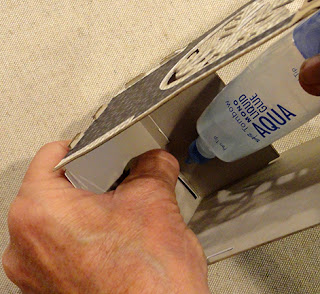 16. Prepare to repeat the attachment of remaining
side wall unit by bending the side wall flange segments
up into perpendicular position and applying glue
to the backsides of each.
 Repeat step 14 to position and attach the final
wall unit to the other assembly, including pressing
the side connector flange segments to backside
of final wall unit.
 17. Prepare the tote for gifting by placing the designer
pop bottom beverage into the interior, then . . .
 . . . tie a decorative ribbon to hold handles together.
Also add twine hanger to number and attach
to ribbon or handle, if desired.
 Here is the completed tote gift.


