
Cut five layers of component shapes,
glue into stacks to replicate the thickness of tag board.
Fit legs and antlers onto body, glue together if preferred.
Or disassemble and store flat for keeping between holidays.
Add tiny bell tied around neck or
other embellishment.
Prepare name tent using “Print and Cut” software
(or print names with enough space to trace
the included tent
tracing template and hand cut).
Reindeer measures approx. 4.25” long x 5.9”
tall x
2.5” wide (antlers) when assembled.
ASSEMBLY: 1. Identify and cut the shapes:
(NOTE: the exact number of shapes that you will
want to cut will depend on the layering test that you
will perform in Step 2; those listed are intended to be
a guide quantity, as was used for the model project
with textured card stock paper)
A main reindeer center body shape (1)
(NOTE the sample project uses the optional
bodies with the raised back)
B right body shape with eye (2)
C left body shape with eye (2)
D nose shapes (2)
E & F leg assembles for front and back (5 each)
G antler shapes (5) H test slot square with strips

 Insert the simulated stack into the slot to see if it
fits in and fills the slot snugly. If not, add a layer
and re-test. Or remove a layer and check that.
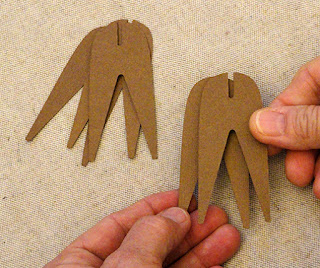
Once the target quantity is determined,
modify the number of shapes of body (add 1 middle
layer, for instance), legs, antler.

 . . . then repeat for the two opposite side bodies.
 If using liquid glue (recommended), use a flat
weighted object such as this fabric covered,
re-purposed weight machine bar to flatten
the glued-up shapes for a few hours until
completely dried and not cool to the touch.



 10. Prepare the name card tent using the "Print & Cut"
method described by Silhouette America in
a tutorial such as THIS ONE.
(An optional tracing method is offered in Step 12)
As an overview, the steps involve:
a) opening the "Registration Marks Window" and
selecting the letter size paper that can be printed
on your household printer, and selecting the system you use.
b) bringing the tent shape to be printed onto
the cut-able area defined.
NOTE: the steps shown here position only ONE
name; you can fill the page between the registration
marks and crossed-out margin in shapes;
just don't overlap any.
c) using the Text tool to type the name of the guest
onto the end (or rotate text copy and position
on both ends) using the desired text style.
d) use the Fill tool to color the words as preferred
(my preference is NOT to use any line outline)


 Also mark the position of the top bends/folds.


(NOTE: the exact number of shapes that you will
want to cut will depend on the layering test that you
will perform in Step 2; those listed are intended to be
a guide quantity, as was used for the model project
with textured card stock paper)
A main reindeer center body shape (1)
(NOTE the sample project uses the optional
bodies with the raised back)
B right body shape with eye (2)
C left body shape with eye (2)
D nose shapes (2)
E & F leg assembles for front and back (5 each)
G antler shapes (5) H test slot square with strips

2. Use the test slot shape to determine the "built up"
quantity of layers needed to have thickened components
that will slot together and remain assembled,
then slide apart for storage and use later.
Begin by layering and holding together five layers
of the intended card stock strips into a simulated stack.
(Can be glued together, but if so, begin with
four layers of strips then add the fifth if needed
for the snug fit that is aimed at.)

fits in and fills the slot snugly. If not, add a layer
and re-test. Or remove a layer and check that.
Once the target quantity is determined,
modify the number of shapes of body (add 1 middle
layer, for instance), legs, antler.

3. Begin layering the body by positioning and
attaching one side body over the middle (non-eye)
body shape, taking care to align ALL cut edges as
precisely as possible. Add the second matching side. . .


weighted object such as this fabric covered,
re-purposed weight machine bar to flatten
the glued-up shapes for a few hours until
completely dried and not cool to the touch.

4. Position and attach the two leg stacks in
a similar manner to the body. Press the stack
with a weight until completely dry.

5. Position and attach the antler shapes in
the same manner. Press the stack
with a weight until completely dry.

6. Position and attach a contrast nose on each
side of the body, corresponding to the silhouette
edges for the nose. The sample project uses red
for the traditional Rudolph look.

7. Also position and attach the contrast eye punch dot
into the eye recess, if desired. Or, use a fine tip felt
marker or similar inking tool to fill in the eye socket.

8. Fit the reindeer components together by
slotting together as shown at perpendicular angle
until the slot depths are fully pushed in.
NOTE this should be a snug fit and no glue
is needed, but can be glued if desired and stored
in its assembled form between seasons.

9. Position and fit the antler shape on
in the same manner.

method described by Silhouette America in
a tutorial such as THIS ONE.
(An optional tracing method is offered in Step 12)
As an overview, the steps involve:
a) opening the "Registration Marks Window" and
selecting the letter size paper that can be printed
on your household printer, and selecting the system you use.
b) bringing the tent shape to be printed onto
the cut-able area defined.
NOTE: the steps shown here position only ONE
name; you can fill the page between the registration
marks and crossed-out margin in shapes;
just don't overlap any.
c) using the Text tool to type the name of the guest
onto the end (or rotate text copy and position
on both ends) using the desired text style.
d) use the Fill tool to color the words as preferred
(my preference is NOT to use any line outline)

e) send the page to the printer, which will print
the names, but not the tent shape, and also include
the registration marks that will tell the Cameo optical
eye where to cut around the printed name.

f) position and smooth the printed sheet onto
the cutting mat as was pictured in the first image
of this step, to prepare to cut it out.

g) adjust the cutting settings for the paper selected,
then load the cutting sheet into the machine
and send to be cut.

h) the Cameo will see the registration marks
as it first begins, and complete its "reading/seeing"
protocol before the blades engage, so don't be
startled if you are not familiar with the routine.
i) once the shape(s) are cut, remove the cutting sheet
from the cutter, remove the tents from sheet,
11. Bend/fold the tent in half along the two perforation
guide lines (score with tool and straight edge lined up
with these cuts if stock is thick).

12. An alternative to the "Print & Cut" option is
to cut the tracing template with its window.
Prepare a regular printed page job using usual
text/type program such as Word to print the names
needed for guests, taking care to leave enough space
between/around the printed names.
(This may take some trial, error and adjusting.)
Center the name is desired in the window
and trace the outer edge as hand-cutting line.


This image shows the tracing completed.
13. Cut out using hand scissors or straight edge
and rotary or straight knife.
Position a straight edge connecting the marked
lines on each side at center then score to assist
folding, crease along lines.

14. Add bell or other embellishments as desired.
Position the tent over the back of reindeer
and it's ready to adorn a festive holiday table.
Or print buffet dish identification and use
the reindeer to help diners know what they are eating.


