Showing posts with label star ornament. Show all posts

Sunday, November 26, 2023

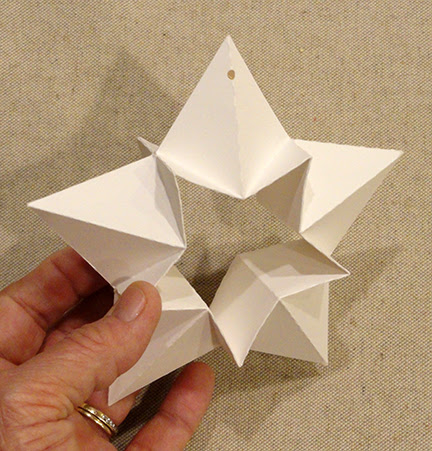
Folded Star Ornament with Five Points

In the German folded paper tradition, 
an inverted hollow five point star is surrounded by 
dimensional, facetted points. 
Punch hole at top point can be threaded with twine 
or soft, narrow ribbon. Hang on wreath or tree, 
nestle in greenery centerpiece, 
or use as package embellishment. 
Recommend cutting from 65 lb. card stock. 
Dimensional star measures 4.75” wide x 4.375” tall 
x 1.25” deep when fully assembled. 

ASSEMBLY: 1. Identify and cut the single shape:
2. Complete first set of folds working across the center,
folding the first perforation - opposite the tabs end -
as "mountain" fold, then alternate "valley" and
"mountain" folds across.
Take care to press the creases all the way to ends.
Also, bend the three-part end edge tab as "valley" fold
in the regular alternating sequence.
3. Invert the shape to be face down on work surface,
then fold top portion (top includes point tabs) down . . .
. . . and bottom portion up. 
4. Working from the front of shape along the top points, 
fold each of the tabs back all across.
5. Working with first point, fold at center, then work
to bend at the diagonal folds as "valley" folds,
by pushing inward slightly while assisting . . .
. . . the perforation to its appropriate angle . . .
. . . then crease each side. 
It will be helpful to fold the point with its connected creases
and press as shown. Repeat for all top and bottom points.
6. Open the shape to compare that ALL of 
the creases match this completely folded sample.
7. Working with face side down on work surface,
bend the points together as shown. Then . . .
. . . bend on the two-layer perforation line as shown
to create a "mountain" fold between each point.
Pinch along the perf fold to ends through ALL layers.
8. Make sure that all point tabs are bend to 
the inside, then use quick-grab glue (if possible)
such as this Fabri-Tac adhesive applied to face side
of first point's pair of tabs. Immediately . . .
. . . bring the point crease edges and plain edges
(bottom point) together, adjust for perfect alignment,
then hold in place until adhesive holds.
Take care that the point seam is completed
all along, all the way to bottom seam ends.
9. Repeat for each of 4 remaining points.

10. At the tab end of assembly, carefully lift
the short tabs and apply a dab of glue, then . . .
. . . apply pressure to attach top split tabs to
bottom long tab, and hold until secure.
11. To join the "ring" of points end to end,
first apply a little adhesive to both the front and
back surfaces of the tab end, then . . .
. . . bring the tab end around to slide between
the opposite end layers. Push in fully, as indicated
by the arrow. 
Apply pressure to secure this seam.
Here is the completed assembly, following slight
adjustment of the "ring" of points so that
star is symmetrical.
12. To finish the ornament, prepare a 12" length
of "silk" style narrow, soft ribbon, and 
use a large-eye needle (darning) to pass the ribbon
hanger through the top punch holes on front and back.
Thread both ends through needle, then pass through
a small bead (check that hole will allow needle
and ribbon through). Push bead fully down, even far
enough to have point rest inside bead hole.
Adjust length, tie knot, trim ends, etc.
Here is the completed ornament with hanger.

Tuesday, August 15, 2023

Six Point Star Slide Together Box

For use as treat of gift box, this six-point star shaped box 
is composed of lower star “casing” 
(front is a complete star with decorative overlay) 
and inner star “compartment” with partial back face wall. 
Fill with contents as desired, slide compartment into casing, 
tighten hanging loop (with optional bead cincher) 
that threads through both structures, 
and the star appears as “solid” form. 
Star box measures approx. 4.4” wide x 5” tall x 
1.21” deep when closed. 
(Requires 12x12 cutting capacity and 
stock for longest boxing strip.)

ASSEMBLY: 1. Identify and cut the shapes:
A case front panel    B front accent overlay
C case back panel
D case boxing strip (for side & lower points)
E insert front panel
F insert back panel
G insert upper points boxing strip
H insert lower boxing strip
2. Position and attach accent overlay to
case front panel; press flat until dry.
(If using dry adhesive which does not require
pressing until cured to prevent warping and
curling, the overlay can be attached after
the case assembly is complete if desired.)
3. Identify the center of the case boxing strip which
is where the bottom hang holes are punched.
This perforation will align at bottom center point.
Prepare the strip by bending the cross perforations,
with center bottom point as mountain fold, then
alternate valley and mountain folds for remaining
perforation lines working outward toward ends.
Also, bend back on all side edge tabs.
4. Begin at center bottom to position and attach
the boxing flange tab along each star edge facet,
taking care to overlap panel straight edge across
tab to perforation line, adjusting for point to point
alignment, then gluing seam.
As work progresses, it will be helpful once the tab
is secured to invert the assembly onto a flat surface
and apply fingertip pressure along each tab seam.
5. Continue in the same manner to bend boxing
into position to attach the panel edge until first
panel side is complete. Then return to center bottom
to complete the remaining edges of opposite half.
6. Repeat the process of attaching panel to boxing
tabs for the case front panel, beginning at
center bottom.
7. Prepare the boxing strips for the insert by bending
boxing strips in similar manner to case strips.
NOTE it may be helpful to position the strips around
the "whole" panel shape to help visualize where
they will attach, correcting or re-bending any cross
perforation lines as needed.
NOTE that the connector end tabs of the bottom strip
bend forward as valley folds, eventually to hook behind
the ends of upper boxing strip.
8. Position and attach lower center long flange tab
behind the whole panel bottom edge in same manner
as for case assembly. Then . . .
. . . bend side segments into position and attach each.
9. Position and attach one end of upper boxing strip
to lower boxing strip end tab, then . . .
. . . continue to position and attach boxing in place.
As the final segment is positioned for attachment,
also attach the final boxing strip end and tab.
10. Prepare to attach the partial back insert panel
by first bending edge flanges of lower boxing strip
to inside and gluing in place to strip backside.
(NOTE this can be completed after step 11 also.)
11. Position the back partial star panel over the assembly
to align points with boxing bends, then position each
flange tab and attach to backside of panel.
12. To close the box (eventually), the insert tucks
inside the case as shown.
13. Cut a length of selected twine of narrow ribbon
at 20-24" (excess will be trimmed later). 
Use a doll needle or long small gauge darning needle
with eye large enough to accept ribbon or twine
to thread ribbon through, working on one side first.
Thread through insert top side, through insert and
out same side bottom hole, then . . .
. . . through inside of case and out the same side
hole. Pull length halfway through, then . . .
. . . repeat the process in reverse to pass needle
back through other side of case and insert until
needle exits insert top hole.
14. Adjust and center ribbon length, determine how
long the ends will need to be to open the box
as fully as desired, then trim ends. Dab with clear
nail polish to keep from raveling. If desired,
thread small stop bead onto ends, then tie knot.
Slip bead down to touch top point to help keep closed.
NOTE that front top point may need a little temp
adhesive (tape or dot) to keep it "closed" and snug
to the insert wall.