
In
the German folded paper tradition,
an inverted hollow five point star is
surrounded by
dimensional, facetted points.

Punch hole at top point can be
threaded with twine
or soft, narrow ribbon. Hang on wreath or tree,
nestle in
greenery centerpiece,
or use as package embellishment.
Recommend cutting from
65 lb. card stock.
Dimensional star measures 4.75” wide x 4.375” tall
x 1.25”
deep when fully assembled.
ASSEMBLY: 1. Identify and cut the single shape:

folding the first perforation - opposite the tabs end -
as "mountain" fold, then alternate "valley" and
"mountain" folds across.
 Take care to press the creases all the way to ends.
 Also, bend the three-part end edge tab as "valley" fold


in the regular alternating sequence.
 3. Invert the shape to be face down on work surface,

then fold top portion (top includes point tabs) down . . .


fold each of the tabs back all across.
 5. Working with first point, fold at center, then work

to bend at the diagonal folds as "valley" folds,
by pushing inward slightly while assisting . . .


. . . then crease each side.

It will be helpful to fold the point with its connected creases
and press as shown. Repeat for all top and bottom points.

6. Open the shape to compare that ALL of
the creases match this completely folded sample.

bend the points together as shown. Then . . .
 . . . bend on the two-layer perforation line as shown

to create a "mountain" fold between each point.
 Pinch along the perf fold to ends through ALL layers.
 8. Make sure that all point tabs are bend to


the inside, then use quick-grab glue (if possible)
such as this Fabri-Tac adhesive applied to face side
of first point's pair of tabs. Immediately . . .
 . . . bring the point crease edges and plain edges

(bottom point) together, adjust for perfect alignment,
then hold in place until adhesive holds.

Take care that the point seam is completed
all along, all the way to bottom seam ends.
9. Repeat for each of 4 remaining points.
the short tabs and apply a dab of glue, then . . .
 . . . apply pressure to attach top split tabs to

bottom long tab, and hold until secure.
 11. To join the "ring" of points end to end,

first apply a little adhesive to both the front and
back surfaces of the tab end, then . . .
 . . . bring the tab end around to slide between

the opposite end layers. Push in fully, as indicated
by the arrow.

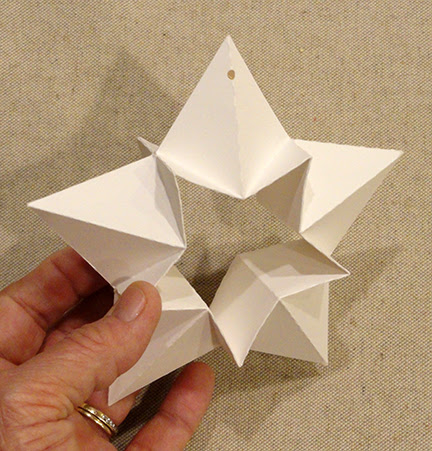
 Here is the completed assembly, following slight

Apply pressure to secure this seam.

adjustment of the "ring" of points so that
star is symmetrical.
 12. To finish the ornament, prepare a 12" length
of "silk" style narrow, soft ribbon, and
use a large-eye needle (darning) to pass the ribbon
hanger through the top punch holes on front and back.

a small bead (check that hole will allow needle
and ribbon through). Push bead fully down, even far
enough to have point rest inside bead hole.
Adjust length, tie knot, trim ends, etc.
 Here is the completed ornament with hanger.


No comments:
Post a Comment