
Slot together, minimalist
with layered-for-thickness shapes
compose jolly elf table decorations to stand
at top of
each table setting.
Multi-purpose design can embellish a package,
identify buffet selections, stand in multiples along
a mantle, and more.

Two
versions included; one with name strip
to hand write or “print & cut” name
then
curve around lower front;

second with hollow “tummy” cut out that can arch
around a Lindt Lindor chocolate ball.
Santa measures approx. 4.2” tall x 2.4” wide
x 1.7” deep when
assembled.
ASSEMBLY: 1. Cut the strips and slot shapes from
the planned card stocks to determine the layering
quantities for the two main body shapes.
NOTE: the body layers that were guessed-at for
the sample project included front & back RED layers,
FLESHTONE layer #2, and 5-6 KRAFT brown
interior shapes. This eventually was determined to be
6 kraft brown, for a total of 9 layers.
Stack the strips then . . .

subtract interior multiples as needed until
the desired tight-fit is achieved. TIP: the tight
fit is required to help cross slices to stay together
without gluing, to allow Santa to be de-constructed
for storage and re-use again next year.


 4. Prepare the body and cross body slice stacks
 Immediately press the glued-up stack under

2. Identify and cut the shapes for
the "whole" body Santa:
A-D Santa body shapes in quantity as determined
in Step 1
E beard overlay
F hat overlay
G mustache and cheek pair overlays
H slot and strips test used in Step 1
I-K layers for cross-slice stand assembly
quantities as determined in Step 1
(for sample: front, 7 interior, back)
not labeled: guest name strip for place card;
not shown: hat tassel (2)

3. Identify and cut the shapes for
the "hollow" body Santa:
L hollow body layers in quantity determined
in Step 1
M hollow cross body slice in quantity
determined in Step 1
N hat, beard, mustache & cheek overlays
(not shown: hat tassel circles)

by layering and gluing the stack layers in order,
taking care to align all cut edges as precisely
as possible.
NOTE: if preferred, the FLESHTONE layer that
"shows-thru" the body front face cut out can be
cut as an interior-colored layer instead, with
the optional FACE shape cut from FLESHTONE,
fit into the opening once the body shapes are
layered and glued together.

a heavy, flat object such as this re-purposed
weight bar that has been covered with muslin.
Leave weight in place for several hours or
overnight. This helps keep the stack glued with flat
while it dries thoroughly, thus minimizing
warping and curling.

for the cross-slice stand shapes. Immediately
press under a heavy flat weight.
 6. Once the stack is pressed and dried,

position the hat overlay and beard overlay
on the front, using cut edges to align appropriately.
 7. Position hat tassel circles on front at top of

stacked body, mustache at center of face
opening, with tiny "mouth" gap left above beard
edge. Position and attach cheek circles,
snugly placed next to mustache and beard edges
within face cut out window.
 Position and attach back tassel as desired.

Press until overlays are dried and flat.
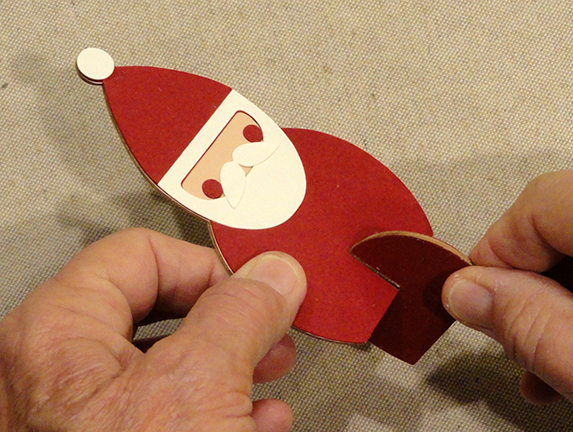
 8. To attach the cross slice shape,

fit the two slots together and push together fully
until bottom straight edges are even.
 Here is the whole Santa completed.
 9. To prepare the guest name or dish I.D.

label trip, print, hand-write, etc., as desired,
then add some back curl all along the strip.


 11. Refer to Steps 1, 3-7 above to prepare

Position and use glue or half of a sticky-dot to
attach center front (to edge of cross slice) and
at sides if needed.

CANDY-HOLDER SANTA
10. Prepare the Lindor ball wrapper by twisting
each end as tightly as possible to help manage
how it will interact with the arch "opening" edges.

the body stack and cross slice components
for the candy ball holder version.
12. To assemble, first slide the ball into
the cross slice "hollow" by inserting it into
the curved space, keeping the "arms" of arch
as "on-plane" as possible.
 13. Next place the ball/slice unit through

Santa tummy "hollow" from back to front . . .
 . . . until the notches align at top of

arch edges, then push notches together
until bottom straight edges align.
 On the backside, to help the ball stay in place,

tuck the wrapper "twist" into the rounded notches
at each side. It may also be helpful to use
a dot of quick-grab glue where the assembly
notches will touch, and a half sticky dot under
the wrapped near side notches to help
the assembly stay united.


Here are the two versions.

No comments:
Post a Comment