
Harvest
season icon presented as a dimensional display,
built in box form (glued
together) with
low-profile contours that “bump” forward for subtle,
minimalist
visual presence.

Stem is a card stock-wrapped 1/2” diam. wooden dowel section
inserted through pumpkin form center to provide
additional structure and
stability.

Tie a raffia, jute or ribbon bow for embellishment.
Pumpkin forms measurements:
large approx. 6.75” wide x 9.875” tall
x 1.25” deep
medium approx. 7” wide x 7.5” tall
x 1.25" deep
(measurements include stem,
exclude the bump outs).
ASSEMBLY: 1. Identify and cut the size:
A lid front assembly panel (with contour cutouts)
B top boxing strip with stem opening
C & D side boxing strips
E bottom boxing strip
F lid front panel overlay (with contour cutouts)
H oval contour front panel with boxing strips
I & J side crescent contour front panels
with boxing strips
K base back assembly panel
L base back overlay panel
M top boxing strip with stem opening
N & O side boxing strips
P bottom boxing strip with stem opening
Q stem collar shapes (5-6 to stack)
R middle support strip
S stem dowel wrap
T contour front panel overlays

divided top and bottom to be taped together, if
required for more effective card stock usage.
 2. Stack and glue together the collar shapes,

taking care to align all cut edges - especially
the hex cutouts - as precisely as possible.
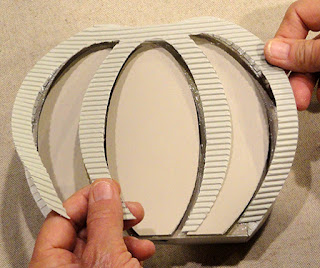
 3. Prepare the BASE bottom boxing strip by bending

the edge tabs/flanges back. Position the collar stack
on the inside surface with hexagon openings matched,
and glue in place. Immediately . . .
 . . . press under a heavy flat weight such as a book
or a fabric covered repurposed bar weight as shown here.
Leave weight in place for several hours or overnight.
 4. Identify the contour assembly shapes which include

tiny symbols near the bottom cut edges, and
the overlay fronts which have NO symbols.
 Also, Identify corresponding symbols in the narrow

boxing contour strips for oval and crescents.
 NOTE that the front assembly panel includes

a half-circle notch on bottom edge as identification.
 5. Prepare the side curved boxing strips by

adding back curl by running the strip across a round
rod tool front top to bottom, taking care not to tear
edge tabs. (Think curling ribbon against straight edge.)
 Near the top end - where the tabs are slightly

narrower - ROLL the first inch or so tightly
around the rod tool for a roll that matches
the hull top shape that lies on each side
of the top strip.
 6. Bend the edge tabs of side strips and top strip

back.
7. Overlap the straight side edge of top strip across
the top end tab of side strip to perforation line.
Adjust top to bottom, and join seam.


to lay over the edge tabs, beginning at top center
strip and edge, then working the strip bend around
the panel edges.
 Make sure to push the strip bend in to closely follow

the panel edges . . .
 . . . paying particular attention to the more tightly

curved portion near the top seams.
 If the paper weight and other factors end up with

the boxing strips a tiny bit longer than the edge,
use scissors to trim the excess away so that
panel bottom edge and strip bottom edge
present a continuous line.
9. Repeat for the second edge and side boxing strip.
 10. Apply adhesive to the face surfaces of bottom strip

end tabs, and to the backside bottom long flange tab,
then insert it into position so that the side tabs slide
under the side boxing strip ends, and over the bottom
panel edge where notch is, adjust and glue in place.
 11. Apply liquid or dry tape adhesive to the backside

of front panel overlay and glue in place.
 BUMP OUT PANELS

12. Identify the oval assembly panel with associated
upper/sides long boxing strip, and shorted bottom/sides
boxing strip. Bend back at the bottom segment
perforation cut lines, but NOT at the side tabs,
which include a GUIDEMARK perf cut, not a bend mark.
 13. Join the upper and lower strips by overlapping

the straight end edge across the tab to guide mark
and gluing.
 Repeat for the second side seam.
 13. Add back curl to the entire ring, except for


the straight short length at bottom of strip ring.
 14. Bend back the upper tabs which can be identified

as opposite the Bottom Cut Away areas shown here.

15. Insert the oval assembly panel within the boxing
strip ring to align the straight bottom edge with
the bottom straight boxing segment, adjust ends
and glue seam.

16. Apply adhesive to the underside of all the ring
tabs, then . . .

so that it confirms to the edges of the oval.
 Press the tab perforations in to closely follow

oval edge, then apply pressure all around. This may
be most easily done by laying the assembly tabs down
on a scrap paper sheet to catch stray glue,
and running fingertips all around the curved seam
until fully attached.
 17. On the bottom edge of boxing, bend the center

bottom tab upward to lie behind the oval . . .
 . . . and the curved edge tabs outward.
 To assist the panel with boxing assembly to be


without warping and to lay flat, place a moderately
heavy object such as a book on top of it for
a period of time until glue sets.

then position it over top of oval seam tabs, adjust
for alignment, then attach fully.
 If the assembly finishes up with slight deviation

of panel and boxing edges, carefully trim away
any excess with scissors.
 19. In similar fashion, prepare to complete

the side crescent assemblies, first identifying
the appropriate inward curve and outward curve
boxing sections, using symbols. Also NOTE that
the bottom straight edge segment is part of
the inward boxing strip, with cut-away indents
along bottom edges on each side of bottom wall.

the straight end edges of outward (outer) boxing
strip over the corresponding end tabs of
inward (inner) boxing strip ends, first one . . .
 . . . then the second, to complete the "ring".


 22. Bend the tab of upper edge (which will attach to


21. Use rod like tool to add curl to the crescent edges,
matching the curl direction to the crescent panel to which
it will be attaching.

NOTE it may help to identify which
boxing edges will attach to the inward/inner curve edge
(straight cut lines which divide tabs side by side) and
outward/outer curve edge which has separate angled
tab edges.

crescent panel) back or inward, then bend the small tabs
inward.

Refer to Steps 15-18 above to position and attach
bottom edge and boxing segment . . .

at top boxing bend, then . . .
 . . . fitting and shaping boxing edge evenly along

curved edge of outer panel and pressing until secure.
 Then fitting the inward curve boxing and panel edges

together in similar fashion.
 Position and attach the face panel over the assembly

and attaching in place. Trim excess if necessary.
 23. Bend the bottom crescent panel tab inward,

then bend bottom tabs outward.


BUMP OUTS ATTACHMENT TO FRONT
24. Beginning with the oval bump out, insert into place
from below back of FRONT assembly, pushing non-tabbed
bottom portion up and over the bottom of cutout until
the straight bottom of bump out aligns with straight bottom
edge of front panel.

Apply glue to the face of the oval's bottom tab, then
reach in from behind to apply fingertip pressure to
secure it in place.

NOTE that it may be helpful to use a spatula tool
blade to reach under to help provide a press-against
surface to complete the seam.

tabs (all around), then push the bump out into
the opening until the cut out edge catches as tab
perf cuts.
 Press the panel edges and tabs together until

seam is complete and secure.

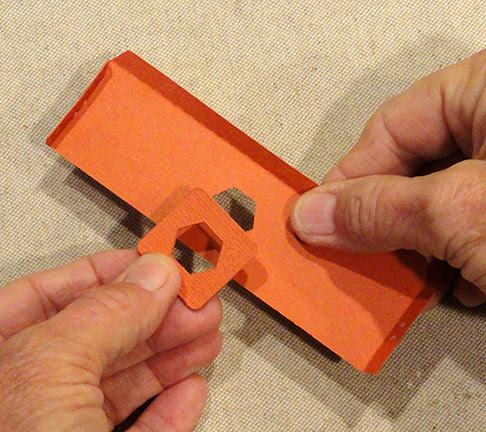
 26. Repeat the process for the crescent pump outs,

NOTE that it may be helpful to used a raised flat
surface such as this wood plank or a book edge
to provide a place to press the bump out edge seams
until they are complete and secure.
(NOTE that this image if from the assembly of
the smaller pumpkin version, and along the crescent
seam edge.)

pushing them from bottom into place so that
bottom portion reaches over panel bottom to
align at straight lower edges.
 BASE ASSEMBLY

27. Follow similar assembly steps to prepare BASE
boxing top and side strips, then insert base assembly
panel into the boxing strips assembly so that tabs
wrap around edges, adjust and glue in place.
 Insert and attach bottom panel.
 28. Prepare the center cross strip by bending back


on side and bottom tabs. Apply adhesive to tabs
outward surfaces, then . . .
 . . . insert into Base assembly at the widest side-to-side

position, attach side tabs to inside of Base walls,
and bottom tabs to back wall.
 POST ASSEMBLY

29. Prepare the wrap by bending back carefully along
the full length of the shape. Also bend the bottom rounded
tabs forward and the top hex cap and tabs back.
 30. Form the wrap into a tube and use the 1/2" dowel

as a shaping tool, wrapping until the straight side
edge overlaps the opposite long flange to perf line.
Work fingertips up and down along the seam until
it is completely and securely joined.
(NOTE that an alternative to this method is to
place the wrap shape on flat surface and bend on
selected long perf lines to bring the seam edges
to overlap, and join the seam. Then "pop" the wrap into
its tube form and insert the dowel.)

it is even with hex and tab perf cuts, then bend
tabs inward, hex cap into position and glue in place.
 32. With dowel in place pushed up to cap end,

bend curved bottom tabs away to mark dowel
for cut length.
 Remove dowel and hand cut the dowel to length.
 33. Reinsert the dowel into tube fully . . .
 . . . until bottom end is even with curved bottom


tabs.


FINISHING
34. From bottom of BASE, insert stem post top throughbottom hole, through cross-strip hole, and up
through top hole, then push into place fully . . .
 . . . and glue bottom tabs to bottom of BASE.
 35. Begin to insert BASE into LID by first inserting


stem post top through LID's top hex opening, then . . .
 . . . slide BASE into position to slip into back of LID.
 36. To help the LID to conform to BASE shape,


use quick grab glue such as Fabri-Tac used here,
apply glue at strategic places between LID and BASE,
including at top straight boxing, along bottom
and sides.
 Here is the completed large pumpkin.

Finish by tying raffia or jute around seam
in a decorative bow with streamers.
 MEDIUM PUMPKIN

35. Assembly for the medium pumpkin is the same
as for the large, with only one notable difference.
If you choose to use a texture front panel overlay,
it is cut (partly by machine, partly by hand most likely)
then adhesive applied, then slipped over the completed
LID with bump outs in place already,
and attached in place.
 Here are the two pumpkin sizes of the ensemble.


No comments:
Post a Comment