
Traditional
Scandinavian treat pocket is woven from
two contrast “halves”, but this version
has
one full length half and two “divided” halves that join
at side bottom seam
for somewhat easier weaving.
Extra overlay shapes can accent or
reinforce
rounded edges and provide punch hole guidance
for ribbon hanger loop, making these "pockets"
a fun "container" for Christmas, Hanukkah and
Valentine's Day gifing or decor.

Alternatively, use the included strip as hanger.
Completed heart measures 5.25”
tall from lobe to tip
x 5.75” across at widest. Use lighter weight (65 lb.)
“card stock” paper for easier weaving.
Variations in the four-design set include:
six-point folk star cut out
checker center "heart",
peppermint add-on, and reindeer head cut out.
NOTE that all four designs have very similar assembly
steps. Folk star version will be detailed first, with
other designs described afterward.
(The reindeer variation is practically identical
in assembly to the folk star pocket.)
FOLK STAR OR HANUKKAH POCKET
ASSEMBLY: 1. Identify and cut the shapes, shown here
as the main hull shape (blue with star cutouts),
contrast color hull in 2 halves, optional handle strip,
opt. rim half circle accent overlays (2 ea. of 2 colors)
opt. punch reinforcements for ribbon handles (2)

2. Identify the notch cutout of the main and secondary
hull shapes which show which edge of the shape must
be oriented toward the top or lobes location of
finished heart. Also carefully fold the main hull shape
with backsides together at the center perforations.

3. Fold back the tabs of the half hull shape, then
begin weaving with that half. At the lower edge,
separate the first strip, then weave it UNDER the
first strip of the main hull shape as shown.
4. Proceed to weave it OVER the second strip, then
UNDER the center strip, next to the center
crease/perforations. Pause after the first 3 strips
to allow easier manipulation of other strips.

5. Repeat weaving for the second strip, going
OVER first strip, UNDER next, etc., pausing after
it is going over the center strip.

6. Repeat the weaving step for the third strip as shown,
noting that this contrast strip . . .

. . . should be woven
UNDER the star cut out.

7. Continue to weave the final two strips in the same
manner. NOTE that as the strips are filled in,
manipulating the strips to be inserted as needed will
become more difficult, and care required to avoid
bending and creasing the strips.
(If preferred, the steps can be "reversed" so that
the first strip at the top of the lobe is inserted first -
woven UNDER the first strip of the main hull near
the rounded lobe end - which may allow easier weaving
toward the crease/perforations end of main hull.)

8. Return to first strip and continue the OVER/UNDER
weaving, carefully working more length of strips
through until the tab perforations reach to the opposite
straight edge of the main hull. This process will require
some patience and careful manipulation . . .

. . . pushing and easing each strip, then its neighbor,
etc., until . . .
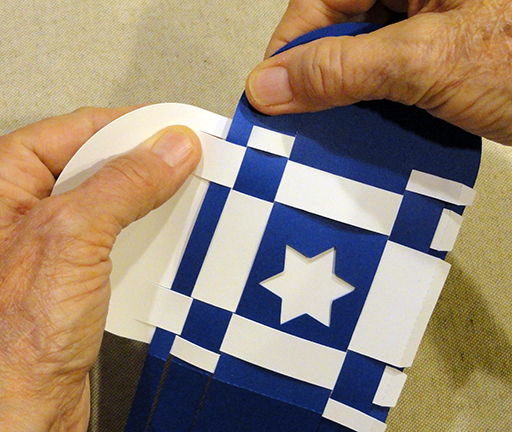
. . . the half heart is fully into position. NOTE that
the lower straight edge of half should align at
the main hull's center crease, so that the fold
can "wrap" over the half heart edge . . .

. . . just as the tabs folds can bend around
the opposite edge of main hull.

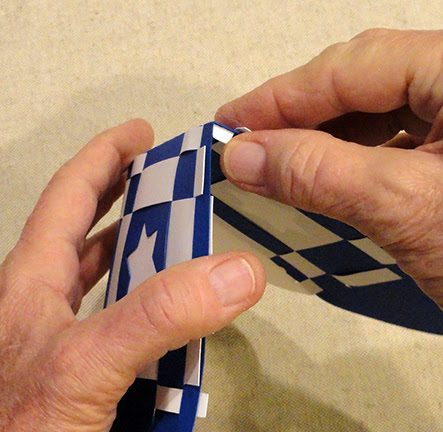
9. With the second (non-tabbed) half contrast heart,
begin the weaving process with the strip positioned
exactly next to the bottom strip of first tabbed half.
NOTE that the bottom 2 strips will pass
UNDER and OVER in matching pattern.
Weave only through 3 strips or so,
weave the next strips in order, then complete
remainder of strip weaving . . .

. . . while working the half shape fully
into position.

The final strip to be woven will be somewhat difficult
to fit into the remaining space. Take care and work
slowly.

Work the "plain" ends of second half heart through
weaving so that ends align at opposite straight
edge of main hull, as indicated.

10. Prepare to join the tabs-to-plain ends seam
of half heart strips by bending at opposite main hull
crease, brining the tab folds to align with
the corresponding plain ends.
NOTE that the tabs should be matched up as
the heart is completely folded, so that the tab
wraps under opposite tab. This will require that
some tabs wrap OVER the main hull strip's edge,
and alternate tabs tuck UNDER, following
the established pattern of the weaving.
Apply glue to the tab face, then . . .

. . .wrap or tuck as indicated, adjust alignment,
apply fingertip pressure to join each seam.

11. If the contrast strip shows along seam edge,
try to adjust and move the strips more fully
into position as you are able.

12. If desired, position and attach the contrast
rim accents, centered, with rim edges aligned
as precisely as possible. NOTE there will be
a small margin beyond rim accent edges
where the main or half hull will remain visible.

If using liquid adhesive, it will be helpful to press
the glued-on accents, using a flat heavy object
such as the fabric-covered recycled weight bar
shown, or a heavy book, etc. Leave weight in place
until glue is thoroughly dried. This may require
a few hours, or over night.

13. If you plan to add a ribbon hanger loop through
punch holes, position the reinforcements on face
(or alternatively on the inside if desired) approx.
a scant 1/4" diagonally below the "valley" between
heart shape lobes. For this design variation,
the on-point square of the weaving is a good location.
(Other designs may differ.)

Use a .2" diam punch (or standard office punch
if the narrower punch is not available) to create
a hole to match that of the reinforcement square.
Repeat for both front and back of pocket.

14. To add the paper strip loop (which may NOT
require the reinforcement or punch), begin by
adding some back curl to the center of the strip
using a rod-like tool such as this narrow dowel.

Apply glue to lower end, tuck strip end behind
the heart wall, center, and apply pressure to
attach in place. Repeat for the second side.
NOTE that you may prefer to position the loop
to allow this joining to be accomplished in a more
flexible, pivoting way by creating a small hole
through pocket wall layers and handle to insert
a regular or small brad fastener instead of gluing.

Here is the FOLK STAR CUTOUT version finished,
ready to be filled for gifting.
For the sample, a coordinated decorating stud
was positioned over the punch hole.

CHECKER HEART CENTER POCKET
15. Identify and orient the main hull and tabbed half
hull sections upper edges, and prepared as
described in Step 2.

Begin the weaving process near the lobe ends,
weaving the contrast half heart top strip UNDER
the corresponding top strip of main hull, and finally
OVER the bottom end strip to complete the first row.

16. Continue weaving by weaving the wide header
portion of the 3 narrow strips of contrast half
OVER the first strip of main hull, but also UNDER
the rounded extension.

17. Continue with only the upper narrow strip
which is woven OVER the corresponding upper
narrow strip of main hull followed by the second strip
which slides UNDER the half circle extension and
OVER the first narrow strip, with the third strip
weaving UNDER both the half circle extension AND
the first narrow strip of main hull, as shown.

18. Complete the weaving of narrow strips
in the regular OVER/UNDER pattern, then . . .

. . . complete the bottom row weaving of wide strip.

19. Repeat the process (in mirror image) to weave
the strips of the second contrast half, beginning
at the upper wide strip, and following the previous
steps to complete weaving. NOTE that as for
the Hanukkah star pocket, the two rows that will
lay side by side at the center next to main hull bend
will have the SAME under and over weave pattern.

20. Refer to Step 10 above to add glue to the tabs
faces, then fold to align, tuck tabs under opposite
plain strip ends, adjust, and join.
Complete the finishing accents and reinforcement
as desired (see steps 13-14).

ATTACHING RIBBON LOOP
21. Cut a 14-15" length of soft ribbon of
.75" - 1" width. Insert from pocket inside through
punch hole to outside front.

Pull ribbon end through to allow enough play
to tie a neat overhand knot, with approx. .75" or
1" tail.

Decoratively trim ends, as desired. If fraying is
a concern, coat cut edge with clear fingernail polish.

Take care and make adjustments to ensure
that the knot will NOT pull through the punch hole.

Repeat the insertion and knotting, etc. for
the second end.

Here is the completed heart checker pocket.

PEPPERMINT POCKET
22. Refer to previous design variation assembly steps
to prepare main hull, then begin weaving near top
as shown, weaving the contrast top strip OVER
the main hull top strip. Continue the pattern sequence
to weave all strips, completely across main hull.

Insert a stylus or equivalent tool to make sure
that the center opening is sufficiently large
for a decorative brad tines.

23. Complete the assembly steps to add decorative
rims, reinforcement for handle, etc. as desired.
Also, layer and attach the peppermint contrast swirl
shape on top of circle disc. Position the peppermint
shapes onto each wall front, insert brad tines through
aligned holes, and bend back on inside to secure.

Add loop from paper strip or ribbon, and finish.

No comments:
Post a Comment