
Dimensional
gift box composed of lid over base
with optional standard plastic gift card
holder
interior cross brace.

Lid is decorated with multiple feathers with 3
overlays,
turkey tipped body, head and neck.
Longest turkey feathers can hold
stitched-in-place
black pop tabs from “zero” soda cans discards.
Full length
lid rim fits down flush over base
to give the appearance of a wood block.

Box
measures approx. 7” wide x 6” tall x .875” deep
when completely assembled and
closed.
ASSEMBLY: 1.Identify and cut the shapes:
A LID assembly front panel (bottom half-circle notch)
B LID boxing strips: upper, sides, bottom multi-notch
C LID front panel overlay (with 'LID' cut in)
D BASE assembly back panel (bottom point notch)
E LID back panel overlay
F BASE boxing strips: upper, sides, bottom multi-notch
G short & long cross brace strips (gift card version shown)
H feathers base shape, I feathers overlay, J short feathers
K body L head, eyes & contrast, beak & contrast, wattle
pop can tabs also shown
not shown: optional stand assist strip (see Step 10)

decorative feathers over the base shape, aligning
the lower straight sides and rounded bottom, as well as . . .
 . . . punched stitching holes in each feather,

then glue together..
Here, an unbent paper clip end is poked through
random holes as needed to ensure alignment.
 3. Position short feathers overlay in same manner

(except there are not stitching holes to align)
with lower portion aligned, and glue together.
 Immediately press flat under a heavy weight such as

this thick book volume, and leave in place for several
hours or over night until glue is completely dried.
This will minimize or prevent warping or curling.
 4. Refer to a similar pop tab project by following

Steps 41-42 at this LINK. NOTE that the only difference
in the stitching occurs between the feathers for
the Turkey Box Pop Can Tabs project, where
stitching thread will need to be carried down to a place
below the cut edges that define the feathers and
discreetly taped in place, before being brought back
up to continue with next pop tab stitching.
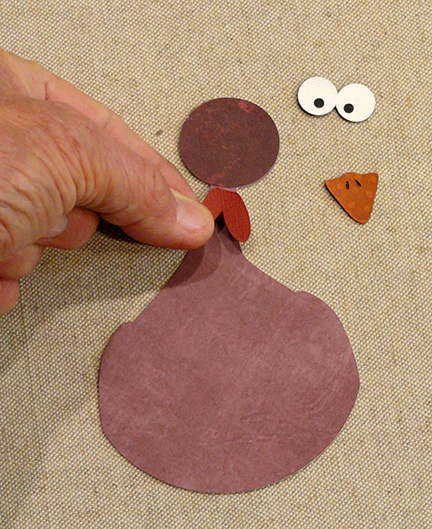
 5. Assembly body and head components and glue together:

A) beak over contrast beak;
B) eyes over eye contrast;
C) head over body/head base;
 D) wattle under head edge.
 6. Finish assembly by placing beak assembly

to overlap and cover wattle-to-head edge
joint, with eyes above at the jaunty angle shown,
gluing all in place.
 7. Position body assembly over front of feathers

assembly, with lower portion edges aligned,
and glue in place with quick grab (thicker) glue.
Press under weight.
 BASE & LID ASSEMBLY

8. Identify the assembly panel and overlays
for BASE. Assembly panel (interior panel) has
pointed notch at center bottom. Overlay has none.
 Identify the LID assembly panel (with rounded notch)

and overlay (includes 'LID' cut into panel).
 9. Prepare the BASE upper boxing (with double circle

symbols cut near ends) by locating the center perforation
line, and bending as "mountain" fold. Working from center
outward toward ends, alternate the bends as "valley"
then "mountain", etc. NOTE that the tabs at bottom edge
have NOTCHES at ends of "mountain" bends, and
simple cut lines at ends of "valley" bends.

10. Also bend side boxing strips with end tabs as shown:

11. Add back curl to the bottom strip.

the side end tabs with matching symbols, then overlapping
upper strip plain side end across top end tab and
glue seam.
 Next, position and attach the bottom strip to the tab

ends of side strips.

then invert with tabs downward on work surface.
Apply glue to the tabs that are now facing upward.
 Slip the assembly BASE panel face down into the "ring"

and push the bottom curved portion into place
so that . . .
 . . . the inward corner edge seats snugly into

the bend at transition between rounded bottom
and feathers wider part.


the bends of boxing.
 14. Apply dry tape or glue to backside of BASE panel

overlay, then position with edges even and glue
in place to underside of assembly.
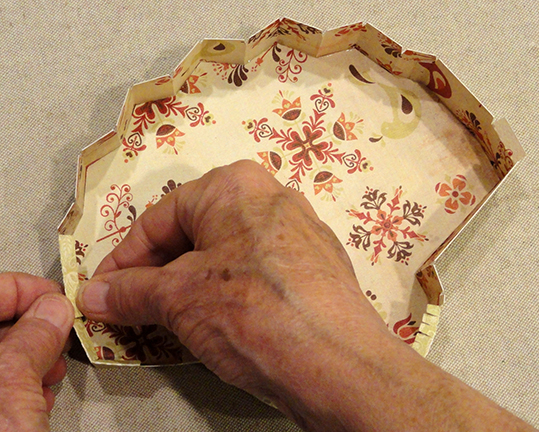
 15. Repeat the process (Steps 9-13) to assembly LID.

Complete LID by bending outer edge "rim" tabs inward
and gluing to inside of walls.
 16. Apply dry tape or glue to backside of LID panel
 7. Complete BASE by preparing and inserting short
overlay, then position with edges even and glue
in place to front of assembly.

and long cross braces as follows:
A) bend side tabs and bottom tabs upward;


B) bend long cross brace back at center perf line,
end tabs outward, bottom tabs outward;
C) if using the gift card variation, also bend
the long tabs toward center (these will overlap
eventually);
D) slip slots together, then push down completely;

E) attach top end tabs at upper angle shown,
bottom tabs to BASE bottom inside;
F) if using the gift card option, bend holder tabs
inward and glue together . . .

. . . where they naturally overlap.

G) place a sticky dot at center of crossed "arms"
then center the card within the indent cut outs.

8. Position feathers assembly onto the LID front,
with even offset margin all around and glue in place.

9. Complete box by slipping LID over base and . . .

. . . adjusting walls to fit as needed, then . . .

. . . push down fully flush. NOTE that a thumb notch
in LID boxing will assist to open.

Here is the completed box, straight front view.
If desired, prepare and attach additional embellishment
across lower front, such as a greeting, personalization,
or seasonal tag . . .

. . . such as one of these:
“Tags Small Harvest Thanksgiving Print Cut” (design
no. 423331
in the Silhouette America online Design Store).

10. If desired, cut and prepare the stand assist strip.
Bend the end perf forward on each end near
the rounded tips, then bend remaining perf lines
back. Align ends to abut at center and glue these
to backside of strip to create the stand shape shown.

Place under the curved bottom of closed box . . .

. . . then rest box on stand in upright position.
(Intended to remain unattached so that turkey
retains it original footprint shape).

No comments:
Post a Comment