Showing posts with label tag card. Show all posts

Tuesday, March 8, 2022

Cross Stitched Shamrock Tag Card

St. Patrick’s Day themed A6 side-folded card 
(measures approx. 4.63” wide x 6.25” tall) includes 
offset rounded corner front panel, accent strip, 
with shaped tag attached as principal interest. 
Tag includes slightly offset front overlay with round window, 
back layers with pair of ribbon tie punch holes, 
and cross stitch holes grid to hand stitch the three-leaf 
and stem shamrock. 
Add St. Patrick’s Day welded word cut below window, 
if desired. 
Tag measures approx. 2.57” across x 4.64” tall. 
Plain back shape is included in file to enable 
tag to be created as an independent project. 

ASSEMBLY: 1. Identify and cut the shapes:
A card base   B front accent panel
C stitching holes panel tag base (2)
D window tag front panel
E horizontal cross accent strip
F St. Patrick's Day welded word accent
2. Prepare the stitching panel by making sure all
the "waste" shapes from the stitching holes have
fallen out, or push them out with the end of a bent paper
clip.  Then layer and glue the punch hole stitching panels, 
taking care that outer edges, punch holes and stitching hole 
edges all align as perfectly.
Press the glued-up shapes under a heavy flat weight
until thoroughly dried, several hours or overnight.
3. Obtain tapestry needles (size 24-26) and
two shades of 6-ply embroidery floss
to complete the cross stitching.
4. Cut a 24-30" length of 6-strand floss, then separate
two strands then lay them together. Fold the lengths in half 
and thread the four ends (or alternately the loops) 
through eye of a blunt tip tapestry needle. Pull the ends
part-way down - the loops will remain as the long end
and will be used to "tie on".
5. Take note of the smaller holes out of line from
the other rows where the center stem will be added.
Compare to the stitching chart where the stem stitch
is shown.
6. Prepare to begin stitching by positioning the loops end
of threaded needle below the holes array on tag backside,
 and secure in place with a small piece of cello tape.
7. Insert the needle in the lowest smaller offset hole
for bottom end of stem.
On front, pull thread all the way through.
Next, insert the needle down (from front) through
the upper offset stem hole, then . . .
. . . pull thread all the way through till long stitch is
flush with front of panel.
8. Repeat the same steps to double the stem stitch
for better visibility.
9. Next, identify the bottom cross stitch of the upper
"heart" on the chart. Insert the needle (back to front)
through the upper right hole of that 'X' stitch.
Then complete the right slant stitch, and . . .
. . . the left slant stitch . . .
. . . as shown here.
10. Continue to refer to the stitching chart to complete
the outline of X stitches, working upward around
the top shamrock "heart" petal . . .
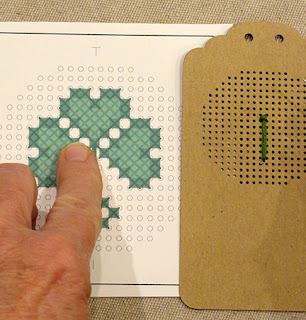
. . . then back downward until it is complete.
When the length of floss on the needle gets used
up, pause before it is too short to "tie off".
This is done by working needle to backside at the end
of the final stitch worked, passing the needle under
a few adjacent stitches as they pass across the backside
of the tag, then clipping excess off close to surface.
11. "Tie on" the newly-prepared length of floss
(as described previously in Step 4), beginning by
inserting the needle from back to front in the upper left
hole of selected 'X' stitch - shown here as the bottom
center "point" stitch of left shamrock "heart".
Pull needle and floss through, but leave a generous
loop on the backside.
Insert needle down through the bottom right hole
of same X stitch, push needle through to backside.
Draw floss through, then pass needle through
the remaining loop, and . . .
. . . pull flush to "tighten" the stitch.
This is the normal "tie on" process.
12. Continue to complete the charted X stitches
around the right and then left shamrock "heart" shapes.
Then pass the needle down backside of work
(invisibly from front) to emerge near bottom of stem,
to complete the series of separate X stitches there.
Tie off and tie on as needed.
13. When the design is completed, either tie off
final floss length as described previously. Or,
direct the floss down to imitate the beginning loop,
secure with cello tape. Then . . .
. . . snip through ALL floss to remove excess.
14. Prepare a length of floss of the interior contrast
color, tie on where it makes most sense, then
complete the stitches within each of the "heart"
shapes as defined by previous X stitches.
Tie off and tie on in usual manner as needed.
15. Position and attach the circle window front tag
panel, offset around sides and bottom edges.
16. Prepare the card base by bending back along side
edge perforation.
Position - centered in both directions - front accent
panel and attach to front panel.
17. Prepare welded word phrase by centering
contrast cross strip behind the "Patrick's" portion,
both side to side, and top/bottom,
and attaching in place where the two surfaces touch.
18. Add ribbon bow to the top of tag.
19. Position tag at center of front panel so that
top edge is approx. 1/8" below accent panel top edge,
and attach in place.
20. Position welded word/strip assembly, centered
side to side, and overlapping the bottom of tag
as desired ("St." portion below circle window),
and attach in place.
Here is the completed tag card.

Thursday, January 9, 2020

Initial Stitched Tag Pocket Cards A to Z

Add just a few stitches (using No. 5 perle cotton yarn 
or equivalent) to playful large-scale cap letter 
to lend an extra measure of “hand-made” love 
to this unique memento pocket tag or card
(stitched letter sample is shown on thumbnail left). 
Great for birthday or other gifting occasion.
Or choose the optional stitch imitation “cut out” 
to glue on (faux stitched letter sample on right). 
Tag card has shaped top with hang hole, reinforcement ring. 
Fold-back panel attaches to form pocket that can 
neatly hold cash paper bills, gift card or message on 
optional insert rectangle. Initial letters have offset base shapes 
(with circle window to allow for stitching thickness) 
to be mounted on rounded corner accent front panel 
then attached to tag front. 
Optional plain pocket card also included (without tag hole). 
Tag measures approx. 4” wide x 7.375” tall when assembled. 
(Letters M & W tag measures approx. 5” wide x 7.375” tall.) 

The stitched version will be the focus of this assembly
guide, with a few notes about non-stitched version at end,
in Step 24.

ASSEMBLY: 1. Identify and cut the shapes:
A tag base with fold-back pocket
B front accent panel
C tag reinforcement rings (1 or 2)
D main letter shape including needle holes
(or for faux stitching detail, placement guides)
E letter offset accent shape
2. Obtain contrast No. 5 perle cotton yarn
or equivalent, and tapestry-style needles in a gauge
that will fit easily through cut stitching holes.
(Size 24 was used for this project.)
3. Cut an 18-20 inch length of yarn. Attach the tail end
above the top stitching hole, on backside with a small
piece of cello tape.
(NOTE: this tutorial will present one way to efficiently
apply stitches to minimize bulk on backside of letter shape
so that it can be attached neatly and flat to 
the offset accent shape; other variations are possible.)
4. Colonial embroidery knots create the "dots" at
top, bottom and sides (where included) of the stitched
design. Below is the stitching diagram for
the Colonial knot.
Insert the needle through the top hole,
and pull yarn through to the front completely.
6. Create a Colonial knot on the front by wrapping
the yarn in the figure 8 around the needle as shown . . .
. . . then insert the needle tip into the same top hole,
pulling the yarn semi-tightly around needle
and sliding it next to the letter shape surface . . .
. . . then hold the tail to preserve the knot . . .
. . .while the needle is pushed/pulled through . . . 
. . . to the backside, carefully drawing the yarn
through to secure the knot . . .
. . . into it's neat, tight form as shown.
NOTE: Take care when pulling needle through 
so that it can slide through without pulling the knot
through the hole with it.
7. Prepare to add the first straight stitches by inserting
the needle through one of the side holes near top . . .
 . . . drawing it through, then inserting into
the mid center hole to create a diagonal stitch.
8. Repeat on the opposite side to create the second
half of the diagonal stitch "arms".
 9. Add the top center long stitch by inserting
the needle into the top mid hole, drawing through
then inserting in the center hole and drawing through
to complete the stitch.
 10. Next move to left to insert into the middle
diagonal tip hole, then across into the opposite
diagonal hole, to complete stitch.
 11. Insert needle to complete the short cross stitch
at the bottom right end of diagonal stitch,
and also the short cross stitch just above.
12. Begin the second center diagonal stitch by
inserting needle at top right hole, then
to preserve uniform look, slide the needle UNDER
the cross stitch as the yarn is carried across
to complete the diagonal stitch and third cross stitch.
 13. Complete the final short cross stitch, then
insert the needle up through the outer hole
and down again through the center hole to complete
the horizontal left medium straight stitch.
(NOTE that for many of the letters, Steps 13-14
will be omitted.)
14. Add the left diagonal "arm" stitches,
then insert needle through center hole to
repeat the horizontal stitch and "arms" stitches,
and the second Colonial knot to the side.
15. To complete the lower portion of the motif,
insert the needle up through the center hole
one final time, then . . . 
. . . down to bottom center hole (NOT the end
knot hole) to complete the long stitch, then
complete the diagonal "arms" stitches as done
previously.
16. Complete the final Colonial knot in the bottom
hole. End with the needle and yarn exiting
from the back of the letter shape.
17. Direct the thread down the letter out of the way,
then trim the excess yarn approx. 1/2" from final
exit hole, and . . .
. . . anchor it with a small piece of cello tape.
18. Position and attach the stitched letter to
the offset letter base, with even narrow margin
all around.
19. Prepare the tag base (or card base if preferred)
by bending back on all perforation lines.
Also position and attach the punch hole reinforcement
ring on front, and on back if desired.
21. Bend the tag pocket panel back with end tabs
folded inward and attach them in place
to main panel backside.
22. Position and attach the rounded corner
accent panel onto the front with narrow
margins at sides and bottom of matching
revealed size.
23. Position and attach the completed
stitched letter assembly, centered both
left to right and top to bottom onto 
the tag front.
Here is the completed 'A' pocket tag.
Insert cash into pocket, or gift card, or
sentiment panel.
24. If you don't want to add the actual yarn and
needle stitches, use the faux cut out stitching,
which is shown here on the letter 'B'.
A) Make sure you have a sharp blade in your
cutting machine. Cut out the stitch shape and
the dot(s) that are needed for the selected letter.
B) Center the shape over the designated letter
cutout and glue in place.
C) Position and glue the dots over the cutouts
on the letter which show positions.
The rest of the assembly is the same.