Monday, April 5, 2021

Duffle Style Gift Box

 
 Hexagon base gift box is cut in one piece, 
with six wall panels that extend into upper sections 
with angled perforation lines that allow pleats to bend inward 
where a cord or narrow ribbon threads through pairs of holes 
to cinch in and tie as closure. 
Add optional contrast accent rounded-corner offset rectangles 
to side panels and triangle accents above side panels. 
Assembled box measures approx. 3” depth x 3.4” width 
x 5.875” tall with 3.5” tall side panels (excludes pleated top). 

ASSEMBLY: 1. Identify and cut the shapes:
A main duffle hull shape
B side wall accents (6)  C top accent triangles (6)
2. Prepare the hull shape by bending back on all
perforation lines for bottom hexagon floor, tabs . . . 
. . . for side wall sections . . . 
. . . and for horizontal mid line.
3. Shape the "cinched in" top portion by bending forward
on each angled perforation line pair, and . . . 
. . . top short perforation line between punch hole pairs.
4. Position and attach the side wall offset accent shapes
within the area defined by perforation lines.
Position and attach the offset triangle shapes within
defined areas above walls. 
5. Form the hull into a tube to bring the straight side edge
to overlap the side flanges to align at perforation lines
for upper and lower segments, and glue in place.
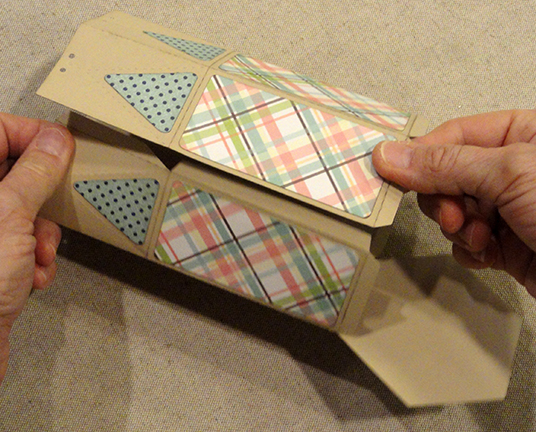
NOTE that the symmetry of the hull shape will allow
the hull to be made flat so that fingertip pressure can
be applied along the side seam segments to ensure
a good seam connection.
6. Prepare to complete the floor seams by bending
the five flanges inward to perpendicular position, 
applying adhesive to the upward edges, then . . . 
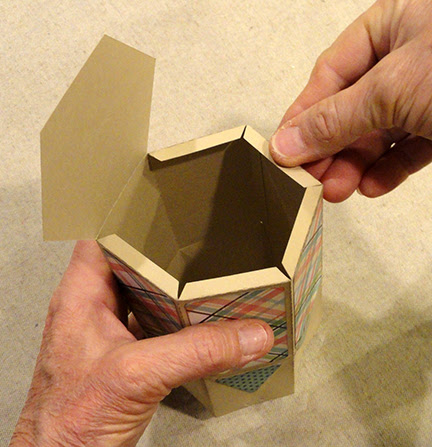
. . . fold the attached hexagon base into position,
adjust wall and base edges to align as precisely
as possible, and glue in place.
NOTE that it may be helpful to place the box base-down
on flat work surface then insert a tool end such as the new
pencil eraser shown to apply pressure along each base
seam to ensure complete and secure attachment.
7. Insert gift contents, then bend and arrange the
upper pleats inward until . . . 
. . . they come fully together.
8. Thread cinching cord(s) or ribbon through punch hole
pairs, then begin to pull tight until . . . 
. . . the cord can be knotted, snugged tighter,
and tied into neat bow.
Here is the completed duffle style container.

Potpie Hexagon Gift Box

Hexagon “potpie” style
 box has side walls that taper outward 
to terminate in curved perforation lines that are carefully bended 
to create edge petal shapes that transition to “lid”. 
Two lid “extensions” include the petal shapes, each with a tab
 that tucks down behind opposite side walls to be held in place
 with temporary double sided adhesive tape. 
A pair of lid punch holes allow for tying a soft bow 
(ribbon 1-1.375” wide suggested; 16-18” in length) 
as top decoration. 
Box measures approx. 3” deep x 3.75” long x 
2.375” tall when fully closed. 

ASSEMBLY: 1. Identify and cut the shapes:
A main hull with attached lid
B side wall offset accent panels (6)
C lid offset accent panel
2. Prepare the main hull shape by bending back on all
straight perforation lines for bottom and side wall panels,
side tabs.
Also carefully start the bends for the curved petal edge
perforation lines. (These do not bend back far, but
are just "crested".)
3. Position each offset side wall accent panel within
the side wall perforation lines that define the side walls,
and attach in place. Also position and attach the lid accent,
taking care to center with even offset margins all around,
with punch holes aligned exactly as possible.
4. Complete the 6 side seams by bending back two
adjacent walls to align straight edge of one wall
across the corresponding tab flange to perforation line,
and joining in place.
4. Test close the lid over the base by first bending
extensions at base center front inward, and lid at each side
of center front downward. Fit . . .
. . . the extensions into position behind corresponding
walls or under lid.
5. Since this container has a "soft" closure,
add 'temp' adhesive dots or tape to the petal tab
extensions that will be tucked in behind lid or walls.
6. Add ribbon to lid by threading ends through
punch holes, then tie a neat knot and bow, trim ends.
7. Add gift contents, then re-close the lid into place,
adjust, then apply pressure as needed to attach petal
extension flanges in place and hold box closed.
Here is the completed box.

Friday, April 2, 2021

Box 3D Petal Folds Top Ruffle

Unique hexagon-base gift box is cut in one piece withcurved petal-shaped indentations forming the compartment “roof” 
and delicate narrow necks that cinch the pleated top. 
Add optional contrast accent rounded-corner rectangles 
to side panels (while hull is still flat). 
Take care when folding and gathering in the pleats
 (neck reinforcement shape included to strengthen against 
or repair tearing). Insert gift contents into pre-folded 
and assembled box, then cinch narrow necks in toward center, 
and tie gently with narrow ribbon. 
Assembled box measures approx. 3.875” length x 3.38” width 
with 1.5” tall side panels (also approx. capacity interior height); 
height to top of “ruffle” is approx. 4.375”. 

ASSEMBLY: 1. Identify and cut the shapes:
A one piece hull   B accent rectangles overlays (6)
C optional narrow neck reinforcements (1-6 as needed)
2. Prepare the hull shape by bending bottom tabs
and base hexagon extension back on perforation lines.
Bend side tabs back, and . . . 
. . . bend along mid horizontal perforation line.
Bend forward along vertical section lines from bottom to
top of shape, then bend lower "box" and upper gathers
short length perforation lines back.
Carefully begin the bend forward at center of each
"ruffles" extension, but don't bend completely nor
press flat. Be sure to end bending above or at
end of perforation line end at middle of hull shape.
Carefully bend a "ridge" along each of the curved
perforation lines.
Help the hull shape follow its final bending configuration
by bending the perforation line between the pairs
of curved lines as VALLEY folds, and . . . 
. . . also help the perforation lines below to form
as MOUNTAIN  folds. Top of ruffle perf line is also
a "mountain" fold. 
Here is the completely prepared hull shape.
3. Position and attach the accent panels, offset within
the side wall perforation boundaries.
(If using liquid adhesive, consider pressing with a flat
weight until dry).
4. Form the hull into a tube to bring the straight side
edges of lower and middle walls, and upper short wall
to overlap coordinated tabs opposite and align with
perforation, then attach in place.
NOTE that the symmetry of the hull shape allows
it to be pressed flat on work surface at this point in
assembly so that finger pressure can be applied
along side seams.
5. Bend the bottom flange tabs inward at
perpendicular angle, apply adhesive to top surfaces . . .
. . . then bend base hexagon extension down into 
position, adjust edges and wall perforation edges
so that they all align as precisely as possible,
and glue in place.
It may be helpful to reach a hand or tool such as
the end of a new pencil eraser into the hull to
apply pressure along each seam to ensure good
connection, while base is flat on work surface.
6. If there has been tear-out during the complex
folding at narrow necks for "ruffle", prepare the small
optional reinforcement shapes by bending to imitate
the hull bends (vertical short perforation as "valley" fold,
and bend back slightly at cross perforation cut). 
Apply glue to the face of the reinforcement, then
insert into hull interior and position behind the narrow neck . . .
. . . with perforations exactly behind narrow neck.
Hold in place until secure.
(This is the point where contents would be added.)
7. Prepare the final shaping to assist the "ruffle" to
gather inward by pushing the petal center fold backward
in toward center, and . . . 
. . . also assisting the top ruffle center fold
to bend back in the same manner.
Continue to gently move the narrow necks
in toward center until they touch each other
(or nearly touch) . . .
. . . as can be seen in this top view.
Hold the gathers in place with one hand while wrapping
a 16-18" length of narrow ribbon around the neck
and securing with knot and bow.
Here is the completed gift box.