Unique hexagon-base gift box is cut in one piece withcurved
petal-shaped indentations forming the compartment “roof”
and delicate narrow
necks that cinch the pleated top.
Add optional contrast accent rounded-corner
rectangles
to side panels (while hull is still flat).
Take care when folding
and gathering in the pleats
(neck reinforcement shape included to strengthen
against
or repair tearing). Insert gift contents into pre-folded
and assembled
box, then cinch narrow necks in toward center,
and tie gently with narrow
ribbon.
with 1.5” tall side panels (also approx. capacity interior height);
height to top
of “ruffle” is approx. 4.375”.
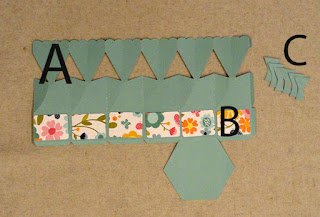
ASSEMBLY: 1. Identify and cut the shapes:
A one piece hull B accent rectangles overlays (6)
C optional narrow neck reinforcements (1-6 as needed)
and base hexagon extension back on perforation lines.
Bend side tabs back, and . . .
. . . bend along mid horizontal perforation line.
Bend forward along vertical section lines from bottom to
Bend side tabs back, and . . .
. . . bend along mid horizontal perforation line.
Bend forward along vertical section lines from bottom to
top of shape, then bend lower "box" and upper gathers
short length perforation lines back.
"ruffles" extension, but don't bend completely nor
press flat. Be sure to end bending above or at
end of perforation line end at middle of hull shape.
Carefully bend a "ridge" along each of the curved
Carefully bend a "ridge" along each of the curved
by bending the perforation line between the pairs
as MOUNTAIN folds. Top of ruffle perf line is also
a "mountain" fold.
the side wall perforation boundaries.
(If using liquid adhesive, consider pressing with a flat
weight until dry).

4. Form the hull into a tube to bring the straight side
edges of lower and middle walls, and upper short wall
to overlap coordinated tabs opposite and align with
perforation, then attach in place.

NOTE that the symmetry of the hull shape allows
it to be pressed flat on work surface at this point in
assembly so that finger pressure can be applied
along side seams.
5. Bend the bottom flange tabs inward at
perpendicular angle, apply adhesive to top surfaces . . .
position, adjust edges and wall perforation edges
so that they all align as precisely as possible,
the end of a new pencil eraser into the hull to
apply pressure along each seam to ensure good
folding at narrow necks for "ruffle", prepare the small
optional reinforcement shapes by bending to imitate
the hull bends (vertical short perforation as "valley" fold,
and bend back slightly at cross perforation cut).
Apply glue to the face of the reinforcement, then
insert into hull interior and position behind the narrow neck . . .
. . . with perforations exactly behind narrow neck.
Hold in place until secure.
(This is the point where contents would be added.)
7. Prepare the final shaping to assist the "ruffle" to
gather inward by pushing the petal center fold backward
in toward center, and . . .
. . . also assisting the top ruffle center fold
to bend back in the same manner.
Continue to gently move the narrow necks
in toward center until they touch each other
(or nearly touch) . . .
. . . as can be seen in this top view.
Hold the gathers in place with one hand while wrapping
a 16-18" length of narrow ribbon around the neck
and securing with knot and bow.
Here is the completed gift box.


No comments:
Post a Comment