Friday, December 10, 2021

Candy Cane Step Card

 
Classic step configured base has side panels that bend back 
into a "supporting role" somewhat behind main panel.
At center, crossing candy canes cameo on a swirl-edge circle 
with holly and berries cluster at intersection. 
Side, bottom and back accent panels are decorated 
with eyelet style lace strips, with two-layer simple plaque 
at center bottom that can hold a penned or stamped sentiment. 
Card measures approx. 5.875” tall x 7” wide 
when folded flat. 
Companion envelope design is also available
as enclosure for giving:
 “Env Candy Cane Flap for Step Card”

ASSEMBLY: 1. Identify and cut the shapes:
A card  base with step fold perforations
B front center panel offset accent panel
C front side accent strips with eyelet lace strips
D front bottom accent strips with eyelet lace strip
E optional back offset panel with eyelet lace strips
F front sentiment panel with offset accent panel
G front accent disc  H loopy edge front disc base
I single candy cane base with stripes overlay
J crossed cane base with single cane stripes overlay
K holly leaves & berries cluster shapes:
base silhouette, whole and half leaves,
berries with contrast berry underlays
2. Crease the perforations of card base in a preliminary
manner, allowing the circle disc shaped cut at top
to pop free. Base perforations are ALL folded as
"mountain" folds, except bend the side panels second
from bottom edge as "valley" folds. NOTE that
the cut file has small 'V' symbols next to these perf lines.
Bend back all the folds while assisting the valley folds
to bend into position, directing the card to arrange itself
into front and back panel halves. Then . . . 
. . . apply pressure to all perforations to
lock the base panel into its final closed form.
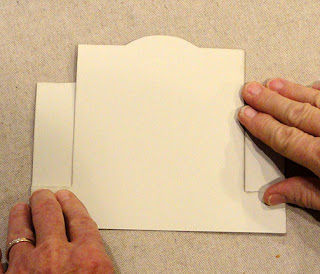
3. Prepare the accent offset panels by adding
corresponding lace strips a narrow margin margin
away from outer or bottom edges as shown.
4. Position and attach the front center panel in place
with narrow, even margin around sides and top edges
as shown.
5. Position and attach bottom strip assembly with narrow
offset margin all around. NOTE that this image shows
a rotated position from the designed positioning
and the final sample version (see next frame).
6. Position and attach side accent strip assemblies
with narrow offset margins.
7. Position and attach the back accent panel assembly
on back of card base with narrow offset margin
on all edges as shown.
9. Prepare the front circle disc assembly by centering
and attaching the main disc onto the loopy edge
accent shape.
10. Prepare the sentiment plaque by layering and
attaching the main (light) panel on top of
the larger panel.
12. Position and attach the corresponding "stripe"
candy cane shapes on top of the single shape
and the crossed base silhouette.
13. Position and attach the single cane assembly
over the corresponding portion of the base silhouette
shape, crossing on top of the other stripe overlay.
14. Prepare the holly and berries cluster by . . .
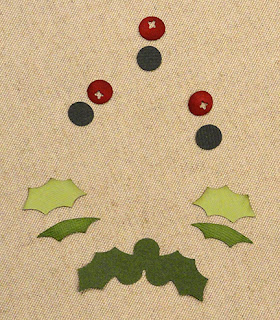
. . . positioning and attaching: the "red" berry fronts
on top of corresponding contrast base shapes;
half holly leaves on top of the whole leaves.
Finally, position and attach the whole leaf assemblies
onto the silhouette base, then placing and attaching
the lower and upper berries.
15. Position the front disc assembly by aligning
the center top portion of the solid circle edge of
loopy back layer with the circle cut edge of
card base,  then . . . 
. . . glue in place.
16. Position and attach the candy cane unit over
the center of the disc assembly, then position
and attach the berries cluster at canes intersection.
Here is the completed card.


Thursday, December 9, 2021

Greeting Card Art Display Plaques

 Add display impact to an artistic card with this decorative wall plaque 
(card artwork NOT included in the design cut file)
which functions as a mat frame for “portrait” oriented 
greeting card art. Plaque is made thick by layering 
cut out shapes for thickness that imitates plywood. 
Components include exaggerated teardrop flourish 
cutout shapes, top shape with a hanger or ribbon punch hole. 
Overlaid shaped-edge frame includes with circle cutouts 
sized to receive .5” painted wooden mushroom “button” plugs 
as accents (shapes also included with holes omitted). 


Card “reveal” shapes include smaller opening measuring 
approx. 6.625” wide x 4.5” tall. 
Landscape plaque measures 
approx. 9.25” wide x 17.5” tall.
Portrait plaque measures
approx. 9.25” wide x 17.5” tall.

ASSEMBLY: 1. Identify and cut the shapes:
A front plaque base shapes (3-4 for thickness build up)
B contrast mat frame (exposed narrow border)
C front mat frame
D top plaque extension (3-4 layers plus face layer)
E bottom plaque extension (3-4 layers plus face layer)
F artwork to be framed ("JOY" floral card from Halmark
Cards is used for the sample project)
G wooden 1/2" mushroom plugs (optional variation included)
2. Layer and glue together the main solid plaque shapes,
taking care here and throughout when layering that
ALL cut edges are aligned as precisely as possible.
Immediately place on a heavy flat surface with heavy flat
weights positioned on top of glued-up stack, as shown.
Immediately place on a heavy flat surface with heavy flat
weights positioned on top of glued-up stack, as shown.
If using a heavy book, consider placing somethings else
heavy on top of book to press as firmly as possible to
help prevent warping and curling, allowing glue to dry
for several hours or overnight.
3. Layer and attach the contrast inner frame layer
(bright green in sample) and top frame layer with
outer edges aligned as precisely as possible.
Press under a heavy flat object until thoroughly dry.
4. Layer and attach the upper plaque extension layers
into a stack - with face layer on front - matching all cut
edges precisely. Press under heavy weights until dry.
5. Repeat step 4 for the lower plaque extension layers.
6. Position the dried mat assembly over the selected
artwork to be displayed, centering so that an even
narrow margin remains unexposed at edges, so that
it can be temporarily taped in place, if preferred, or 
glued more permanently in place.
7. Position the mat/artwork assembly over the dried stack
of main plaque shapes, align cut edges, and attach.
Press under heavy flat weight as before.
8. Place the dried upper and lower extension assemblies
together on work surface with straight inward edges
aligned and abutted.
9. Position the main front plaque assembly over
the top, and position upper and lower edges
at the corner transition points as indicated with
pointing finger . . .
. . . so that the main plaque is centered side
to side at indicated points, as shown.
Glue in place with strong glue such as Fabri-Tack.
10. Position and attach painted or stained
mushroom buttons (if using that variation).
11. Attach decorative ribbon hanger loop
or bow, as desired, then hang from peg or nail.


Saturday, December 4, 2021

Scottish Pleated Kilt Tag

Traditional highland kilt is represented in dimension
with pairs of pleats on each side of center, 
centered within a scalloped frame. 
Other details include layered sporran suspended from cords, 
belt that attaches across top of kilt,
 and wraps at sides, buckle. 
Tag base has straight edges, with ribbon slot at top, 
and measures approx. 3.5” wide x 5” tall. 

ASSEMBLY: 1. Identify and cut the shapes:
A tag front (with added 2 layers for strength as desired)
B ribbon slot reinforcement ring
C scalloped frame   D contrast panel for frame
E pleated (perforated) skirt panel
F kilt belt with tiny buckle shape
G sporran assembly: base with "chain" extensions,
stylized cantle medallion and circle accent
2. If using multiple main tag base layers,
position and attach these together, matching
all cut edges as precisely as possible.
Press under a heavy flat weight until completely dry.

3. Position and attach slot reinforcement ring.
4. Prepare accent frame by positioning the contrast
panel behind the frame . . . 
. . . with panel straight edges offset evenly in
from frame's scallop edges on all sides.
5. Position the frame on tag base front,
centering side to side, then gauging space between
side edges and frame, and matching that margin
at bottom, then attach in place.
6. Prepare the sporran assembly by layering
the shapes from bottom upward as shown
in this column . . .
. . . with punch holes aligned, to become this unit.
Insert a tiny contrast brad through the hole as accent.
7. Prepare the kilt skirt shape by bending the perforation
lines as mountain or valley folds as shown
(working in from sides: valley, mountain, valley, mountain).
8. Fold the pleats to condense the kilt shape,
then apply glue under the pleat folds within 1/8" of top,
(repeat along backside, also) and apply pressure
until pleats are secure.
9. Center the belt shape along the top of kilt pleats,
with belt top edge approx. scant 1/8" above pleats
top cut edge and attach in place.
Bend the side ends of belt back . . .
. . . and glue in place on kilt backside.
10. Position the sporran unit on front of kilt with
"chain" ends aligned at top edge edges as shown,
and attach in place.
Position and attach buckle shape centered
on belt shape.
11. Position and attach the assembled kilt
within the frame, applying adhesive along top/belt
edges and kilt side edges only, allowing
the dimensionality of pleating to remain.
12. Arrange and attach ribbon and twine-tied 
cockade as desired.