Sunday, November 29, 2020

Ornament 3D Invert Ends Dble Taper

One piece hull has triangle folds above and below centerline 
in alternate positions which bend inward giving 
this double pointed ornament visual interest. 
Optional narrow offset overlays offer coloring options 
(sample shows only triangles added)­­. 
Punch holes at top and bottom allow for tassels or other baubles 
to hang from below, with tie ribbon or cord at top. 
Ornament measures approx. 2.66” diameter at widest 
x 3.25” tall when assembled. 

ASSEMBLY: 1. Identify and cut the shapes:
A ornament body
B upper and lower inverted triangle panel accents
(8)
2. Prepare the body shape by bending back on all
perforation lines, except the angled perforation lines
for the inverted upper and lower triangles . . .
. . . which are folded forward.
NOTE: It may be helpful to turn the ornament body
face side down and bend along the angled perforation lines
from the back.
3. Position and attach the accent triangle shapes
onto the corresponding inverted panel areas,
with narrow offset margins all around accents.
4. Form the body into a tube to bring the straight side
edges to overlap the opposite side tabs to perforation line,
adjust and join in place.
NOTE: that the body shape is symmetrical which
allows it to be flattened so that fingertip pressure
can be placed along the side seam to help secure it.
5. Bend the upper portion inward along perforations
so that . . . 
. . . triangle panels are inverted, and bend triangle top tabs
inward at ninety-degree angles so that they come 
together along three sides.
Apply glue to the tabs, then . . . 
. . . bend the top square panel down into position
so that the straight edges align at tab perforation lines.
Hold in place until secure.
6. Thread tassel, bead, etc., onto narrow cord,
then thread onto long needle and insert through middle
of ornament. Secure cords at top with knot, etc.,
or attach to cord loop. Add bow or other accents.
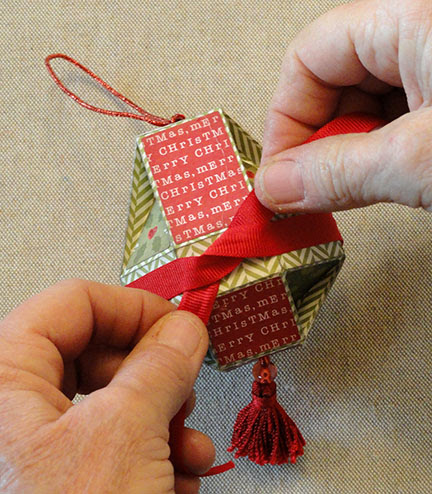
Here is the completed sample ornament.

Ornament 3D Invert Ends Oblong

One piece hull has narrow side panels around center 
where ribbon and bow can adorn, triangle folds above and 
below in alternate positions which bend inward giving 
this oblong ornament visual interest. 
Optional narrow offset overlays offer coloring options. 
Punch holes at top and bottom allow for tassels or other baubles 
to hang from below, with tie ribbon or cord at top. 
Ornament measures approx. 2.66” diameter at widest 
x 3.125” tall when assembled. 

ASSEMBLY: 1. Identify and cut the shapes:
A ornament body   B top/bottom panel accents (2)
C middle accent rectangle accents (4)
D upper triangle accents (4)
E lower triangle accents (4)
2. Bend body back on all perforation lines for upper tabs,
upper panels . . . 
. . . middle panels, lower tabs, etc.
3. Bend forward on angled perforation lines for
upper and lower inverted panels.
NOTE: it may be helpful to turn the body with face
side down to crease on angled perforation lines.
Also NOTE that you can preview the inverted triangle
arrangement by bending on the angle line and 
then back on the adjacent lines to see how the upper
ends taper inward.
4. Position and attach accents onto the face of
the body, with slight offset margin all around between
accent edge and perforations which define panels.
5. Form the prepared body into a tube to bring
the straight side edge around to overlap side tabs on
the opposite edge to align at perforation,
and completed the three sections of side seam.
NOTE: the body shape is symmetrical and can be
flattened to enable finger pressure to help secure
side seam.
6. At top end, bend the inverted panels and side
upper side panels inward, and triangular tabs
at ninety-degree angle so that the triangular tabs
come together to form a three-sided platform.
Apply glue to the platform tabs, then bend the top squares
panel into position . . .
. . . so that square edges align with tab perforations,
then press into place and attach.
7. Repeat for the bottom end.
8. As desired, thread tassels, beads, etc. onto narrow
cord onto a long needle, then insert and thread from bottom
to top, then tie and secure at top with additional beads,
hanging loop, etc. 
9. In place of center accent panels, wrap narrow ribbon
length around center and tie knot and bow.
Secure in place with a dab of glue at center back
and under bow.
Here is the completed oblong inverted ends ornament.

Thursday, November 26, 2020

Countdown Ornaments Inverted Ends

Make quick and simple tree or peg ornaments for each 
of the 12 Days of Christmas, as 1-24 December countdown, 
or other winter celebrations. Leave the numbers and disc off 
for a dimensional addition to swags and garlands. 
Raise interest level by cutting and adding optional 
narrow offset overlays. Square side panels surround “equator”, 
and triangle folds above and below bend inward. 
Punch holes at top and bottom allow for tassel or 
other bauble to hang from below, with tie ribbon or cord 
at top (top only punched hull also included). 
Ornament measures approx. 2.66” diameter when assembled. 
Check out other similar dimensional ornaments in the same style: 
Ornament 3D Invert Sides Oblong; 
Ornament 3D Invert Sides Dble Taper. 

ASSEMBLY:  1. Identify and cut the shapes:
A main ornament body
B top and bottom square accents (2; with punch holes)
C middle panel accents (7)
D invert panel accents (4 upper, 4 lower)
E number disc with numbers
2. Prepare the body panel by bending BACK on all
perforation lines for panels . . .
. . . top and bottom squares,
end tabs; and . . .
. . . FORWARD on diagonal inverted lines.
NOTE: it may be helpful to reverse the body shape
and bend along the diagonal lines from back.
It may also be helpful to "dry fit" how the ends will
form with inverted panels to confirm where any optional
accent panels will be placed for desired effect.
3. Open body flat to position and attach the inverted
panel offset triangle accents, and . . .
. . . and the middle square accent shapes.
NOTE that when using the disc with count down numbers,
the front panel accent can be omitted because it will be
covered almost completely by the disc.
4. Form the body shape into a tube to bring the straight
side edge to overlap the opposite tabs to perf line,
and glue in place.
NOTE: that the hull shape can be flattened to apply
fingertip pressure along the seam to make sure
it is completely aligned and secured.
5.  Bring the three triangle top tabs together
by bending along the inverted panel diagonal folds . . .
. . . then apply glue to the triangle tabs.
Bend the top square panel down into position and
adjust so that the squared edges align at triangle tab perf folds,
and glue in place, holding until secure.
6. Repeat for the opposite end.
7. Position the countdown numbers onto the circle disc,
balancing and centering for best presentation.
8. Position, centered, onto the front panel
and attach in place.
9. If adding a tassel array, thread the stringers onto
a long (doll) needle, then thread the needle through
the ornament from bottom to top, then . . . 
. . . tie onto a wire or ribbon loop at top, and
"bury" stringer ends back inside the ornament
if possible. Sample ornament also has a ribbon
bow tied at base of wire loop, and hot-melt glued
in place.
Here, below, are two of the various twelve days
count down ornaments.

Thursday, November 12, 2020

Bowl 3D Snow Swirl

Paper hexagonal bowl for light duty snack serving 
or seasonal display features fold-in walls and 
optional handles panel overlay to include as two side panels. 
Interior walls strengthen while hiding construction, 
along with base and wall accents, outer wall offset accents 
with swirl cluster decoration that peeks slightly above rim. 
Add small stars and flakes, with optional jewels. 
Finished bowl measures approx. 2.25” deep 
(excluding handles) x 6” x 7”. 

NOTE: this design will be released to public availability
in late mid December as part of a designer promotion
for SnapDragon Snippets portfolio in
the Silhouette America online store.
This post is a "place saver".

ASSEMBLY: 1. Identify and cut the shapes:
A hull with handles panel (2)
B hull without handles panel(4)
C bowl base hexagon with tabs
D offset overlay accents for handle panels (2)
E offset overlay accents for plain panels (4)
F interior offset accent panels (6)
G interior offset panel for base
H snow swirl overlays (6)
I snowflakes (18) and J stars (12) to decorate snow swirls
2. Prepare the wall panels by bending the (upper)
interior portion and side flange tabs back on both
handle and plain panels. Also bend the base panel flanges
forward.
3. Position and attach offset overlay accents
onto the exterior (lower) panels.
4. Position and attach the interior offset wall accents
onto the interior portion of wall panels and base.
NOTE: for handle panels, the accent panel will be
inserted underneath the handle, onto the handle cutout
and the remainder of the interior panel.
5. Assemble the snow swirl decorations by placing
and attaching the snowflakes in their silhouette positions.
Do the same with the stars.
Later in the assembly, the snow swirl shapes will be
placed at the top of the exterior panels with side edges
within the side edges of the handle or plain panels as
shown, with the top swirls extending slightly above
the level of the perforation that forms rim.
But for now, DO NOT attach them.
6. Prepare to assemble the bowl by placing the base
face down then center the bottom edge of the first handle
panel along one perforation of the base, overlapping the tab.
Adjust if necessary, then glue in place.
Next position and attach the second handle panel
on the opposite side of the base panel.
7. Position and attach the four plain panels in
the remaining positions around base.
8. Bend the first two walls back into position to align
the first side seam, overlapping the plain side edge
over the flange to the perforation line, make sure
that the rim lines match up. Repeat to align, adjust
and join remaining 5 side seams.
9. Apply adhesive to the interior wall extensions
(four sides), then . . . 
. . . bend each wall inward, until . . . 
. . . the bottom edge seats at the bottom next to the tab
perforation line of the base, overlapping and camouflaging
the interior assembly tabs.
10. Position and attach the snow swirl decorations
on the exterior of each wall section.
11. If desired, position and attach small jewels
at the center of each snowflake.
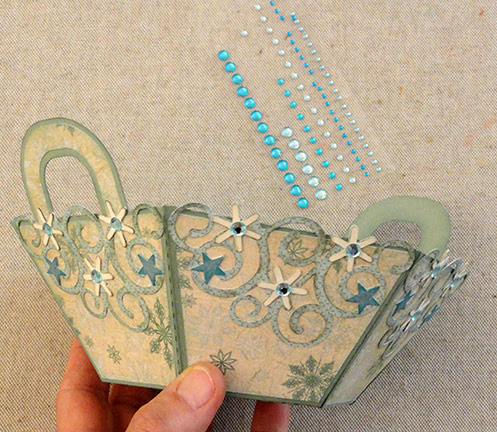
Here is the completed bowl.