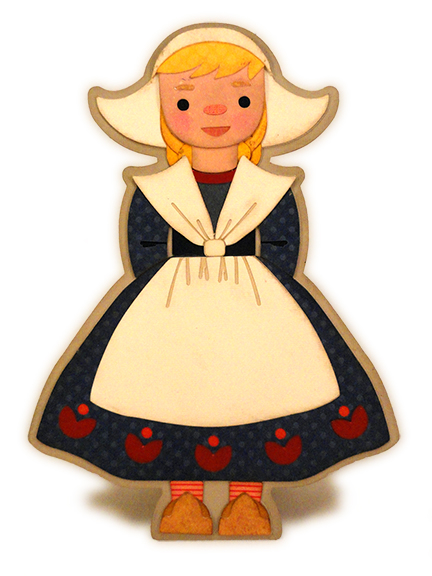
Paper doll -style shaped card of little Dutch
Miss
is great for special birthday celebration
and many other occasions.
Multiple layers of many shapes creates
detail.
Card back includes perforation at
shoulder level.
Upper portion of card back base is attached above perf line
so it can bend away to reveal message space.
Measures approx. 5x7 when
closed.
ASSEMBLY: 1. Identify and cut the shapes:
A card base front B card base back (with perf line)
C figure silhouette base
D hair/braid layers
E face shape F head shape
G mouth and eyes underlays
H fringe/bangs hair
I hat base J hat top band
K left and right sleeve overlays
L bodice/sleeves base shape
M apron strap base N apron strap overlays
O bodice 'V' inset and band
P apron straps "knot" (cut 2)
Q apron overlay R apron base
S skirt base (alt. shape used here)
T flower punch show-thru underlay
U tiny tulip petals (5)
V legs/feet W & X shoe base and front

 3. Attach eyebrow cut shapes over cut-out
openings, nose at center above mouth as shown.
4. Position face shape over corresponding portion
of head/neck shape, match upper and side edges
and attach in place. NOTE: it will help here
and throughout to keep the assemblage flat and avoid
warping or curling if a flat weight is placed over
the glued-up shapes until the adhesive is dried.


 7. Position the head/hair unit onto the hat base,
centered, with top center and bottom edges lined up,
and attach in place.


 10. Position apron straps over the corresponding
areas of the apron straps contrast base shape
and attach in place.
Also position and attach the apron skirt overlay
into the apron skirt base so that sides
and bottom edges line up.
A card base front B card base back (with perf line)
C figure silhouette base
D hair/braid layers
E face shape F head shape
G mouth and eyes underlays
H fringe/bangs hair
I hat base J hat top band
K left and right sleeve overlays
L bodice/sleeves base shape
M apron strap base N apron strap overlays
O bodice 'V' inset and band
P apron straps "knot" (cut 2)
Q apron overlay R apron base
S skirt base (alt. shape used here)
T flower punch show-thru underlay
U tiny tulip petals (5)
V legs/feet W & X shoe base and front

2. Prepare the face shape adding blush with
tool or fingertip at cheek areas,
and by gluing mouth contrast
underlay behind mouth cut openings,
and eye underlay behind eyes/brows openings.

openings, nose at center above mouth as shown.
4. Position face shape over corresponding portion
of head/neck shape, match upper and side edges
and attach in place. NOTE: it will help here
and throughout to keep the assemblage flat and avoid
warping or curling if a flat weight is placed over
the glued-up shapes until the adhesive is dried.

5. Working from bottom up as the three
braid/hair shapes appear when the file opens
(aka widest on bottom, narrower on top),
stack and attach with top and side edges,
and center bottom that correspond lined up,
and attach.

6. Position and attach the head unit on top
of the hair stack, centered, with top
and center bottom edges of all lined up.

centered, with top center and bottom edges lined up,
and attach in place.

8. Position and attach the bangs/hair shape
on top of face shape, then position and
press down and attach the front hat brim over hair
(take care to attach brim ends onto hat surface at ends, too.

9. Position sleeves on top of bodice base shape
where edges line up, and attach.

areas of the apron straps contrast base shape
and attach in place.
Also position and attach the apron skirt overlay
into the apron skirt base so that sides
and bottom edges line up.

over the corresponding portion of the bodice unit.
12. Attach band to 'V' inset, then position
and attach the inset into the 'V' area of bodice.

13. Position and attach the underlay strip
behind the punch holes on the alternative skirt shape.

where the tulip petals cut shapes
will be positioned, then . . .

under the punch circles, with lower curved sides
at the curved guidemarks.

15. Prepare the left and right leg/foot units
by layering the main shoe over the leg shape,
then centering and attaching the shoe front
on top.

16. Assembled the figure's units by
first positioning and attaching
the head/hair/hat unit onto the silhouette
base shape, aligning the edges of each.
17. Position and attach the bodice/arms unit
over the silhouette beneath the previously-
positioned unit, overlapping slightly at the
shoulder line as prescribed by
aligning edges that match.

18. Position the skirt onto the silhouette
and attach in place, then position the apron skirt
centered over skirt and attach.

over the silhouette base portions
and attach in place.

20. Position the assembled figure silhouette
onto the card front base, with the even offset
margin all around, and attach.

21. Bend the card back base shape forward
at the horizontal perforation lines.
Working from the backside, position the upper
"head" portion of the back base over
the corresponding portion of the card front base
backside, and attach both front and card bases
together above the perforation line ONLY.

The completed card in its finished configuration
can act as an easel for display.

No comments:
Post a Comment