
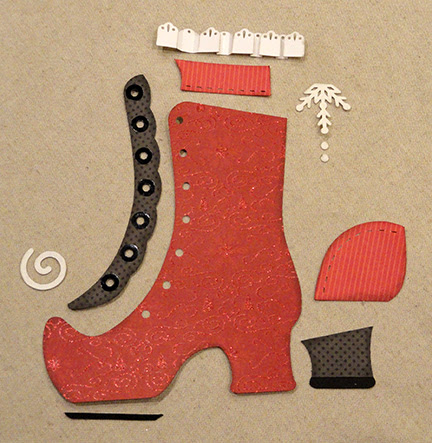
Fun and festive, this Mrs.
Kringle boot is composed of
front and back base panels that are layered for
thickness,
and attached to a shaped container structure between.

Front (and
duplicate back) boot has decorative detail,
including eyelet rings, bracket,
cuff & heel accents
with faux stitched cutouts, snowflake
flourish at upper,
swirl at toe, and box-pleated lace strip at top opening.
Thread ribbon or lacing through eyelets then knot and bow for realism.

Add
“Jingle Bell 3D Holly Sprig” at toe
(twine tie through pair of punch holes),
and “Kringle Kisses Tag” for extra style.
(Assembly guide for Tag begins in step 23.)
Boot measures approx. 7.35” tall x
6.2” wide
x 2.125” deep when finished.
ASSEMBLY: 1. Identify and cut the shapes:
A boot front (right side; 3 for layering thickness)
B front inner layer with guide marks
C boot back (left; 3 for layering thickness)
D back inner layer with guide marks
E boot decorative back (and front; cut 1 each)
F eyelet bracket back (and front; cut 1 each)
G heel upper overlay (cut 1 front, 1 back)
H heel stack overlay (cut 1 front, 1 back)
I & J sole shapes (cut 1 set front, 1 set back)
K cuff (cut 1 front, 1 back)
L box pleated lace strip (cut 1 front, 1 back)
M snowflake accent (cut 1 front, 1 back)
N swirl accent (cut 1 front, 1 back)
O & P vessel back and front
Q-S boxing strips for vessel (see step 9)

2. Identify the boot back (or front) main layering shape
AND the companion inner shape which includes guide
marks for positioning and attaching the vessel walls
later on in the assembly.

3. Position, layer and join the three back (or front)
main boot shapes, taking care to align all cut edges
- including lacing holes and bottom 'sole' edges -
as precisely as possible. Then . . .

. . . reverse the inner front (or back) guide mark shape
and layer in the backside of the stack, aligning
ALL edges in the same precise manner, then joining.

To help the stacks each remain as flat as possible
and to void warping or curling, particularly when using
liquid adhesive, PRESS flat under a large heavy weight
such as the wood plank shown, a large book volume or
other similar object, for a couple of hours or longer,
until adhesive is completely dried and no longer cool to touch.

4. Assemble the back (and front) boot decoration
using the shapes laid out here.
A. attach 7 eyelet rings over the lacing holes on bracket;
B. attach sole shape onto heel stack;
C. attach front sole shape on toe bottom edge;
D. attach lacing bracket and heel stack;

E. position heel and cuff shapes;

5. Prepare the lace edging by folding on the perforation
lines in alternating "mountain" and "valley" directions
to form box pleating as shown here.

HINT: three-scallop panels are 'fronts' with "mountain"
folds on each side, with 'backs' that have "valley" folds.

Press and glue pleats in place along the bottom
within scant 1/4" of bottom edge.

6. Position the pleating behind the top/cuff edge
so that it is overlapped by approx. 1/4" , then
glue together where they overlap.
7. Position and attach the snowflake (abutted at lower
cuff edge, with dots in-line below) and swirl
accents. Press under a flat weight if possible until dry.

8. Position and attach the decoration assembly
onto corresponding main boot layered stack (once dried)
taking care to align lacing holes, and also bottom straight
edges as precisely as possible, with narrow offset margin
all around. Press under flat weight until dry.

9. Identify the inner vessel assembly shapes:
A right/front panel B left/back panel
C back boxing strip D bottom boxing strip
E front/tongue boxing strip

10. Prepare the front and back shapes by bending
the front tongue area edge flanges back.

11. NOTE that the strips include tiny symbols in
end tabs or side tabs to assist in assembly order.
Here, the small circle symbol is shown in back
boxing strip bottom side tabs, with corresponding
symbol in the bottom back end tab.

12. Prepare back and bottom boxing strips by bending
side tabs back, and also bending back
on cross perforations.

To assist in visualizing how the assembly will progress,
arrange the strips (back, bottom, front) around
the front vessel main panels, re-bending in opposite
direction as needed to echo the edge angles of panel.

13. Begin the boxing strip attachment at the back top
of the front panel, positioning the back top long tab
of back strip at the corresponding edge of the boot shape,
with top/end edges aligned, and boot shape edge
overlapping tab to align precisely at perforation bend;
adjust strip to match edge end and bend angle, and join.

14. Continue the joining sequence by adding adhesive
to the next segment of boxing strip, then position and
join to panel edge.

15. Repeat the alignment and attachment steps
for the remaining edges tabs and panel edges
along the back strip. HINT: it may be helpful to
add adhesive to a couple of tabs, align as group
before attaching, which may assist with alignment.

NOTE: it is also helpful to place the assembly face side
down on flat surface to apply fingertip pressure along
the tabs of the seam to assist with secure attachment.

16. Prepare to attach the next (bottom) strip by
making sure the circle ends are being joined, then . . .

. . . slip the end tab of bottom strip under the end
of attached back strip, center and attach.

17. Position and attach bottom strip tabs along panel
edge in the same manner as before, until all edge tabs
are attached in place.

18. Position front strip lower end to end of bottom (toe)
strip by slipping tab under joined strip end,
align perforation with straight edge, and attach in place.

19. Position strip edges to overlap panel front tabs
to perforation edge, and join along the three edges.

NOTE: the top "tongue" end will extend above
the panel's top edge as shown.

20. Repeat steps 14-19 to position and attach
the opposite side panel to boxing strip tabs
all around. NOTE: it will be particularly useful to
reach finger(tips) through access openings in panels
to be able to align and apply pressure to seams.

21. Position each left or right decoration assembly onto
the corresponding edge of inner vessel assembly . . .

. . . using lacing holes to register position (take care
that these holes in all layers align as precisely as possible)
and also aligning vessel edges at/within guide marks
on inner edge of layered panel stack; also make sure
bottom straight edges of panel stack and vessel
align so that boot will sit flat on surface when completed.

22. Repeat step 21 to position and attach the second
boot assembly to vessel.

Here is the completed boot box.

22. Thread a 1 to 1.125 yard length of cord, lace
or soft ribbon on a long needle, then thread through
bottom lacing holes AND through vessel at the same time,
center ribbon length, then continue lacing as desired
up the sequence of lacing holes. Knot and tie bow
at top as desired.

The sample project includes painted wooden balls
or beads attached to ribbon ends.

The separate design "Jingle Bell 3D Holly Sprig"
can be assembled and attached at boot's toe
by threading attachment cord or twine through bell's
top punch tab and then through the pair of holes
at boot toe.

KRINGLE KISSES TAG
Tag can be an additional embellishment to boot.
Tag can be an additional embellishment to boot.
23. Identify and cut the shapes:
A tag base layer
B inner layer (shows through oval opening of front)
C front layer
D "kisses" stencil cutout underlay contrast
E chocolate kiss underlay contrast
F chocolate kiss shape with "plume" strip
G kringle word cut out
H holly leaves pair top and underlay
I berries welded trio base plus 2 separate circles

24. Complete press assembly:
A. layer and attach holly with contrast underlay;
B layer separate berry circles onto trio base;
C. bend plume strip at angle perforation marks;
tuck bottom edge under kiss edge and attach.

25. Position inner tag layer behind front panel
so that hang holes at top align precisely,
with narrow offset edges all around.

26. Position bottom contrast panel into window
and attach.

27. Position and attach front/inner assembled layers
onto front of tag base, aligning hang holes, etc.

28. Position and attach the heart contrast circle
into recess window, then position and attach
choc kiss assembly, centered, in oval window
so that heart has contrast show through appropriately.
NOTE that plume will extend above oval frame.

29. Position and attach holly at lower shaped
edge of front panel where edges will match, then . . .

. . . position and attach berries assembly
where edge shaping suggests.
30. Position and attach the "kringle" word cutout
as shown.
Here is the completed tag.

Attach tag in position desired on boot, as desired.

No comments:
Post a Comment