
Celebrate
the Easter season message with this elegant flourish
5x7 top-fold card with
dimensional left and right tipping lilies.
Leaf and vine flourishes are cut out
of front accent card panel
with subtle sunrise at center top.
Second front
panel layer includes “PEACE” stencil cutout.
“Easter” script word cut out is
layered over stencil cutouts.
Third front panel provides contrast to show
through stencil letters.
A rolled lily with leaf is placed on diagonal
attached
at each upper corner.
ASSEMBLY: 1. Identify and cut the shapes:
A card base with horizontal center perforation
B front rounded corner "contrast" panel no. 3
C front accent panel no. 2 with stencil-cut PEACE
D flourish edge front panel no. 1
E "Easter" word cutout

For following lily dimensional bloom shapes,
F-I shapes will be cut as one left set, one right set
(right set shown)
F lily petal shape G sepal base coneH stamen accent I leaf accent

2. Position and attach the panel layers in order,
with narrow offsets all around, except that flourish layer
should be positioned with side and top edges offset with
even margin (bottom edges fall slightly above same margin width.

are positioned and attached onto panel no. 3, and . . .
 . . . finally the front panel three-layer assembly is

positioned and attached to the "front" panel of
the base shape, folded in half at perforation line.
3. Position and attach the "Easter" word cutout,
roughly centered, overlapping the stencil word slightly.
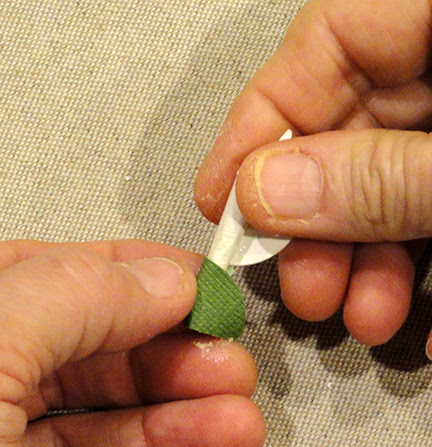
 4. Prepare the lily petal by using a very narrow rod-shaped

tool such as this needlework hook handle/shaft to
A) add forward curl to the broad part of the petal, and . . .

. . . B) tightly curl, then roll the narrow end of petal,
curling inward until the bottom notch is reached.

spiral (shown by the position of the rolling rod, here)
to form the whorl of the blossoming lily.
 5. Remove the rod, then continue to work the spiral roll

so that it is as tightly rolled as possible at the bottom tip . . .

. . . with whorl approaching the same tangent as petal tip.

add a discrete dab of quick-grab clear adhesive
at the base of the spiral.

6. Prepare the sepal "cone" shape by curling in a pivoting
manner, working the rod tool from bottom center tip
in a fanning motion to begin the suggestion of cone shape.
NOTE the textured cardstock used for the sample flowers
separated into two "ply's" and only top ply was used
to complete the lily.

7. Add a dab of clear quick-grab adhesive to the tip of lily spiral,
then position the cone with arched edge upward,
so that the lead edge will fall along blossom center back.

Continue to roll cone around the tip, and glue the cone in position
as it is wrapped around to back, then . . .
. . . overlap at back.

Trim excess cone neatly along back, and smooth
edge into place as necessary.

8. Add a dab of quick-grab glue to the bottom tip of
stamen strip, then insert into the whorl spiral center
inside the blossom, push downward until top tip is
in desired position, then hold in place until secured.

9. Apply glue along the back "spine" of blossom assembly,
then position and attach along the lower inward edge
of leaf accent, as shown.

Here is the completed right blossom.
(Left blossom is created as mirror image.)

10. Position and attach lilies in place into card's
front panel, roughly in the positions shown.

Here is the completed card.

No comments:
Post a Comment