
Large gift deluxe gift box has crossed
streamers,
pairs of large and medium joined-strip loops
and a center large brad
for a stunning box-topper
for gifting or display.
Measures approx. 6.5"
wide x 6.75" long x 1.75" tall.
ASSEMBLY: 1. Identify and cut the shapes:
A streamer shape (2)
B large loop halves (4)
C medium loop halves (4)


 5. Form the loop strip unit into its final shape
by bringing rounded ends toward center,
one at a time, aligning punch holes, and
gluing the area around the holes into position.
Complete this step for all loop units.

 7. Position the second large loops unit
over assembly at appropriate angle
as shown, and glue in place.
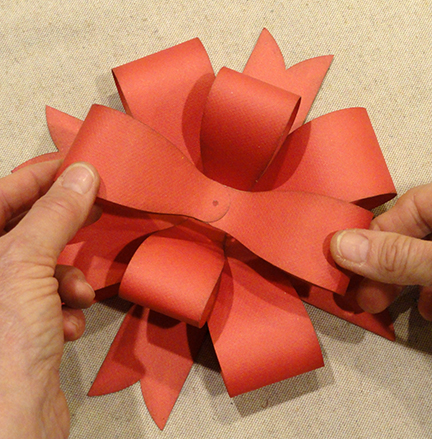
8. Flatten the loops slightly - use gentle, steady
downward palm pressure, taking care
NOT to form creases at loop centers.
This will allow medium loops to sit in place better.
 9. Position the first medium loop over the
assembly, aligning directly over the steamer
beneath, and attach in place.


A streamer shape (2)
B large loop halves (4)
C medium loop halves (4)

2. Position the streamers into "X" form with
center punch holes aligned, and side edges
lined up at guide dash marks.
Glue the overlapping surfaces together.

3. Join the strip halves together at the squared
ends by overlapping to line up punch holes,
with side edges also aligned.
Complete 2 large loop units and 2 medium loop units.

4. Add some curl to the center only portions
of each loop "half" by running the loop over
a barrel-like tool such as this tailor's pencil
or dowel, while applying thumb/finger pressure
(think curling ribbon).
It may require more than one pass across
the tool to achieve the regular, even curl desired.

by bringing rounded ends toward center,
one at a time, aligning punch holes, and
gluing the area around the holes into position.
Complete this step for all loop units.

6. Position the first large loop unit over the streamer
base with punch holes aligned (here and
throughout), with the loop at the 45 degree angle
that places it halfway between streamer extensions,
and glue in place where surfaces overlap.

over assembly at appropriate angle
as shown, and glue in place.
8. Flatten the loops slightly - use gentle, steady
downward palm pressure, taking care
NOT to form creases at loop centers.
This will allow medium loops to sit in place better.

assembly, aligning directly over the steamer
beneath, and attach in place.

10. Position and attach the final medium
loop assembly. Flatten the medium loop
ends in similar manner to flattening
of larger loops in step 8, for a uniform look.
11. Insert a medium or oversize brad through
the center hole punches, bend and tighten
prongs on backside.
Dimensional double bow is now complete,
ready to attach to package or decoration.


