Showing posts with label bow. Show all posts

Sunday, January 6, 2019

Bow 3D Wavy Lattice Overlay

Unique dimensional bow decoration has lattice overlay 
loops shape, solid base loops shape, 
double-point ends streamer layer. 
All layers are connected with center brad hole. 
Large size bow is perfect for decorating paper craft 
or floral projects, gifts and more, measuring 
approx.  5.5" wide x 3.75" tall (with both streamers). 
Smaller version is sized to work as a bowtie 
for "Snowman 3D Ball Head" project with 
two stem lengths for easier attachment to head. 


ASSEMBLY: 1. Identify and cut the shapes:
A main bow loops
B wavy lattice overlay
C top streamer
D bottom streamer
2. Bend the loops forward slightly at the center dash
cuts near middle and at ends.
Do this for the overlay also.
3. Add some curl to the fattest part of the loops
of main shape, and . . . 
. . . to the lattice overlay.
4. Curve the loops back, one at a time, to bring
the end punch hole/tab to line up behind
the center front, and glue all layers in place.
5. Position and attach the overlay center to
the center of the main whole shape, with
center punch holes lined up.
6. Curve each loop toward back as with main loops
shape, to line up the back tabs and punch holes,
and glue all layers together to connect at center only.
7. Position the loops unit at center front of
top streamer with punch holes lined up, and
attach in place (or wait and use brad to connect).
8. Position bottom streamers shape behind
the other assembly, and attach in place.
OR . . . 
. . . insert a regular size brad through the center
punch hole to join layers.
9. For the bow tie for Snowman ensemble, 
cut the smaller main and overlay shapes,
(omit the lower streamer shape)
and connector stem strip,
then follow steps 2-7 to prepare bow.
Insert the mini brad through all layers,
but don't bend the prongs back yet.
10. Bend the stem ends back at the inner perforations
and forward at the outer perforations as shown
on this picture.
11. Position and attach the connector
behind the bow assembly with center punch holes
lined up.
12. Insert the mini brad from bow assembly front,
bend prongs back toward sides, then bend
the stems inward so that the short segments
of each lay flat next to bow back and glue
to attach.
13. Align the long segments of stem back to back
and glue together.
14. Bow tie is attached to the snowman head
shortly after the head is attached onto
the post by inserting the stem extension between
head and top rosette layers.
Here is the completed (large) bow.


Sunday, December 17, 2017

Bow 3D Double Loops

Large gift deluxe gift box has crossed streamers, 
pairs of large and medium joined-strip loops 
and a center large brad for a stunning box-topper 
for gifting or display. 
Measures approx. 6.5" wide x 6.75" long x 1.75" tall. 

ASSEMBLY: 1. Identify and cut the shapes:
A streamer shape (2)
B large loop halves (4)
C medium loop halves (4)
2. Position the streamers into "X" form with
center punch holes aligned, and side edges
lined up at guide dash marks.
Glue the overlapping surfaces together.
3. Join the strip halves together at the squared
ends by overlapping to line up punch holes,
with side edges also aligned.
Complete 2 large loop units and 2 medium loop units.
4. Add some curl to the center only portions
of each loop "half" by running the loop over
a barrel-like tool such as this tailor's pencil
or dowel, while applying thumb/finger pressure
(think curling ribbon).
It may require more than one pass across
the tool to achieve the regular, even curl desired.
5. Form the loop strip unit into its final shape
by bringing rounded ends toward center,
one at a time, aligning punch holes, and
gluing the area around the holes into position. 
Complete this step for all loop units.
6. Position the first large loop unit over the streamer
base with punch holes aligned (here and
throughout), with the loop at the 45 degree angle
that places it halfway between streamer extensions,
and glue in place where surfaces overlap.
7. Position the second large loops unit
over assembly at appropriate angle
as shown, and glue in place.
8. Flatten the loops slightly - use gentle, steady 
downward palm pressure, taking care
NOT to form creases at loop centers.
This will allow medium loops to sit in place better.
9. Position the first medium loop over the
assembly, aligning directly over the steamer
beneath, and attach in place.
10. Position and attach the final medium
loop assembly. Flatten the medium loop
ends in similar manner to flattening
of larger loops in step 8, for a uniform look.
11. Insert a medium or oversize brad through
the center hole punches, bend and tighten
prongs on backside.
Dimensional double bow is now complete,
ready to attach to package or decoration.


Sunday, November 20, 2016

Candle 3D Stand for 3 Inch Pillar Candle

Traditional clam shell filigree panels 
adorn this simple tapered candle stand 
with slightly recessed tray top to hold 
a 3" diameter pillar candle (or narrower). 
Panel angles are reinforced with "leg" strips underneath. 
Adorn front panel with separate 
"holly leaf 3d bow sprig" design, if desired.
(Tutorial included at the end of candle stand step 12.)
 Measures approx. 3.5" tall x 4" wide at base. 

ASSEMBLY: 
1. Identify and cut the shapes for the stand:
A front panel with top platform
B sides and back stand panels
(NOTE that these shapes are also
presented in two sections in the cut file,
for smaller capacity cutting situations.)
C accent panel overlays (4)
D top platform reinforcements (2)
(NOTE that the 'X' has been eliminated)
E under-leg reinforcement strips
(The unmarked shapes have been
eliminated in the final design.)
If preparing the bow and holly embellishment,
cut these shapes, too:
A left and right bow loops base
B left and right bow overlays
C bow streamers
D right holly leaves   E left holly leaves
F berry base with three berries
2. Position and attach one panel accent "legs frame"
shape around the clam shell panel.
NOTE that accent inner edge corners will
align with corresponding "corners" edge of
each panel.
3. Prepare front and side/back panels by
bending back on vertical perforations and tabs,
also bend top tab perforations upward,
next inner rim perforation back.
4. To prepare RIM for platform, apply glue
under the "rim flange" portion of the folded area
at top of each panel . . . 
. . . then applying pressure along the rim edge,
leaving the tab flange unattached.
Complete the "rim" gluing for each of the panels . . .
. . .including the front which will be 
completed later (see step 9), where the "flange tab"
is actually the stand platform.
5. Prepare the reinforcement layers
by aligning edges and joining.
NOTE that it may be helpful to press these
under a flat weight during the joining process.
6. Position the reinforcement (X cut eliminated)
on the underside of the front panel platform,
centered to offset the same margin at all edges,
and glue in place.
7. Join the front with other panels at the
side seam, overlapping the straight edge at 
the corresponding tab perforation line.
8. Form the assembly into a tube to
complete the final side seam.
9. Complete the front panel's rim gluing at this
point, applying adhesive at the rim underside,
then bending into position to apply finger
pressure all along until the joint is completed.
10. Apply adhesive to the sides and back rim
flange tabs (these should be bending inward
and perpendicular to the tabletop), then . . .
. . . bend the platform into position
between all rims. NOTE it may be
helpful to use a blade tool such as this
spatula to ease the edges into their snug fit.
Turn the assembly upside down to access
and apply pressure (fingertips underneath)
along the platform-to-flange seams.
11. Prepare the leg reinforcement strips
by bending forward along the perforation.
NOTE the "top" of the strip is marked
with a tiny up arrow 'V' cut.
12. Apply glue to the backside surfaces
(this image may look like glue is applied
to the inner surfaces - but it should be backside),
then . . .
. . . position behind each leg angle, pushed
upward so that the bottom edges of strip
and panel align.
Place the candle onto the platform,
within the raised rim.
HOLLY LEAF 3D BOW SPRIG
If preparing this embellishment,
cut these shapes too 
(repeated here for easy reference):
A left and right bow loops base
B left and right bow overlays
C bow streamers
D right holly leaves   E left holly leaves
F berry base with three berries
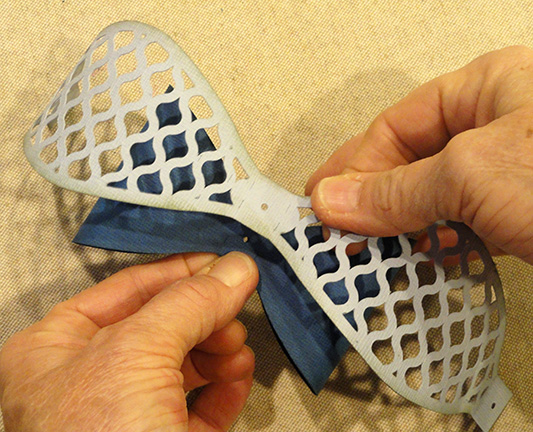
1. Add some curl to the center portion of
each bow loop shape . . .
. . . and to the overlap loop shapes.
2. Position and glue both ends of the overlay
to the face of the main loop shape ends.
Complete for both loops.
This is how the loop assembly should appear.
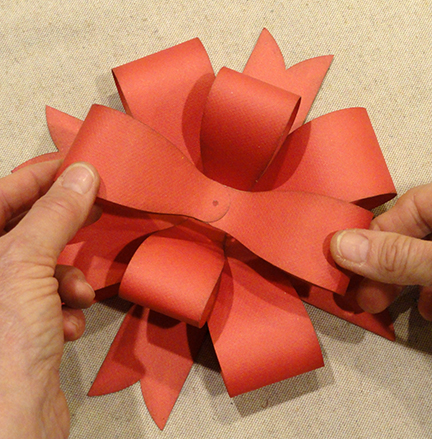
3. Position and attach the "back" end of each
loop, one at a time, behind the streamer shape,
using punch holes as alignment marker.
4. Bend - but do not fold - each loop outer end
inward to position and attach over the
previous punch hole position.
5. Add some back curl to the center portion
of each of the holly leaves.
Also add some upward curl at the tip.
This is how the "curled" leaves should appear.
NOTE that the left or right leaves have a
slight curve downward.
6. Position the left or right pairs of leaves
one on top of the other, and angled artistically
with punch holes aligned, and glue
together where the surfaces touch.
7. Position each pair over the bow assembly
and glue the stem area around punch dot
in place.
8. Position and attach each of the 3 berries
over the berries base.
9. Position and attach the berries assembly
over the leaf stems. with all punch holes aligned.
Here is the completed assembly,
with brad inserted (or stud positioned)
over the punch hole.
Position and glue (quick grab glue such as Fabri-Tack
recommended) the bow assembly over the
punch hole location on the stand front panel.
Here is the completed stand with bow embellishment.
Shown here with pillar candle.
Stand with embellishment shown
as table centerpiece with
"Folded Star Sprigs 3D Wreath".