
The April Calendar Graphica banner quilt
in the year-long series is now available
as a cut file from SnapDragon Snippets
through the Silhouette America online store.
CONSTRUCTION TIPS:
 Refer to the other "Calendar Graphica" banner quilt tutorials for other basic steps.
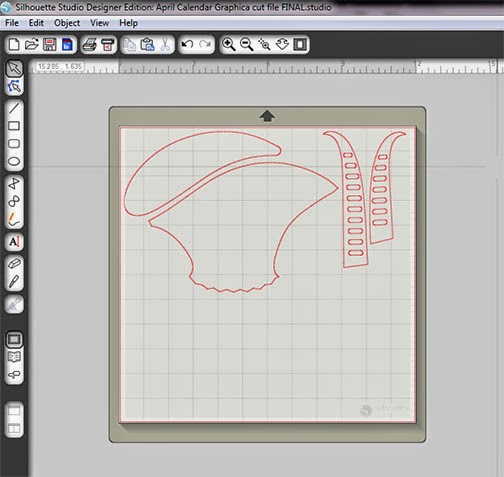
1. After downloading and opening the file in Studio, ungroup then move the shapes into the groupings that will be cut from the same fabric. Cluster these in a "cutting-efficient" arrangement, with a little margin around each. Then use the "reveal mat" feature in the Page drop-down menu to figure out how bid to cut the piece of fusing and fabric for this set of shapes.
Here, I can count the one-inch grid squares to determine than my fusing and fabric need to be about 7.5" x the width of my mat (12"). I usually make sure there is about 1/4" margin between the shapes and the edge of the cut fabric/fusing panel.

2. Cut the piece of fusing to the size figured in Step 1, then fuse it efficiently to the backside of the corresponding fabric.
3. Trim the fabric even with the fusing paper backingb edges (rotary cutting equipment is great for this).

4. Place the prepared fabric panel onto the mat to correspond with the positioning of the shapes on the screen mat. (In this case, the shapes cover the entire width of the mat.) Smooth it and make sure it is evenly attached.
5. "Send to Silhouette, and make all the necessary adjustments before pressing "CUT". The settings I prefer are "fabric cotton print" with the blade depth adjusted on-screen to 4, and the blade itself ratcheted to 4, too.

6. Carefully weed the excess fabric, then use the spatula tool to lift the cut applique shapes from the mat, taking care not to stretch them.
Repeat the arranging, fabric prep and cutting for each cluster of shapes.

7. To fuse the "April" name panel, use the "panel stencil" shape in the cut file to cut a placement guide from paper or card stock. NOTE that it does NOT include the seam allowances, so center it within the panel's edges. Use a temporary marking tool to mark letter "openings" positions. OR, place the cut letter shapes within the openings, use a tiny tack iron to tack-fuse a portion of the letters so they will stay in place, carefully lift away the stencil, then thoroughly fuse the letters in place.


9. Use the Applique Pressing Sheet, if available, to pre-assemble the layered shapes from the bottom up, then carefully peel the assembled applique unit and position it as a whole onto the center panel. Make final adjustments, then complete final fusing in place.
Here the basket is being assembled on the Pressing Sheet.

Tulip heads . . .
 . . . and bunnies can also be pre-assembled on the Sheet.
For the bunnies: place the base (darkest fabric) shape first, then position the tummy and tail, then the "body" (front and back paws and middle), then head on top.
Position bunnies onto the panel with paws lower edges approx. 1.25" above the panel's lower cut edge. Position circles centered between as shown on completed image or thumbnail.
(Image to follow)
If the bunny eye circles seem to small to fuse and stitch, either leave the edges unstitched, or use the round end of a paint brush loaded with black acrylic paint to place a paint "tutti-dot" circle in the eye position.

10. Finish the exposed applique raw edges with over-edge stitching of your choice. I use a short & narrow machine blanket stitch with matching thread. For secure stitching, leave thread tails at beginning and end of runs, pull ends to backside and hand tie in double knots before clipping tails short.
11. (Image to follow)
Join upper and lower panels, then add narrow and outer borders to complete the top. My border widths are CUT: narrow 1" (to finish at 1/2") outer 1.75" (to finish at 1.25"). Layer with backing panel (cut a couple of inches longer and wider) and thin bat or drapery flannel. Smooth and pin layers, then complete machine quilting as desired, at border seams, at applique edges, and in background if or how desired. Trim and bind outer edge. Add hanging system sleeves. (See Steps 16-23 of the tutorial for January Calendar Graphica for details.
Tulip heads . . .
For the bunnies: place the base (darkest fabric) shape first, then position the tummy and tail, then the "body" (front and back paws and middle), then head on top.
Position bunnies onto the panel with paws lower edges approx. 1.25" above the panel's lower cut edge. Position circles centered between as shown on completed image or thumbnail.
(Image to follow)
If the bunny eye circles seem to small to fuse and stitch, either leave the edges unstitched, or use the round end of a paint brush loaded with black acrylic paint to place a paint "tutti-dot" circle in the eye position.
10. Finish the exposed applique raw edges with over-edge stitching of your choice. I use a short & narrow machine blanket stitch with matching thread. For secure stitching, leave thread tails at beginning and end of runs, pull ends to backside and hand tie in double knots before clipping tails short.
11. (Image to follow)
Join upper and lower panels, then add narrow and outer borders to complete the top. My border widths are CUT: narrow 1" (to finish at 1/2") outer 1.75" (to finish at 1.25"). Layer with backing panel (cut a couple of inches longer and wider) and thin bat or drapery flannel. Smooth and pin layers, then complete machine quilting as desired, at border seams, at applique edges, and in background if or how desired. Trim and bind outer edge. Add hanging system sleeves. (See Steps 16-23 of the tutorial for January Calendar Graphica for details.


