Showing posts with label wreath project. Show all posts

Wednesday, June 4, 2014

Bunting and Stars Patriotic Swag

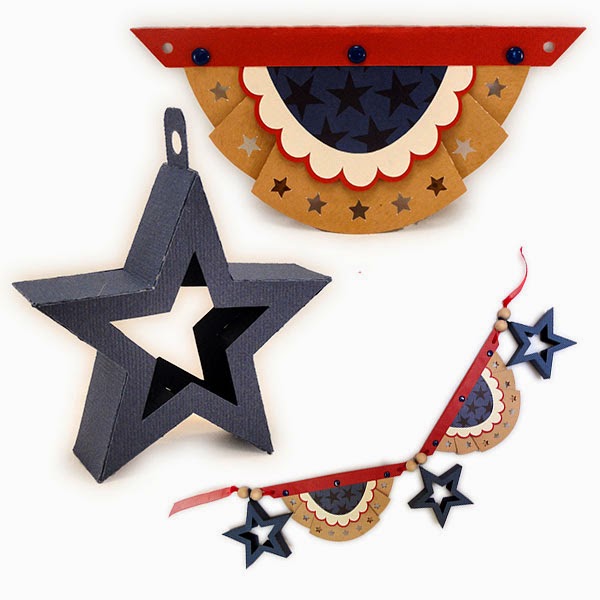
Festive elements to use in combinations for wreath or patriotic swag.
Cut files include the larger bunting semi circle as shown here
which measures approx. 3.6" x 8", 
or a smaller version measuring approx. 2.75" x 6.125"
(slightly different top band design).
3d see-thru star ornament measures approx. 3" across,
and is provided in a 1" depth and a .6" depth.
Two top hanging methods for each: inserted tab with punch hole,
or paired punch holes in boxing body near top point.
Cut files available soon for purchase and download
from SnapDragon Snippets through SVG Attic
and the Silhouette America online store.

ASSEMBLY:
 1. Identify and cut the pieces. At left are the 5 pieces required for ONE swag unit (this is the large size). At right are the 5 pieces required for ONE "thick" star with slot hanging tab.
BUNTING ASSEMBLY
2. Fold the bunting on the perforation lines, beginning at the two nearest the center as "mountain" (back-to-back) folds, the work toward the sides folding in alternating order as "valley" (front-to-front) folds, mountain, valley. 

When folding is completed and pleats are flattened, the top edge should align in a straight edge.


3. Apply a little glue inside each pleat near the top of the bunting only. Re-align pleats and flatten as in image for step 2, and hold in place while applying pressure until glue is secure.


4. Layer the three decor pieces, then position and glue centered at the top of the folded bunting.


5. Fold top band, apply adhesive on inner (underneath) surfaces of both halves.

Center and place over top of assembly, aligning center hole and if possible, side holes. (Because of the variety of paper thicknesses that can be chosen for this project, the side holes may or may not line up exactly.)


6. Use sharp tool like this awl to punch through layers to create holes to match the band front and back holes. 

 7. Attach decorative brads (regular size) through the three holes. 

NOTE that end holes are for hanging the bunting into a swag, using string or ribbon, etc.


3D STARS ASSEMBLY

This image compares the two star styles included in the cut file. The blue one is deeper (thicker) and has a separate hanging hole tab that is inserted through a slot in the wider star boxing strip at top.

The red star is more shallow, and has a pair of punch holes for threading ribbon or string.


 8. Bring top ends of pair of left and right boxing strips together, and overlap the straight edge over the tab end that includes the slot, but make sure most of the slot still shows. This creates one long strip.

Fold the strip at the perforations to match the star shape. Fold tabs back.


9. Fold hang hole tab in half at center, then fold tabs away. Glue center surfaces together.

Insert tab from backside of boxing through the slot, stopping at the end tab perforations.


10. Glue the tabs in place on the backside of the boxing.


11. Align the first star upper edge with the perforation angle on one side of the top point. Apply glue to the tab, position and hold in place until glue is secure. Make sure that the angle perforation of the boxing and the angle of the star front correspond accurately.


12. Fold boxing to align edge with next star front edge and repeat the process to glue the tab behind the star.


13. Continue to work around the star side to join each segment with a star point edge. Complete the second side of the star, but see the next image before final side is attached.


14. As the final side is positioned to be glued, also prepare the end tab to be joined to the opposite boxing end.


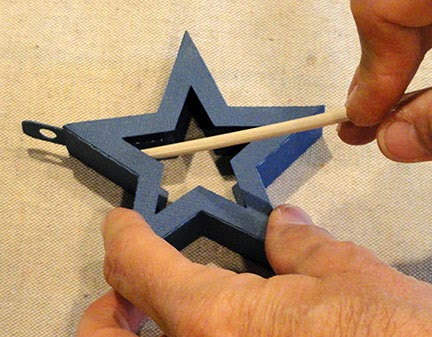
Assist the gluing process by using a skewer or similar long narrow tool inserted inside the star openings and positioned behind the area being glued, so that fingers have something to press against to help seams join.


15. Add the back star shape to the boxing tabs in similar fashion.


Here is the completed thick tab hole star.


Here is a completed section of the swag. I have used 1/2" wide sheer red ribbon threaded through the bunting end holes, strung behind the swag band, then through a wooden unfinished bead on each side of star hang hole tab, then through the next swag unit.


Here is wreath project that uses 
the shallower star and smaller bunting swag unit . . .

... and the whole wreath looks like this.


Monday, January 27, 2014

"Wonderful Winter" Wreath Project

 Paper-cut dimensional and regular elements find a perfect home
in this multi-materials wreath project. 
Scroll thru the construction process and read about the fun elements
and the "found" fixin's that make this chock-full decoration so visually interesting.
Part of the fun was gathering materials and accents that I already owned,
then creating something that looks so rich for under $15 of actual expense.
(The burlap ribbon was the most expensive single item purchased "new",
even though there are trimmings that would have cost $45; 
many items were "cast-offs" or left-overs from other projects and jobs.)


My wreath began with a plastic-wrapped straw base form found at a thrift store for $1. "Greenwrap" recycled paper webbing for mail shipping that I had on hand was cut into long strips, scrunched, then wrapped and hot-glued in place as the foundation covering.


Here is the pre-performance collection of completed elements that I created or assembled for my wreath. Details are shown in following pics. As I envision, plan and then finally execute a wreath project like this, the collection and prep process is BOTH the best and worst part. It is exciting to hunt and find, but all the time I am impatient to actually get into the project.


Tiny pinecones gathered during my autumn "Thanksgiving Point Garden" walks were wire-mounted into bamboo skewers, immersed in gesso base coat, dried, then top-coat dipped in colored acrylic paint. Here you can see one cone inserted into a deep plastic cup then "spun" by rolling stick briskly between my palms to remove excess paint. When dried, the cones were sprayed with adhesive and sprinkled with crystal glitter to make them sparkle as though just kissed by Jack Frost. 
(Skewers help with the painting; wires remain attached, unwrapped first from sticks.)
In this prep step I turned deep-discount Christmas tree glass mini ball ornaments into "woolly snow blossoms". A searched blog post shared information about cutting 5-petal flowers from wool felt, pre-clustering the petal shape with needle and thread, then joining these into dimensional blossoms. I modified the process to use four of these cut shapes clustered around the ball stem (removed the metal cap/hanger). For Silhouette users, find a petal shape in the online store or your library, or email me a request for the one I created and I will send it by email as a pdf file or svg. file per your request.

Now the details: "Wonderful Winter" (created with this project in mind) is available from SnapDragon Snippets. Three layers were cut and joined, then edge "antiqued". I cut chipboard duplicate base shapes, threaded faux silk ribbon between as these were glued, then attached ends to each side of the wreath. The string of snowflakes are metal "found" shapes I already had, mounted on an offset shape created with the "trace" feature in Designer Studio (traced the metal flake shape) with added holes for the string, with beads between.

Wanting to "cameo" this dimensional snowflake was at the idea genesis for this wreath. Snowflake is also a SnapDragon Snippets cut design.

This image shows the cream bulap ribbon that was the second wrap layer, on top of the brown paper web. The next wrap layer was cream colored faux silk ribbon loop "fringe" that was a contracted sewing project "left over" that suited this project well. You can also see the silver glitter ball pick cluster wrapped in leftover pleated trim, sequin glittered branch tips (under snowflake) from a deep-discount after-Christmas bin.

In this photo, you can see the finished woolly blossom, and also the "extra" ball blossom created from flattened and clustered mini-cup pleated papers (think cupcake paper cups, only smaller) that were used to finished the sixth blossom needed for my three pairs (I ran short of woolly felt). 

At lower right, see the painted pine cone cluster that was tied with ribbon short lengths.


Here is a closeup of the miniature 3d skis and poles, a cut design also created with this wreath in mind.

Plastic Darice tiny snowflake ornaments show in this image (again left over from a decorative craft project).

At lower left a pinecone cluster peeks into the shot. Here you see the tiny "seed drop" stems clustered with the pinecone wires that were separated from a "closeout" pick in the seasonal bins at Jo Ann Fabrics.


The final featured dimensional design is this vintage ice skate. Below is a fabric covered button (again left over from other paid-for projects), made into a double rosette using left-over pleated ribbon trim, hot glued to a circle chipboard base.


Once again, the finished wreath.
Hope you are inspired and energized
to create your own wreath project.

SnapDragon Snippets cut designs available in the Silhouette America online store:
3d skis and poles miniatures
3d snowflake with triangle points
3d ice skate ornament
wonderful winter word art