Showing posts with label bunting. Show all posts

Sunday, June 18, 2017

America Bunting Swag Plaque

Large scale wall decoration features 
a header with "AMERICA" letters and folk stars, 
layered base shapes that connect 9 three-part 
bunting wedges (base layer add-on layer recommended 
for rigidity),  folk star accents in two sizes, 
and 22 decorative brad accents. 
Layer multiple shapes for reinforcement and rigidity. 
Measures approx. 19" wide x 12.25" tall. 
Pop-out hanging brackets with reinforcements 
integrated for easy ribbon hanging. 

ASSEMBLY: 1. Identify and cut the shapes:
A main header FRONT base (3)
B side FRONT header extensions (2 sets of 3)
C & D header side BACK sections (3 left, 3 right)
E & F plaque fronts with letter guide marks
G hang tab reinforcements (for pop-up tabs in C & D)
H plaque trim strips (4)
I plaque accent stars   J letter accents
K & L bunting wedge upper layers
(include extra hang holes to connect to header)
M regular bunting wedge sets (7)
N wedge star accents (9)
2. For strength and heft, layer the header shapes
and glue together, aligning cut edges and brad
punch holes as precisely as possible.
If using liquid adhesive, be sure to apply flat
weights or something heavy over the whole shape 
to keep the assembly from warping or curling
during the drying process.
Here is the main FRONT header shapes . . . 
. . . the left and right BACK header shapes
(be sure to pop up the hang tabs on the top layer
and keep it from being glued flat) . . . 
. . . and the left & right  FRONT side extender "squares".
Shown here is one weight solution:
cast-off fabric covered weight bar from a broken
pulley-weights machine.
(It is being used on a built-up shape from
a different project.)
3. Prepare the tab reinforcement shapes by
bending forward on the middle perforation line
of each. Position over the corresponding
pop-up shape on the back of each of the side header
build up shapes, matching the rounded
upper edges, punch hole and perforation,
and glue in place.
NOTE that the more attractive card stock face
of these BACK side panels is selected
to be the backside of the plaque.
4. Prepare each half of the plaque (face plate)
by positioning a trim strip at top and bottom
edge of each.
5. Identify the LEFT panel by locating the 'L'
cut at the left end of the lead panel that
eventually will be hidden under the left star accent.
Position the left and right panels side by side
and face down on work surface, butt the center
edges together tightly with top & bottom edge
aligned, and secure temporarily with a piece
of cello or other thin tape.
For reference, here are the plaque face shapes
with the 'L' guide mark and the star- and letter-bottom
guide marks shown.
NOTE that the front edge of the 'R' will
line up with the center joint.
6. Position and attach the star and letter accents
onto the plaque panel assembly.
7. Assemble the header by positioning and attaching
the BACK left and right panels behind the main 
FRONT panel, lining up top edges and
corresponding brad punch holes of each.
8. Position and attach the FRONT extension units
to the sides of the main FRONT panel, lining up
top and outer side edges.
9. Position and attach the AMERICA plaque
over the header assembly, lining up top and
side edges.
10. Prepare the 7 regular swag wedges by layering
and attaching together the sections as shown,
taking care to line up corresponding outer cut
edges and punch holes.
Also prepare the left top and right top wedges
(identify these by their extra top edge
attachment holes).
11. Position and attach an accent star into
the corresponding recess cutout on each wedge.
12. Lay out the left & right upper, 7 regular wedges
over the downward arch
of the header assembly, lining up the corresponding
brad punch holes.
Remove, apply adhesive, then re-position and
attach each wedge in place.
NOTE that there is a slight margin of space
between each wedge,
and that punch holes of left & right upper wedges
line up with corresponding holes on MAIN header.
13. Insert 22 contrast regular size brads
at all punch holes (reinforcement connectors
and accents).
14. Attach ribbon or twine hanger through
the punch hole pop-out tabs on backside.
Here is the completed swag plaque.


Wednesday, June 4, 2014

Bunting and Stars Patriotic Swag

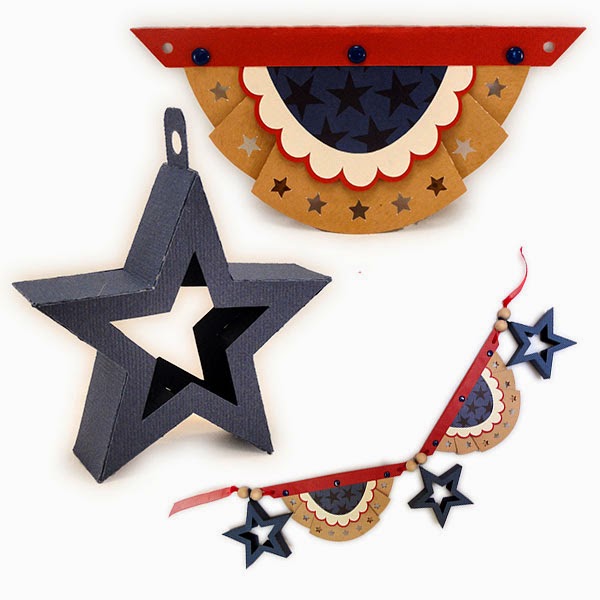
Festive elements to use in combinations for wreath or patriotic swag.
Cut files include the larger bunting semi circle as shown here
which measures approx. 3.6" x 8", 
or a smaller version measuring approx. 2.75" x 6.125"
(slightly different top band design).
3d see-thru star ornament measures approx. 3" across,
and is provided in a 1" depth and a .6" depth.
Two top hanging methods for each: inserted tab with punch hole,
or paired punch holes in boxing body near top point.
Cut files available soon for purchase and download
from SnapDragon Snippets through SVG Attic
and the Silhouette America online store.

ASSEMBLY:
 1. Identify and cut the pieces. At left are the 5 pieces required for ONE swag unit (this is the large size). At right are the 5 pieces required for ONE "thick" star with slot hanging tab.
BUNTING ASSEMBLY
2. Fold the bunting on the perforation lines, beginning at the two nearest the center as "mountain" (back-to-back) folds, the work toward the sides folding in alternating order as "valley" (front-to-front) folds, mountain, valley. 

When folding is completed and pleats are flattened, the top edge should align in a straight edge.


3. Apply a little glue inside each pleat near the top of the bunting only. Re-align pleats and flatten as in image for step 2, and hold in place while applying pressure until glue is secure.


4. Layer the three decor pieces, then position and glue centered at the top of the folded bunting.


5. Fold top band, apply adhesive on inner (underneath) surfaces of both halves.

Center and place over top of assembly, aligning center hole and if possible, side holes. (Because of the variety of paper thicknesses that can be chosen for this project, the side holes may or may not line up exactly.)


6. Use sharp tool like this awl to punch through layers to create holes to match the band front and back holes. 

 7. Attach decorative brads (regular size) through the three holes. 

NOTE that end holes are for hanging the bunting into a swag, using string or ribbon, etc.


3D STARS ASSEMBLY

This image compares the two star styles included in the cut file. The blue one is deeper (thicker) and has a separate hanging hole tab that is inserted through a slot in the wider star boxing strip at top.

The red star is more shallow, and has a pair of punch holes for threading ribbon or string.


 8. Bring top ends of pair of left and right boxing strips together, and overlap the straight edge over the tab end that includes the slot, but make sure most of the slot still shows. This creates one long strip.

Fold the strip at the perforations to match the star shape. Fold tabs back.


9. Fold hang hole tab in half at center, then fold tabs away. Glue center surfaces together.

Insert tab from backside of boxing through the slot, stopping at the end tab perforations.


10. Glue the tabs in place on the backside of the boxing.


11. Align the first star upper edge with the perforation angle on one side of the top point. Apply glue to the tab, position and hold in place until glue is secure. Make sure that the angle perforation of the boxing and the angle of the star front correspond accurately.


12. Fold boxing to align edge with next star front edge and repeat the process to glue the tab behind the star.


13. Continue to work around the star side to join each segment with a star point edge. Complete the second side of the star, but see the next image before final side is attached.


14. As the final side is positioned to be glued, also prepare the end tab to be joined to the opposite boxing end.


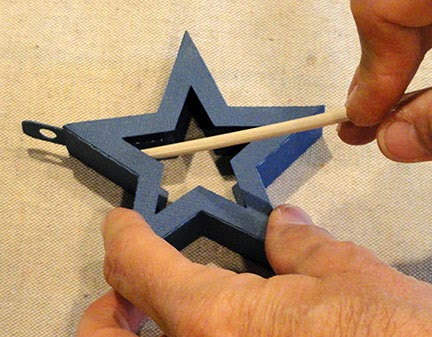
Assist the gluing process by using a skewer or similar long narrow tool inserted inside the star openings and positioned behind the area being glued, so that fingers have something to press against to help seams join.


15. Add the back star shape to the boxing tabs in similar fashion.


Here is the completed thick tab hole star.


Here is a completed section of the swag. I have used 1/2" wide sheer red ribbon threaded through the bunting end holes, strung behind the swag band, then through a wooden unfinished bead on each side of star hang hole tab, then through the next swag unit.


Here is wreath project that uses 
the shallower star and smaller bunting swag unit . . .

... and the whole wreath looks like this.


Saturday, December 29, 2012

WINTER Tag Swag

Re-awakening my creativity after 
the hustle and clutter of a passing Christmas, I styled and created 
a paper and ribbon swag with my brand new Cameo from Silhouette. 
Since it is always a little melancholy to dismantle the holiday decor, 
having something new brings a fresh batch of cheer.

It measures about 36" from "nail to nail", and about 12" at the longest "drop" point.

To request a detailed list of the shapes used, size modifications, 
embellishment suggestions, etc., 
email Jodi at hearthsewnpatterns(at)yahoo(dot)com.


 Here you can see more detail. The WINTER layered tags(in 3 sets) plus "winter" phrase are from Snapdragon Snippets designer Kenzie Daley, as well as the 3d drop ornament "icicles" and jingle bells. Other 3d embellishments include the 3d snowflake at the center (converted by me into a "slice form", front half only), and the pinecone that was recently offered as a free shape from Silhouette America.


Another snowflake design highlights the E tag with its added oval of corrugated brown paper, with fanfold cut paper rosettes giving dimension to the W & T tags. White and silver netting are sewn and gathered into rosettes for N & R. Plastic snowflakes, multiple size circles are glued onto sheer and satin ribbons.


 I couldn't resist adding here a few photos to show more details. Lots of ribbons, surface textures, glitter, and interesting added findings (fancy word for things that I have in my studio waiting to be used). Here you can see the paper rosette, wood bead bauble, and slice-form-ized 3d snowflake.

Ribbon textures add so much: silver bead cord, woven "tape" cord, metalics, twill, shimmer sheers, brown jute. Never can add too much ribbon, do you think?!
 A closeup of the W end shows off the shiny cardstock used to cut the letters, along with a snowflake row that I sized, duplicated, overlapped the arms and then welded into a shape just for this project. A bookmark shape was also drawn and cut to place behind the rosette for a hang-hole and another tassel.

You can also see the jingle bell and pinecone better.


Here you can see the wonderful 3d drop ornament that made me think "icicle" the first time I saw it in the online store. To reinforce that notion, I created my own icicle shapes to hang along side. 

First I glued a miniature wood spindle shape to a round bead, attached a tassel in the bead end hole, and painted. Then I wrapped silver jewelry wire around the spindle, through a drill hole at the top and shaped it into a loop. 


You can see how "new" and interesting my paper and ribbon swag makes my usual "January" decorations seem. 
I love the red & green of the Christmas season. But having this much fun with aqua, milk chocolate & gray makes me want to re-decorate through the entire house!

You may think this a little bit "over the top" with so many details and embellishments. Just scale your own creation back and leave out elements you consider "extra".