Whimsical and not-so-spooky witch card
with multiple details can serve as
a Halloween greeting, or as seasonal decor.
Following are the assembly steps to help
you create this unique, shaped card.
ASSEMBLY: Identify and cut the shapes,
shown here with numbers for identification
in the tutorial steps that follow.
STEP A: Identify #1 card building silhouette - onto
which all the other shapes will be attached.
You can distinguish the difference
between #1 and#2 Card Front
because #1 is larger, including
an offset margin all around, except
the two shapes will have bottom edges lined up.
STEP G: Assemble the hat #15 unit by positioning
and attaching the hat brim at bottom (edges lined up)
and band right above it. Also attach star as desired.
NOTE that the hat perf line will be bent
when the card is completed, in order to allow
card to be fit into a 5x7 standard envelope.
STEP H: Position the hat (lower portion only)
over the card assembly so that brim side edges
and portion of hat shape line up, and attach.
STEP M: Position broomstick
assembly over the front of the card
as desired, and attach edges
that overlap card front and assembly.
ASSEMBLY: Identify and cut the shapes,
shown here with numbers for identification
in the tutorial steps that follow.
STEP A: Identify #1 card building silhouette - onto
which all the other shapes will be attached.
You can distinguish the difference
between #1 and#2 Card Front
because #1 is larger, including
an offset margin all around, except
the two shapes will have bottom edges lined up.
STEP B: Assemble dress #3 over
#1 Assembly Silhouette with
bottom edged lined up.
STEP C: Continue to add other clothing
parts, #4 lined up with bottom edges of
previous assembly. Position #5 so that
lacing ends cover punch circles.
Position #6 left and right cape shapes
over the assembly so that lower and
side edges match the building silhouette.
Position #7 clasp so that the ends of the
arc are centered over left and right stars.
Then position the clasp assembly
partway down the “collar” portion
of the spikey cape tops.
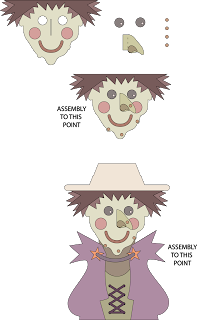
STEP D: Position hair #9A & #9B over
head with top edges aligned, side spikey
shaped edges matched up. Position cheek
circles and mouth and attach.
Also layer eye base “see-thru” under
colored pupil/accent eye shapes. Position
assembled eyes in eye socket holes.
Position nostril #12 on #11 dimensional
nose and attach. Add the “wart” punch
circles on the lower left cheek, at right
chin edge, and two other places as desired.
STEP E: Insert nose tab (#11) into face slot,
and glue in place to backside of head.
STEP F: Position the head unit over
the card front, centered, with spikey
hair, face sides lining up.
STEP G: Assemble the hat #15 unit by positioning
and attaching the hat brim at bottom (edges lined up)
and band right above it. Also attach star as desired.
NOTE that the hat perf line will be bent
when the card is completed, in order to allow
card to be fit into a 5x7 standard envelope.
STEP H: Position the hat (lower portion only)
over the card assembly so that brim side edges
and portion of hat shape line up, and attach.
STEP I: Prepare card back #16 by
bending at perforation so that
card back face are bending
toward each other.
STEP J: Position card back #16
on backside of card front
assembly, and glue ONLY
the upper portion above perf
line to card front back.
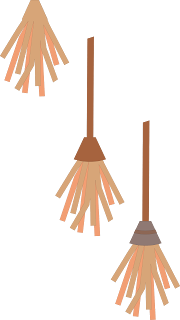
STEP K: Layer broom straw back #18 with
straw front #17 with top common edges lined up.
STEP L: Position and attach #19 broomstick
handle over top of straw assembly so
that bracket points line up.
Also add #20 bracket and #21 trim shapes.
assembly over the front of the card
as desired, and attach edges
that overlap card front and assembly.
Here is the completed card.


No comments:
Post a Comment