
many
holidays with customized coloration.
She is composed of outer and inner reinforcing hull.
Skinny arm tubes enclose 1/4”
wooden dowels
cut to size below threading holes,
with fold-over simple hands
that attach at bottom tab extensions.
Complex oval shaped head has multiple
wedge seams
and tabs, and fits onto the top of a hex tube-wrapped
1/4” wooden
dowel inserted through assembled
body hull and attached at bottom.
Arms are
attached with ribbon or twine and bead joints.
Brocade wings
have built-up layers on front,
aligned with small punch hole pair on back .
Tiny heart button and “halo” wreath layers add details.
Measures approx. 7.75” tall x 4.5” wide (wingspan)
x 2.35” deep
(at base) when assembled.
ASSEMBLY: 1. Identify and cut the shapes:
A main body hull B lower body hull
C post collar build up (7-8)
D bottom hull cover
E bottom hull top opening reinforcement
F post strip G arm tubes (1 l, 1 r)
H hand shapes
I body center accent overlay
J body side accent overlays (2)
K head front (face) L head back
M eye contrast underlay N opt. cheek stencil
O heart button build up (8)
P wing base and build up overlays (see next screen)

(NOTE that, except for main base,
the shapes are cut as left and right sets,
with 2 layers of each being cut.
(Petal interior circles and teardrop should be
retained from the petal cut, so that each will be
stacked in sets of 4 shapes.)

2. Layer and glue together the shapes that need
to be prepared so that they can be drying/setting
while other construction proceeds.
A. Stack and glue the post collar shapes,
taking care to align all cut edges as precisely as possible
(for this shape and all others), particularly at
the inside opening where post will need to fit.

NOTE: for glued-up shapes, it will be helpful
when using liquid glue to press them under a flat
heavy weight of some kind, such as the fabric-covered
re-purposed flat weight shown here.
It may take several hours for shapes to dry completely.
Pressing the shape stacks will help keep the flat,
avoiding warping and curling.

B. Layer and stack the heart button shapes.

3. Layer and stack the left and right wing shapes:
A. the main base (double-wide) shapes
and the left and right wing bases

B. leaf base and overlays

contour left and right, middle circles (4 ea.)
and tear drop (4)

D. the three swooshes

4. Assemble the wings (complete both left & right halves):
A. petal base with overlay shapes

petal base

(upper portion of outer edges aligned)

edges offset very slightly


aligning large rounded edge offset at lower portion . . .

G. insert circle and teardrop stacks into recesses

5. Position and attach the half assemblies onto
the double-wide wing base, with narrow offset
at edges.

6. Prepare the post wrap shape by carefully
bending back on all the long perforation lines.

of seam, insert the uncut 1/4" wooden dowel inside
the tube, then apply glue to backside of flange,
wrap straight edge over flange and force edge
to match up with the first perforation line, and
apply pressure all along the seam until it is
accurately attached and secure.

8. Push dowel in to be even with top edge,
mark bottom edge with pencil, then remove
and cut dowel to size with small hand saw tool.

9. Push dowel out one edge slightly, apply glue
to exposed dowel and to the inside of empty post tube
at opposite end, then re-position to attach tube to dowel.

on all segment perforation lines and side flange,
top tabs and top "lid". Also push back the top center
hex opening, then . . .

post opening of the main hull "lid" by rotating hex tube
to match the opening dash line, then pushing through
to bend the wedge tabs inward.

11. Identify the center segment (wide with NO punches),
then . . .

. . . position and attach the offset accent panels
over corresponding wide segments.
NOTE: if you prefer to have a back accent also,
cut a second "center front" panel, position and
attach over the "back" panel, then use a piercing
tool such as an awl to poke through where wing
alignment hole punches are on the hull shape.

12. Form the hull into a tube to bring the straight
back segment edge to overlap the opposite flange
to perforation line, and glue the side seam.
NOTE it may be helpful to insert a rigid tool
into hull behind the seam to provide a press-against
surface to help secure the seam across the center.


. . . then bend the top "lid" into position
to align cut edges as tab perforation lines,
and glue in place.

14. Prepare the lower hull shape by bending back
on all segments and flange perforation lines,
bottom base and tab lines.
15. Position the collar stack on the inside of
the base shape with hexagon openings
aligned as precisely as possible, and glue in place.

16. On the outside, position (centered) and glue
the bottom cover in place.


18. Bend the bottom tabs inward, bend the bottom
panel into position, align and attach edges at
perforation edges.

19. Prepare the top reinforcement shape by
bending the edge flanges forward.
Insert the reinforcement into the opening, then . . .

hull top long edge and glue in place until secure.

Use a tool (such as this weeder hook) to pull
the reinforcement shape into position
(this is a snug fit) so that all other edges align
and can be glued to hull top edges.

20. Apply glue along inner hull lower wall edge,
then insert lower hull into the bottom opening
of the upper hull, and slide the two together
until bottoms are aligned as closely as possible.

21. Prepare the left and right arm tube shapes
by bending back on the long perforation lines
(similar to post tube) and also bend the upper
tabs and hex panel inward, and lower tabs and
hand* extensions inward (*hand extension base
perforation is bent back, second perf line is
bent forward).

the 1/4" uncut dowel to assist with aligning
side straight edge and side flange perf line
and gluing the seam.

23. Move the top of dowel down to align end
with top tabs and hex panel, then bend
tabs inward . . .

. . . bend "cap" hex into position and glue in place.

24. Cut two arm dowel insert pieces at 2.125" each
(NOTE that dowel will not fill the arm tube
beyond the ribbon-joint hole punch.

25. Insert dowel into bottom of arm tube
and push inward until end is even with
bottom/hand base tab perforations.
Glue dowel in place.


. . . bend hands toward center as shown,
glue hand base segments to top of dowel,
and hand main portions back to back
to each other.

bending back on center perforation line.
Apply glue to hand underside,
then wrap around hand extension,
adjust and glue in place.

27. Prepare ribbon or twine joint with bead ends
by threading a needle that will fit through selected beads
with a double length.
A. thread needle through bead and tie end knot and bow.
B. thread needle through first arm hole punches
(NOTE hand straight edge is front edge).

C. thread needle through hull side panel hole punches.

E. thread through final bead, tie knot and bow,
and trim excess ribbon or twine.

28. Prepare the head shapes by bending back
on all perforation lines for panels, wedge and edge
tabs, etc.
29. Position and attach the eye contrast shape
behind the eye punches of face panel.

30. Bend head front panel segments to overlap
and align perforation and straight seam edges:
A. first top side seam


(Complete second side in same manner.)
31. Bend side panels of head partition back, then . . .

to other side tabs.

Bend tabs inward then bend partition into place,
tucking tabs inside head edges, and glue in place.
(Refer to step 33 to see partition panel in final position.)

32. Prepare the back head in similar manner
by completing the upper . . .


fully into the bottom slot of front head assembly
and glue in place.

34. Insert side and top tabs into corresponding
slots, push in fully, and glue in place.
If possible, at the same time, apply glue along
inner edge of head back so that these will
join to front edge edges.

35. To apply cheek rouging, bend the check stencil
shape back on perf lines, then position with bottom edge
at face panel bottom edge, secure in place with temp tape,
then apply distressing ink or stencil paint, etc.
Remove and discard stencil.

to the post end, then inserting
it into hull through top hex opening,
working into position in front of or behind the arm
joint ribbon/twine, through interior reinforcement
hex opening, then . . .

. . . down to bottom to seat the end into the collar
hex recess at inner hole bottom panel,
applying pressure to sense when post fits in properly.

37. Apply glue to back panel face of exposed post,
then inserting end into head bottom opening,
and sliding head fully into position, then applying
pressure so that back of post attaches to
interior partition.

38. Position and attach wings so that punch holes
align with corresponding holes of hull back panel . . .

Insert and glue in place mini brads through
punch holes (or studs to cover holes, etc.).

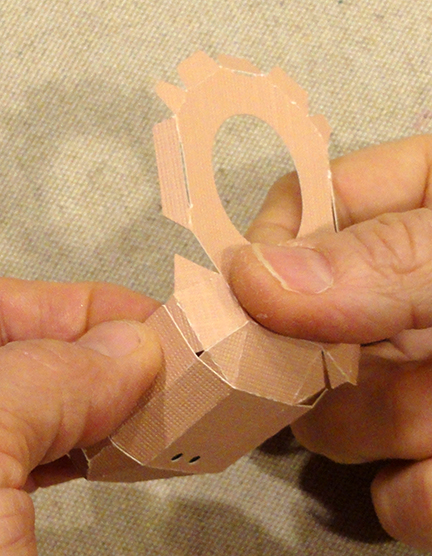
39. Use a narrow tool such as this fine stylus tip
to add upward or downward curl to halo wreath
shapes, outer and inner twigs.
NOTE: non-card stock weight will work best for halo
shapes. If paper with color on face and back is not
available, consider cutting duplicate mirror shapes
and gluing the two back to back before beginning assembly.

so that twigs offset, then glue together at 'ring".

tipping back slightly as desired (see final photo).
(Model project has tiny artificial buds as decoration.)

42. Thread twine through heart button holes
and tie knot and bow.
Position and securely attach on front panel.

Here is finished project.

No comments:
Post a Comment