
Multiple shapes are layered to assemble
the
playful, be-spectacled crustacean that decorates top
of unique oval-shaped gift
box.

Lid fits over base to enclose a platform gift card holder
(to hold
standard plastic 2.125” x 3.375” gift card).
Measures approx. 5.35” wide x 4.1”
long x 1.25” deep.
ASSEMBLY: 1. Identify and cut the shapes for the oval box:
A LID main panel B Lid contrast offset overlay
C Lid boxing (side wall) strips (2)
D gift card platform with stand tabs
E gift card platform opening underlay
F BASE main panel
G Base boxing strips (2)
H upper platform interlocking strips
I lower platform interlock strips

 3. Assemble the crab lid decoration:
A LID main panel B Lid contrast offset overlay
C Lid boxing (side wall) strips (2)
D gift card platform with stand tabs
E gift card platform opening underlay
F BASE main panel
G Base boxing strips (2)
H upper platform interlocking strips
I lower platform interlock strips

Also identify and cut the shapes for the crab decoration:
J main crab silhouette (shows thru as legs)
K & Ls contrast show-thru for body speckles
M leg tips N offset crab silhouette
O eye insert 'whites' P body Q cheek circles
R eye pupils S claw overlays T spectacles
U hat base V hat rim band W front brim with anchor
X hat crown base with top button
Y hat crown center


B) layer brim front over 'band' contrast, and
center, attach anchor
C) layer crown center onto main crown shape,
then add tiny button at top

then add crown assembly above.
E) position and attach crab body assembly onto offset silhouette
F) add contrast inlays at lower body edge, claws
G) add eye 'white' circles, mouth


with claws where they match up


it is a good practice to press flat under a heavy flat weight
until thoroughly dry, to prevent warping or curling.
This may require a couple of hours to ensure thorough drying.

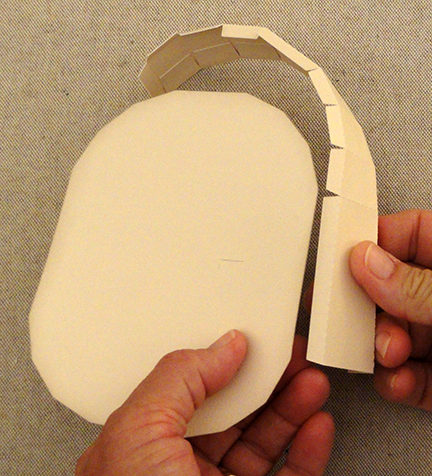
5. Prepare the BASE boxing strips by bending back
at each vertical segment perforation and also bending
bottom tabs back.

long edge of the main BASE panel, then overlap the panel's
straight edge over boxing tab to perforation line,
adjust for side to side alignment, then glue in place.

along the panel straight edge and glue in place.

8. Continue in the same manner to bend, align and
glue each segment's tab along the corresponding straight
edge of the panel.
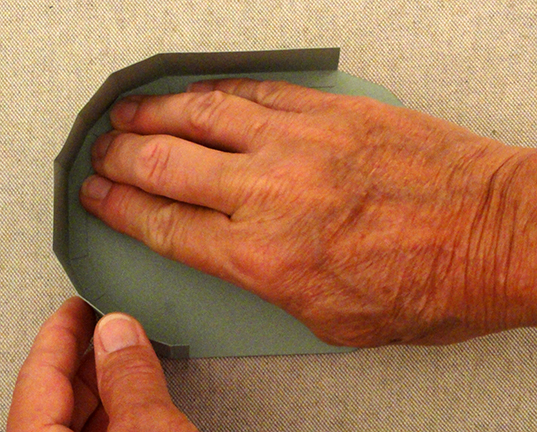
As the assembly progresses, invert the base on a flat surface
and apply fingertip pressure along the tabs from the inside
to help them attach completely.
9. Position and attach the straight end of the second
boxing strip over the end tab of the first strip, then
continue to position and attach the second strip's
segment tabs all around.
When the final tab is being glued, at the same time
position and attach the first straight side edge
over the corresponding side tab in one operation.

10. Prepare the LID boxing strips by bending back
on vertical perforations and top tabs as was done
for BASE, also bend the rim tabs back.

11. Skip the long segment rim tab, then bend back and
glue in place the remaining rim tabs for both strips.

12. Position and attach the LID boxing strips just like
the BASE strips were positioned and attached in Steps 6-9.
segment tabs down and glue in place . . .

. . . positioning the lid so that the area is flat and
fingertip pressure can be applied along the tab
until thoroughly attached.

14. Position and attach the contrast lid panel
(dry adhesive recommended if possible, to avoid
warping and curling since no flat weight can be applied).

15. Position and attach the crab decoration,
centered on the lid top panel.

16. To assist the base box to maintain its oval shape,
support 'struts' and reinforcement for the gift card panel
can be assembled and added.
Identify the upper strip set, which have a circle 'bite'
out of the end tab edge, as indicated here by pointing finger.

Here you can also differentiate upper and lower short
strips (as well as long strips) by the slots: the upper strips
will have slots that extend UP, and the lower strips
will have slots that hang DOWN.

and forward on bottom tabs.
Work with the long and short strips that correspond . . .

. . . then position the short strip straight end over
the tab at end of long strip and join first side seam.

Next, form the strips into a trapezoid
to bring the opposite two ends together and join
the second side seam.
Repeat for both the upper and the lower strips sets.

trapezoid, with narrow ends on the outsides as shown,
and line up the slots so that . . .

. . . the shapes can interlock, then work the two strips
together until top and bottom edges are flush across.

19. Apply adhesive to the end tabs that extend from
points, and to the bottom tabs along the strips, and . . .


. . . insert it into the BASE and . . .


Apply pressure to attach end walls together,
as well as attach point tabs and bottom tabs along strips
to the walls or base where they touch.

20. Prepare the card platform by bending back the stand
tabs.

'liner' shape behind the window cutout.
Be sure to leave the tabs extending into the opening
unattached.

21. Apply adhesive to the stand tabs, then . . .

to fit around platform strips. Push platform down fully
so that the panel rests on top of the supports.

22. Gift card can be inserted under the tabs to fit
in the recess.

Then position and fit the lid over the base
(this should be a snug fit).

Here is the completed gift box.

No comments:
Post a Comment