
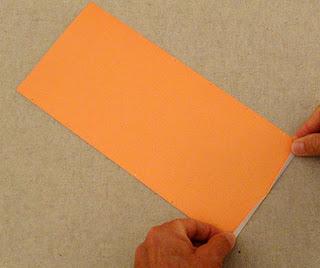
Select lighter weight card stock or heavier weight
printed paper. Perforations define the pleats
to complete the accordion diamonds and
fan-fold ends of this pointed spherical ornament
for holiday or seasonal decor - shown with two colorways.
Bend, crease, and shape three panels; join end seams,
then use a tapestry blunt end needle to thread
no. 5 perle cotton thread/yarn through the tiny holes
to gather the ends. Insert prepared tassel or other “dangles”
plus ribbon or cord loop before cinching up
the top and bottom and tying off.
Measures approx. 3.75” tall x 4.25” middle diameter
when completed (separate from tassel and loop, etc.).
Additional embellishments can include wooden
or glass beads, metal bead end cups, etc.
ASSEMBLY: 1. Identify and cut the shapes:
3 pleat panels
optional half diamond accents, 12 sets per panel

 . . . continue to alternate across the panel with
"mountain" fold next . . .
 . . .and so forth.
 3. Bend along each diagonal line, beginning at
the short length perforation lines near ends . . .
 . . . and creasing only along length of perf line
(do not extend across the lengthwise perforation lines) . . .

. . . and along each diagonal line across panel.

 4. Repeat to bend and crease along the opposite
diagonal lines.

 . . . identify the center segment of each vertical
perforation line and pay attention to it . . .
 . . . so that, as the sides are directed downward,
and inward, the line within the "diamond" will be . . .
 . . . redirected in the opposite folding direction
as shown. NOTE that it may need to be pushed
downward slightly to allow it to "pop" into desired position.
 6. Continue to gather and stack the perforation lines
as shown, working along toward opposite end . . .
 . . . as more pleats are formed and condensed or
closed together.
 NOTE: it may be necessary to assist with the bending
and pleating at the intersections.
 When the entire panel is pleated and stacked,
it will have the appearance of a domed tent.
 Apply fingertip pressure along the stacks of perforation
folds to lock them in and make sure creasing is complete.
 Here is one panel allowed to expand.

 . . . and then the second half.

 8. Position, align and attach along side seams,
overlapping the straight plain edge of one panel
overlapping the side tabs of the opposite panel.
NOTE that it is possible to join all side seams at
this point in assembly as is done for other styles in
this series.


 Continue threading the pleats onto the needle and yarn.
When threading is complete across one side,
trim a tail, add a knot to keep the yard from slipping back
through.
 Repeat for the other edge of panel.

 11. If desired, a decorative array of tassel, beads,
bead caps, etc. can be prepared. One way to achieve
a small tassel for the ornament ball is to purchase a few
inches of home decoration "tassel trim" often available
through fabric or craft stores such as JoAnn or Hobby Lobby.
Here is how the "trim" is converted into a single tassel
on strings.
A) separate by cutting halfway between the tassels
 B) un-stitch (pull chain threads) that hold the loops
of yarns into the "tape" portions of the trim
 C) straighten and gather the resulting yarns
so that the tassel "hangs" from these
(wet these and pull taut to dry straight)

 . . . cinch the threading yarns tight (with a single
overhand knot to keep the yarn from tearing through
perforations or threading holes), then secure with
second overhand knot to complete the square knot
or granny knot (NOTE you may need an extra pair of
hand or a crafter's clip to achieve a tight-as-possible cinch).

the gathers circle opening, as desired.

3 pleat panels
optional half diamond accents, 12 sets per panel

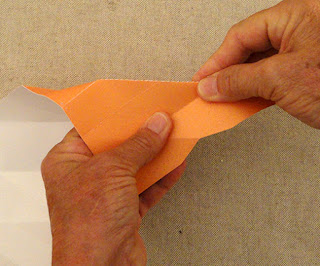
2. Begin creasing process by bending back the side
tabs as "valley" folds. Then . . .

"mountain" fold next . . .


the short length perforation lines near ends . . .

(do not extend across the lengthwise perforation lines) . . .


Be sure to pinch the crease at ends to define
the crease lines precisely.

diagonal lines.

5. Prepare to begin the pleating by bending the end
tabs into upward position, then . . .

perforation line and pay attention to it . . .

and inward, the line within the "diamond" will be . . .

as shown. NOTE that it may need to be pushed
downward slightly to allow it to "pop" into desired position.

as shown, working along toward opposite end . . .

closed together.

and pleating at the intersections.

it will have the appearance of a domed tent.

folds to lock them in and make sure creasing is complete.


7. Open the pleated panel into flattened position,
then position and attach the half diamond accent
into crease-defined spaces, first one half . . .


Make sure that the accent shapes DO NOT interfere
with the panels folding.
The model project uses contrasting half diamonds,
but other combinations are possible, including
having a "whole" diamond of one paper
alternating with a "whole" diamond of another.

overlapping the straight plain edge of one panel
overlapping the side tabs of the opposite panel.
NOTE that it is possible to join all side seams at
this point in assembly as is done for other styles in
this series.

9. Cut a 36-40 inch length of no. 5 perle cotton yarn
or equivalent soft twine onto the finest gauge tapestry needle
that will comfortably pass through the threading holes
of the panel.

Tie an overhand knot onto the single end,
then pass the needle down-up through the first pairs of holes
that fall on each side of the first "mountain" fold.
Pull through until the thread stops at the end knot.

When threading is complete across one side,
trim a tail, add a knot to keep the yard from slipping back
through.


10. Form the panel assembly into a tube to align
and join the final side seam.

bead caps, etc. can be prepared. One way to achieve
a small tassel for the ornament ball is to purchase a few
inches of home decoration "tassel trim" often available
through fabric or craft stores such as JoAnn or Hobby Lobby.
Here is how the "trim" is converted into a single tassel
on strings.
A) separate by cutting halfway between the tassels

of yarns into the "tape" portions of the trim

so that the tassel "hangs" from these
(wet these and pull taut to dry straight)

12. Add beads to the tassel loose yarns end, if desired,
then tie ends to a loop of other twine, ribbon or cord.
(You will need to do some exploring about how long
to have the tassel end yarns and the loop so that
the tassel end bead will "snug" up against the bottom
of the pleated sphere, and the loop extend to desired
length above, with the knot falling inside the ball.)
13. Insert the loop/tassel array through the center
of the still-loose pleating, then . . .

overhand knot to keep the yarn from tearing through
perforations or threading holes), then secure with
second overhand knot to complete the square knot
or granny knot (NOTE you may need an extra pair of
hand or a crafter's clip to achieve a tight-as-possible cinch).

14. Repeat the cinching at the top to complete
the spherical ornament. Apply glue to
securely attach the beads to the sphere and hidethe gathers circle opening, as desired.

No comments:
Post a Comment