
Select
lighter weight card stock or heavier weight
printed paper. Perforations define
the pleating folds
to complete the accordion fan-folds of this disc-shaped
ornament for holiday or seasonal decor.
OVERVIEW:
OVERVIEW:
Bend, crease, then shape three panels;
join end seams
to create a tube. Fold the ends inward to form the disc profile,
then use a tapestry blunt end needle to thread
no. 5 perle cotton thread/yarn
or soft twine through the tiny holes
along
each edge to gather pleats to achieve final size
and shape; tie off and hide ends.
Cover
the cinch gather center hole with miniature layered
poinsettia blossom (or other
decoration of choice).
Add wire, ribbon or cord loop through center top hand holes.
Measures approx .875” thick x 3.875” diameter.
ASSEMBLY: 1. Identify and cut the shapes:
2 lower side pleat panels
1 top center pleat panel (with holes)
1-2 sets of flower petals and leaf

 3. Continue along the vertical perforation lines to bend and
crease in alternating direction, valley, then mountain,
then valley and so forth, across the entire panel.
 4. Slightly bend and crease along the diagonal
perf lines, first in one direction, and then going back
to crease along the opposite diagonal perf lines.
Also crease the one-unit wide diagonal perforations
on each end.

 . . . while encouraging the short center perforation within
the center "diamond" lines to re-direct in a downward depression
- in opposite direction to the extended fan pleat line folding.
Then gather and condense the fan pleats together
one by one across . . .
 . . . the width of the panel. Press and crease the stacked
perforation lines well, especially at the intersections
along the center diamonds.
 The end profile of the pleated panel will have
the appearance of a tall tent as shown here.
 6. Note that the top center panel has center punch holes
for eventual insertion of the hanging loop.

 8. Form the flexible panel length into a ring to
align and complete the final side seam.


 12. Cinch each threaded length up carefully to
the tightest possible, and complete the overhand knot,
turning it into a secure square or granny knot to hold cinching.

 When glue is dry, trim the tails excess close to surface.
 14. Thread length of the hanging loop of choice
through the top punch holes and tie ends together
at desired hanging length.

 Position the leaf whorl underneath, pivoting to
have the leaves exposed between other petals
as preferred, and secure with a dab of glue.


2 lower side pleat panels
1 top center pleat panel (with holes)
1-2 sets of flower petals and leaf

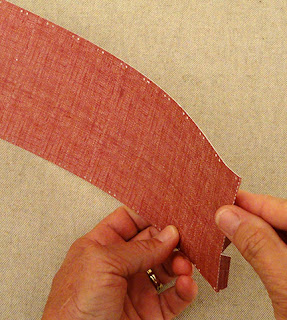
2. Bend and crease each of the pleat panels,
beginning at the side tab end and bending tabs back
(mountain fold).

crease in alternating direction, valley, then mountain,
then valley and so forth, across the entire panel.

perf lines, first in one direction, and then going back
to crease along the opposite diagonal perf lines.
Also crease the one-unit wide diagonal perforations
on each end.

5. Prepare to pleat the panel (working from the non-tab
end as shown) to bend the side portions down and inward,
allowing the panel's "fan pleats" to be drawn together . . .

the center "diamond" lines to re-direct in a downward depression
- in opposite direction to the extended fan pleat line folding.
Then gather and condense the fan pleats together
one by one across . . .

perforation lines well, especially at the intersections
along the center diamonds.

the appearance of a tall tent as shown here.

for eventual insertion of the hanging loop.

7. Open the pleat panels, prepare and join the side seams,
with the straight plain end edge of one panel overlapping
the tabs of the opposite end of adjacent panels, with
ends and intersections accurately aligned, then glue seam.

align and complete the final side seam.

9. Cut a 36-40 inch length of no. 5 perle cotton yarn
or soft twine and thread one end through the finest
tapestry needle that will comfortably pass through
the pleat panel stitching holes.

10. Tie a "stop knot" onto one thread end, then . . .

. . . select a beginning spot away from the hang holes
and begin the down-up "stitching" through the pairs
of holes at the mountain folds . . .

. . . all along one edge of the joined panel . . .

. . . until the complete circuit has been made.
Trim, leaving a tail (cut at the halfway length of original
yarn length), and tie overhand knot between pleat fold.
Also tie a stop knot at the new end to keep the yarn
from coming loose.
11. Repeat this threading process on the other edge,
remove the needle, tie knot, and stop knot.

the tightest possible, and complete the overhand knot,
turning it into a secure square or granny knot to hold cinching.

13. Trim stop knots off, thread the end through
the center opening in opposite directions (so knots and
short tails are left inside the "tunnel"). Apply glue to help secure
the knots and tails inside the tunnel.


through the top punch holes and tie ends together
at desired hanging length.

15. Add curl to the petals if desired, then layer from
largest (bottom) to smallest on top with center punch holes
aligned. Pivot to offset the petals of each layer
as desired, then secure with a dab of glue at center.

have the leaves exposed between other petals
as preferred, and secure with a dab of glue.

16. Position and attach a blossom unit onto the front
and back (if desired), centering over the cinch ring.

Add and glue in place a mini brad through center.

No comments:
Post a Comment