
Select lighter weight card stock or heavier weight
printed paper. Perforations define the pleats
to complete the accordion diamonds
and
fan-fold ends of this pointed spherical ornament
for holiday or seasonal
decor.
Bend, crease, and shape three panels; join end seams,
then use a
tapestry blunt end needle to thread
no. 5 perle cotton thread/yarn through the tiny holes
to gather
the ends. Insert prepared tassel or other “dangles”
plus ribbon or cord loop
before cinching up
the top and bottom and tying off.
Measures approx. 3” tall x
3.75” middle diameter
when completed (separate from tassel and loop, etc.).
Additional embellishments can include wooden
or glass beads, metal bead end
cups, etc.
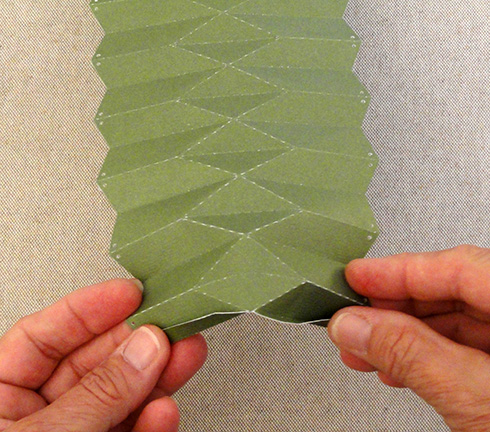
ASSEMBLY: 1. Cut the three pleat panels.

 3. Continue to bend and crease the next perforation
line as a "MOUNTAIN" fold.
Continue to alternate VALLEY and MOUNTAIN folds
across the full width of the panel.
 Compress the panel folds and apply fingertip pressure
to "lock" down the creases.
 4. Bend and crease along the diagonal perforation segments,
allowing the creasing to happen between the vertical
perforation line intersections ONLY. Begin with
the short line segments at one end of panel, then . . .
 . . . continue in same manner to bend and crease on
diagonal lines that extend across TWO vertical spaces,
taking particular care to "pinch" the end intersections
to ensure that creases extend as far as they should,
but no further.
5. Repeat the diagonal folds for the opposite SLANT
diagonal perforation lines.

 . . . and assisting the short center line segment fold
to be re-directed to fold opposite the MOUNTAIN folds
on each side, allowing it to 'POP' downward.
 7. Continue to gather the pleats with fingers of both hands . . .
 . . . one set at a time, until . . .
 . . . all of the pleats are stacked into a sort of tent shape
as shown here.
 Apply fingertip pressure along the edges of the stack
to lock down the creases and ensure that they are complete
especially at the intersections.
Complete the creasing and pleating of all 3 panels.
 8. Open the panels flat, then arrange so that the plain
straight side edge of one panel overlap the opposite
panel's side edge tabs. Join two seams.
(NOTE: it is possible to join all three seams at this point
in the assembly, if desired, though this may make it
more awkward to complete the threading.)

 10. Begin at one end to insert the needle "down" through
first hole on right side of pleat then "up" through next hole,
continuing in the same down/up manner across the width
of the pleated panel. At the end, cut the yarn at about
the 18" or halfway point and tie a stop knot to prevent
the stitching from coming loose.
11. Repeat the process to thread the other edge.


 C) arrange the yarn lengths to pull away from the tassel.
 D) the yarn ends can be inserted through a bead with
large opening, or as with the sample project, a fine hole
bead is being used, so one continuous thread is separated
from the others, then preserved in place while . . .
. . . remainder
are pulled free from the threaded bead.
 The fine yarn pairs were then threaded through
the selected bead.
 For the sample project, the yarns were long enough
to thread through a bead cap, through the center length
of the pleated tube, then through another cap and bead, etc.

 16. Attach hang loop if not already included
in the dangle array.
Apply glue to secure that the beads attach to the sphere
and hide the gathers circle opening, as desired.
Here is the completed ornament.


2. Begin the creasing by starting at side edge with
tabs, then bend and crease along the vertical
perforation lines to form "VALLEY" bends.

line as a "MOUNTAIN" fold.
Continue to alternate VALLEY and MOUNTAIN folds
across the full width of the panel.

to "lock" down the creases.

allowing the creasing to happen between the vertical
perforation line intersections ONLY. Begin with
the short line segments at one end of panel, then . . .

diagonal lines that extend across TWO vertical spaces,
taking particular care to "pinch" the end intersections
to ensure that creases extend as far as they should,
but no further.
5. Repeat the diagonal folds for the opposite SLANT
diagonal perforation lines.

6. Begin the pleating at the tab side end, gathering
the pleats on each side into their compressed form . . .
to be re-directed to fold opposite the MOUNTAIN folds
on each side, allowing it to 'POP' downward.


as shown here.

to lock down the creases and ensure that they are complete
especially at the intersections.
Complete the creasing and pleating of all 3 panels.

straight side edge of one panel overlap the opposite
panel's side edge tabs. Join two seams.
(NOTE: it is possible to join all three seams at this point
in the assembly, if desired, though this may make it
more awkward to complete the threading.)

9. Thread a 36" length of no. 5 perle cotton or equivalent
soft twine onto a tapestry needle of fine enough gauge
to allow it to fit through the threading holes.
Tie a stop knot at the single yarn end.

first hole on right side of pleat then "up" through next hole,
continuing in the same down/up manner across the width
of the pleated panel. At the end, cut the yarn at about
the 18" or halfway point and tie a stop knot to prevent
the stitching from coming loose.
11. Repeat the process to thread the other edge.

12. Form the panel assembly into a ring or tube
to bring the side edge and tabs together, align,
and glue the final side seam.

13. If desired, prepare a tassel array to place
through the center of the sphere. One way to
accomplish this is to purchase home decorating tassel
trim (by the yard).
A) Separate the tassels by cutting
halfway between two tassels.

B) pull the assembly chain stitching to remove
the structure and allow the yarn loops the be free.


large opening, or as with the sample project, a fine hole
bead is being used, so one continuous thread is separated
from the others, then preserved in place while . . .

. . . remainder
are pulled free from the threaded bead.

the selected bead.

to thread through a bead cap, through the center length
of the pleated tube, then through another cap and bead, etc.

14. Tie an overhand single knot with the cinching yarns
at the bottom edge, then pull up as tightly as possible
to close the cinch hole to smallest, then tie second
overhand knot to complete the square or granny knot
to hold cinching in place securely. Trim ends to have
short tails, then tuck inside the tube.
Secure with dab of glue.
15. Repeat the cinching and tying off at the top end
in same manner.

in the dangle array.
Apply glue to secure that the beads attach to the sphere
and hide the gathers circle opening, as desired.
Here is the completed ornament.

No comments:
Post a Comment