Wednesday, December 4, 2013

Nativity 3D Box Tutorials: Baby Jesus, Mary, Joseph


Now available:
 cut file designs of 3d nativity boxes.
These three range in size from 2 5/8" to 7 1/4" tall.
They may look like they are constructed from wood blocks
but they are BASE-AND-LID boxes made of card stock.
Though there are several steps in the process,
they are not difficult to construct.
Make them yourself, or let your little people help you,
then talk about the reasons we celebrate Christmas.

Construction for all three boxes will be demonstrated here.
Scroll to find steps and photos for Mary or Joseph as you need.


BABY JESUS IN MANGER
1. Identify and cut the pieces. Note that the boxing shapes for the LID (top, right) and BASE have tiny symbols cut into the end tabs or top tabs nearest the end to help match them in perimeter order. Also note that the manger darkest brown piece will be layered UNDER the front medium brown piece so that the nail holes will show through as contrast.

NOTE the Baby base shape between the blanket and trim shapes and the other baby components. This is used to assemble the smaller pieces accurately. You may also wish to accent the half-circle "eye" cut by running a thick needle tip loaded with distressing ink or similar along the cut. A pinky end dipped in makeup blush adds color to cheeks of all three box designs.

2. Begin with the LID shape. Fold the boxing strips on perforations: side tabs inward; fold end tabs and side perfs to match the "mountain" or "valley" folds of the corresponding corners of the LID face shape.


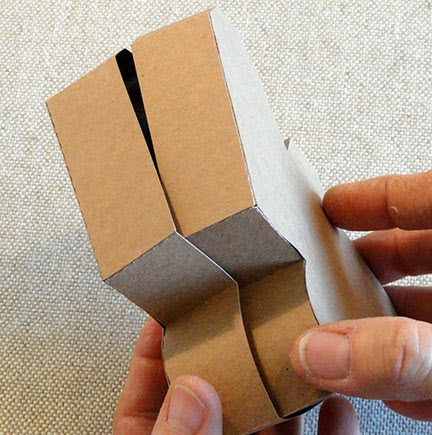
 3. Before gluing, shape the side section of the boxing outward slightly by curling it slightly over a finger or thumb as shown. This is more easily accomplished BEFORE the tabs are folded, or just re-straighten them for the curling step.
4.  Apply glue and join the first seam to the LID. 

5. Continue joining segments in order. For the curved section, align the ends, then flex and work the boxing edge to match the curve of the lid face shape. While glue is pliable, continue to make adjustments as necessary for an accurate, smooth joint.


6.  Join the end tab to the first boxing end.


7. Continue the sections edge-joining process until all three boxing strips are joined and in place. This image shows the final end-to-end tab gluing process. Because the space is tight in this corner, take time and use fingers or other sharper-edge tools like a ruler or pencil to be able to apply pressure against the ridge and side end for an accurate and neat joint.

Repeat the assembly for the BASE.


8. Assemble the design shapes separately, then glue to the face of the LID, keeping the "echo" margin between shape edges and box face edges.

Fit base into backside of lid to complete the box. Insert a small packet of doll weight pellets or similar material, if desired, before closing box. Glue layers together (see Mary tutorial for these steps for that box). 


MARY TUTORIAL
9. Identify and cut the shapes. 

Note that this image shows the design foundation shape (bottom left) upon which  the colored pieces will be assembled.


10. Fold the boxing shapes on perforations: side tabs inward, other end tabs inward, shape sections to match the corners of the LID shape.


11. Shape the curved sections by "curling" them slightly over finger or thumb so that they imitate the lid curves that correspond.

(NOTE that Mary's curves are inward curls while the manger edges are outward curls.


12. Align and attach the first section of the boxing strip you begin with. Here the left side, second segment above the curve is being joined first. This is one choice for a starting place. It may be helpful to have the section beyond the curve in place before the curved section is attached so that the curve can be flexed against that secured edge for better fitting during gluing.


13. Next, glue the curve. Align the opposite end (or both ends if construction order different that what is described in step 12) and glue, then while glue is still pliable flex and glue the curve section in between to match and fit the LID edge accurately.
14.  Continue joining segments in order. Attach the next boxing strip end tab to edge of first strip as construction progresses. 

Complete boxing strip joining.


 15. Assemble design shapes onto their component base shapes, then onto the foundation shape. Note that the eye and veil/headdress contrast is provided by the foundation shape.


16. Glue the design shape, centered, onto the LID. Once glued and positioned on the face, it may be helpful to turn the LID over on a smooth hard surface and apply finger pressure from the backside, as shown here. This may assist the edges to attach more smoothly.


17. Fit the base inside the lid. 
18. If desired, before closing box, prepare and insert a small baggie of doll weight pellets.


Glue the baggie in place, if you have concern about movement within the box.


As an optional step, apply glue between the LID and BASE edges. This way, the box will function more like a wood block figure.

JOSEPH TUTORIAL
19. Identify and cut the shapes. (Missing from this layout is the dark brown staff)


20. Fold the boxing strips on perforations, tabs inward, other folds to match the LID shape.


21. Position and attach the first edge of boxing strip to LID. Continue attaching edges, joining boxing strip ends, etc., to complete the LID.


22. Assemble the design shapes on their base shape or component shapes until completely assembled.

Attach design shape to LID face.


23. Complete BASE in similar fashion. Add weight pellet baggie, if desired, then fit base into lid backside.  Apply glue between the lid and base edges (see illustration at the end of Step 18) if desired.


Enjoy your completed three-figure project!


Canning (Mason) Jar Lids for Gifts


Use the Silhouette system
and the "lid circles for mason jars paper or fabric"
cut file to add the finishing touch to
your home made canned or assembled
gifts.

For paper, cut the shape in the file that includes the perforations and the tiny wedge cut-out that will allow the pleats to fold appropriately. Also choose the regular or wide mouth larger size that you need.

Fold the perforations to create the pleats. Fold the right perforation as "mountain" fold, and the left perforation as a "valley" fold.


Thread a large-eye (darning or crewel) needle with 24" or so of cord, twine, or ribbon and lace it through the hole pairs as shown. Lace it all the way around.


Place the cover over the mason jar lid . . .


 . . . then cinch up the cord and tie knot and bows.


Because the card stock or print paper usually can't be cinched as tightly as fabric, you may want to place a foam adhesive square on the lid to help keep it in place until your recipient wishes to remove the cover to enjoy the contents.


If you prefer, you can cut the lid circle from fabric, but first the fabric needs to be stabilized with either fusible web (fabric interfacing) or with a sizing product shown here.

Terial Magic Spray is a stiffener which prepares fabric to be stiff enough to be placed directly onto the cutting mat without the fusing glue of the other alternative.

You can see a tutorial here. In the picture, I am spraying my 7-8" fabric square with the liquid, making sure it is saturated.


Following product directions, I fold many layers and squeeze to help the liquid spread through all. This helps conserve the spray which getting my fabric fully saturated.


Unfold and allow the fabric to dry partially.


Press the fabric square to be completely dry. If it dried too completely, re-apply slightly, then iron dry.


 Position the fabric on the mat just like you would paper, adjust the settings (I prefer to use the "cotton canvas" setting almost always for fabric), sent the job to the cutter, then eject and peel the fabric and circle from the mat.

NOTE: having a good grip mat (relatively new, that is) is fairly essential when cuttiing Terial Magic prep'd fabric.
Thread ribbon or cord through holes, just as with card stock or paper. Place on jar and cinch up fullness and tie similarly, too. Then take a moment to adjust the fullness and the pleats so they fold all in one direction around the jar lid.


Fabric Gifts Using Cut Shapes: Group 1

Cutting fabric shapes is very easy and fun
with the Cameo and the Silhouette system.
Here are five quick projects (stocking makes a "guest" appearance) 
using shapes from the cut file titled
Christmas Basic Shapes
from SnapDragon Snippets.
The appliques are cut from fabric that has been prepared
by fusing a required size square or rectangle to
paper-backed fusible web (Silhouette has a product
they call "fabric interfacing") such as Heat N Bond light.


APPLIQUE PREP STEPS:
A. Select your applique shape, size it appropriately, then check the "selection" design measurements on your Cameo or Silhouette screen. Add approx. 1/2" on each side (that's 1" increase to the width and length measurements), then cut this size piece of fusible web (paper backed such as Heat N Bond light for sewing in, or Ultra Hold if you will NOT be over-edging because the project will not be washed). Fuse on fabric backside according to product directions, then trim fabric to match paper size. Cut following Silhouette's recommendations. (See tutorial here.)

PROJECT #1: SPARKLING JUICE TALL SACK

1. Cut two 15"x7" rectangles (includes 1/4" seam allowances and wide opening hem). 
Fold in half lengthwise with face sides together and stitch one SIDE seam. Over-edge or serge raw edges (here and throughout as desired). 

Center applique of choice approx. 3.5"-4" up from bottom edge on one of the panels, fuse and over stitch raw edges. Attach buttons for berries.

Open flat and press seam. At top edge, fold back a wide header hem of 3.25".


2. On front side of hem area, use temporary marker to make a stitching line at 3" from fold.

Open header hem flat, then re-fold with face sides together as in step 1 and sew second side seam. Also stitch across BOTTOM. Press seams flat as well as possible.


3. Prepare the bottom shaping seam: Re-fold the bag so that one side and bottom seam line up on top of each other at the center. From the end point that forms with this folding, mark a perpendicular stitching line 1.5". 


Stitch across on the marked line, locking stitching at each end.

Repeat folding, marking and stitching for the opposite side. Turn the bag face side out.


4. Fold header hem to the inside of the bag and re-press as needed. Stitch all around on the previously-marked line.

5. If desired, attach the center of a decorative double tassel cord at the hem stitching at the bag's center back by stitching across 3-4 times. Or attach or simply tie ribbon in the same place. 


PROJECT #2: DISH TOWEL

1. Prepare and attach fabric applique to your purchased dishtowel. Some styles will work best with applique centered from side to side. This towel with wonderful side edge stripes seemed best with applique near the left edge. Overedge the raw edges of applique, pulling stitching threads to the backside and tying off to secure. Clip threads. Attach buttons.


PROJECT #3: COASTER


Prepare, fuse and overstitch the holly leaf applique edges. This project uses a pre-finished linen coaster with faggot open stitching detail. You could also simply cut squares 3.5" - 5", layer face sides together, stitch around leaving turning opening, turn, press, and edge stitch.


PROJECT #4: FRAYED PLACEMAT


1. Purchase coarse weave fabric. approx. 18" yardage is required for this double-layered version per placemat. Cut two rectangles from the fabric. To do this and keep the grainline and edge yards parallel with the cut edges, start at one end of the cut edge of yardage and pull a yarn. Continue pulling to create a trim line across the edge. If the yarn breaks, trim along the yarn path until the broken end can be retrieved and the pulling continue all the way across.

Prepare a base square from contrast coarse weave fabric, large enough to give a margin beyond applique shape with approx. 3/8" fringe. Complete applique on base square, position and topstitch to top placemat rectangle in desired position. Attach buttons. Layer both placemats, topstitch securely all around (shorten stitch length) approx. 3/4" - 1" (fringe depth). They remove edge yarns from both layers to produce fringe.

PROJECT #5: SACHET HANGER BAG

1. Trace a tag shape on top layer of double layer of selected fabric. (For your own shape, trace 4" wide x 5" tall rectangle, then trace diagonal of a 1" square on each upper corner.) 
2. Trim layers 1/4" beyond marked lines.
3. Press 1/4" hem back along bottom edges. Unfold flat.
4. Complete applique on front of top layer. Attach buttons and other details.
5. Re-layer and stitch 1/4" around on all but hem edges; back-stitch to lock at opening.
6. Turn right side out, press flat.
7. Complete a 1/2" button hole at center top approx. 1/2"-3/4" from top  as a hang hole.
8. Fill with loose lavender or favorite potpourri. Pin and stitch across layers. Thread sachet hole over purchased padded hanger hook. 

Hope these ideas help with your gifting!