
Hexagon-based form has delicate one-piece rim shape
to
which attaches the 6 side wall shapes
which form the “vessel”. Upper side walls
fold back
into place creating a dimensional rim.
Offset accent shapes adorn
side walls, with marked positions
for studs or jewels. Hexagon inserts
stabilize and strengthen
interior and bottom rim with optional hexagons that
include
a square opening to accept the square stem posts
of Daffodil 3D Flower
With Stand and
Crocus 3D Flower With Stand designs, if desired
(use longest
stems for these as provided in separate cut files.
Measures approx. 2.375” tall x 3.375” wide x 2.875” deep
when
assembled.
Just the right size to invert and prop up
the block letter “O” in the BLOOM
Letter Box Ensemble.

ASSEMBLY: 1. Identify and cut the shapes:
A six-sided rim and pot upper sides
B accent "rectangles" for upper sides (6)
C pot side wall wedges (6)
D accent trapezoids for lower side wall wedges (6)
E upper hexagon reinforcement F plain cover insert
G lower hexagon finger-hole insert
H lower plain hex insert

The file also includes upper and lower hexagon inserts
with square stem holes for 3D flowers (crocus & daffodil).

2. Prepare the six-side rim shape by handling CAREFULLY
as panel perforation lines are folded back, except . . .

for bottom tabs which should eventually
be folded forward.

3. While the rim shape is flat, position and attach each
accent shape within the side panels of the rim shape,
centering so that the offset margins are even all around.

4. Prepare each side wedge by bending back (mountain
fold) on side flange and bottom perforations,
and bending forward (valley fold) along bottom flange tab.

5. Position the top edge of first wide wall wedge along
interior flange perforation of rim, centering from side to side,
and glue in place.

6. Bend the first wall wedge outward and out of the way,
then repeat positioning of top edge of second wedge
described in step, and glue in place. Continue in same
manner to position and attach remaining four side walls.
NOTE: this assembly will be rather floppy as attached
walls add to weight and awkwardness - handle with care.

7. Bend the first two walls upward into position where
the straight side edge (of left wall as pictured below)
overlaps the adjacent side flange. Adjust, if possible,
so that wall edge and flange perf edge align, then
glue the seam.
8. Repeat the positioning of the next four walls,
until final wall is positioned . . .

. . . then bend it into place so that straight edge
(shown on right of final wall wedge, below) overlaps
adjacent flange in usual fashion, while at the same time
the left edge flange is tucked under straight edge
of first wedge wall. Join one wall seam, then final seam.

8. Carefully bend the first upper side wall panel of rim shape
into position and tuck bottom tabs into wedge wall slots . . .

. . . then on the inside of pot, bend the tabs down
and attach in place to backside of wall. Hold in place
until secure.

9. Prepare the position and attach the second upper
side wall by applying adhesive to the side tab
of previous section as shown, then . . .

. . . tuck tabs into slots and position as for
previous upper wall, attaching tabs to inside wall
and also joining side seam.

10. Continue to position, tuck tabs, glue side tabs, etc.
for remaining upper side walls. For final wall,
the final side tab will also need to be tucked under
adjacent section's side wall . . .

. . . before tucking tabs into slots and attaching
tabs and wall seams.

12. Prepare the bottom opening tabs by bending
bottom-most segments forward to create the ledge
where eventually the bottom hexagon reinforcement
will attach. Then . . .

. . . apply adhesive ONLY to the backside of NARROW panel
that is "connected" to the wall panel, then bend each flange
inward to interior of pot and attach in place ONLY
the "connected" portion of the tab to the inside of the wall.
Edge flange (ledge) MUST remain unattached.

13. Prepare to insert and attach the bottom hexagon
insert (stabilizer) by bending ledge tabs into
horizontal position. Apply adhesive to the face
surface of the ledge tabs all around, then . . .

. . . insert the hexagon stabilizer into opening to rest
on the ledge tabs.

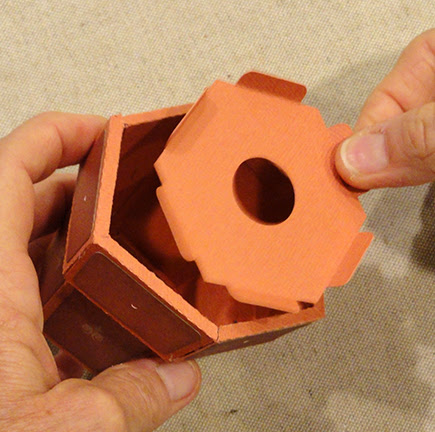
Use finger access opening to reach in and apply
pressure to join each hex edge to the flange underneath.
Work around the hexagon to ensure each seam
is joined.

14. NOTE that there are options in the cut file
for the bottom "cover" hexagon shape.
A) use plain hexagon for a "finished" look bottom panel;
B) use square hole cutout with a pot that will hold
the cubic stem of 3D crocus or daffodil design;
C) use the smaller "drain" hole hexagon for pot realism.

Apply adhesive to hexagon's underside edges,
then position and attach over the stabilizer hexagon.

This image shows the "realistic" drain hole hex option.

Apply fingertip pressure all around edge to ensure
the cover of choice attaches securely.

15. Prepare the mid pot stabilized hexagon by bending
the side tabs forward, then . . .

. . . apply adhesive to the backside of the tabs.

Carefully insert the shape into pot's opening
and push downward into place where hex edges
fit snugly against inside of side walls.
Adjust as necessary to ensure that insert is
perpendicular to bottom of pot, then attach tabs.
16. Position and attach choice of upper cover hexagons
(plain as shown, or square stem hole opening)
on top of insert.

Here is the completed mini pot.

Shown below is the mini flower pot as part of
the BLOOM 3D Letter Box ensemble.
Positioned, centered, on the up-turned bottom . . .

spelling out "BLOOM", attached to the ensemble base.


No comments:
Post a Comment