Showing posts with label gardening. Show all posts

Monday, June 10, 2013

Garden Themed Dimensional Paper Crafting

Turning from winter blahs to the sensations of summer, 
the designers at SnapDragon Snippets are developing a favorite theme. 
Sharing here a handful of garden themed designs available 
from the Silhouette America online store.

Cut files:
3d watering can
3d terra cotta pot
3d garden hat
bow - narrow (add on to hat design)
3d garden spade
seed packet

Find more information in tutorials on this blog (terra cotta pot http://needlesnknowledge.blogspot.com/2013/06/terra-cotta-3d-garden-pot-tutorial.html, garden hat http://needlesnknowledge.blogspot.com/2013/06/garden-hat-3d-tutorial.html, 3d garden spade http://needlesnknowledge.blogspot.com/2013/06/tutorial-for-3d-paper-garden-spade.html) or on the 3under3andmore blog (3d watering can http://3under3andmore.blogspot.com/2013/03/3d-paper-watering-can-tutorial.html ).

To see a project that uses these designs together, visit: http://needlesnknowledge.blogspot.com/2013/06/grow-3d-letter-box-ensemble.html

Saturday, June 8, 2013

Terra Cotta 3d Garden Pot Tutorial


Create this realistic planting pot using one 12x12 sheet of card stock. 
(Finished size approx. 3 1/8" tall x 4" at widest.)
This svg cutting design from the creative minds at SnapDragon Snippets
is available for purchase from the Silhouette America online store.
Of course, it could NOT be used for real planting -- water would destroy it. 
Still, you will find lots of other great ways to use it.
Perhaps you will fill it with garden goodies like seed packets, 
a rolled pair of gardening gloves, gift card to a favorite garden center, or even candy corn.
Wrap in cellophane with a bow and tag, and it will be a unique and thoughtful gift.


Here are the 9 cut out pieces used to create the pot. Clockwise from upper left: inside hex base; inner liner; rim section; back side piece (includes outer base hex), five side pieces.


Begin by bending the BACK SIDE and SIDE pieces at the bottom perforations making a mountain fold (inner) and a valley fold for each. Also fold side tabs back.

.


The back side piece is shown in the illustration above, and a representative side piece is shown here.

Note the "lower rim" section - long rectangle - between the body of the side and the tab on all side and back side pieces. These rim areas will be folded back and glued to the inside of the pot during a later step.


Fold the RIM piece along the 3 perforations for each "slice" of the shape. Fold the bottom and side tabs back, also. Handle carefully, since the actual hexagon "ring" shape is less than 1/4" wide and may be subject to bending and tearing.


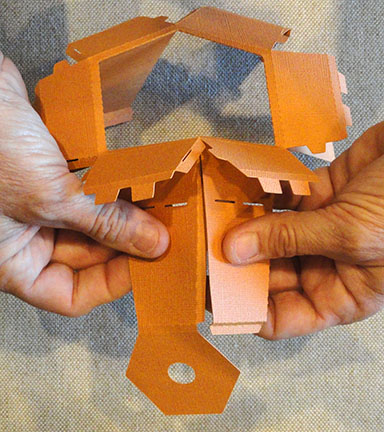
Join one side piece to each of the inner 6 edge tabs. 

The upper edge of the siide edge is glued to underside edge of tab. 

Push the side's top edge all the way into the fold angle at the perforation.


This image shows all six sides attached to rim inner edge tabs.


Lift assembly and bring the first two edges together, with straight side edge of one piece overlapping the tab of the adjacent piece, as shown. Apply adhesive and join.

Repeat this step until all six seams are joined.


At lower edge, apply adhesive to the "rim" portion of each side piece. 


Fold back and pinch each to attach firmly to inner pot surface.


Fold tabs of the 5 side pieces away from pot sides to form a ledge. (Do the same for the side back piece, too, though a bit differently.) Apply adhesive to the ledge tabs. 


Fold the hexagon base into position so that edges will rest on the ledge and glue in place.


Use the eraser end of a new pencil to push against the ledge tabs to help attach these to hexagon base.


Insert the bottom tabs of first rim section into the corresponding slots in the pot side.


Push tabs all the way in, then fold upward.


Apply adhesive to the upper edge of tabs, then fold up and hold in place until secured.


For the second section, side tab will be inserted into corresponding slot of first section. Apply adhesive to the full edge side tab of the adjacent section, and to the slot tab and insert. Hold in place until glue is secure, then insert lower tabs into body as with previous step and three images.


Repeat this process until only final rim section remains.

For final section tabs and side edges, the positioning is the same, except there will be two side tabs to glue and insert before inserting and gluing the lower tabs.


Next, fold the LINER piece with valley folds all around. Fold bottom tabs inward.

Glue the side seam edge and tab.


Apply adhesive to the backside of bottom tabs.


Apply adhesive to the backside of entire liner.


Insert liner into pot interior. Push liner down until it is snug with tabs against the bottom. Hold in place and smooth edges as they adhere.


Use eraser end to apply pressure to tabs.


Finally, apply adhesive to backside of  HEXAGON INNER BASE piece. Insert into interior and work down until it is flush with other bottom surface. 


DONE!
To see a finished dimensional project that incorporates this terra cotta pot, 
follow this link to a different post in this blog:
http://needlesnknowledge.blogspot.com/2013/06/grow-3d-letter-box-ensemble.html


Tutorial for 3d Paper Garden Spade

This life-size garden spade may look real, measuring approx. 11" tall.
But it is actually created from cardstock cut-out shapes 
using a Cameo digital cutting system with an svg cut file available for purchase
through SnapDragon Snippets at the Silhouette America online store
(Shape title: 3d garden spade).
Two other companion "gardening" 3d designs are also available:
3d terra cotta pot and 3d garden hat.


These shapes are used to create the 3d spade. Left to right they are: blades front (top) and back, shaft, handle with orange decorative grip above it, decorative band below it.


Begin with blade pieces. Fold FRONT BLADE at perforations: mountain fold center, valley fold two sides. Apply adhesive to spaces around perforation-defined triangle as shown. (Do not apply to area between side perforations.)

Position front over BACK BLADE. Align upper and side curved edges. The perforation folds will give the finished blade some cupping shape. (Don't try to make it flat!) The cut out triangle will allow the curving of the blade. Smooth away any potential folds that may begin to form near the pointed blade end. Continue to check and adjust and smooth edges so both layers align as closely as possible. A triangle shaped channel will form in the un-glued area around perforations.


Next prepare the SHAFT. Fold at the perforations in three mountain folds. Circle end is the top. This view is from the back. When viewed from the front, the far right face will act as a tab that will extend the full width of the shaft back to assist in the gluing.


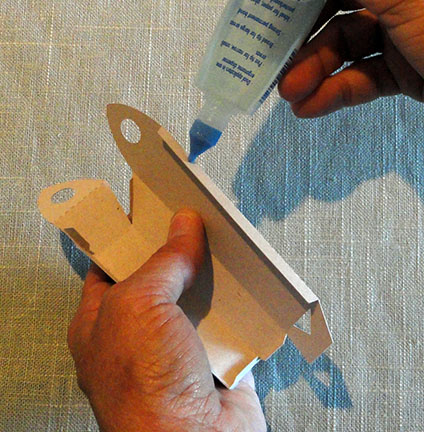
Apply glue to the "tab" face full length.


Fold at perforations to position the "tab" face behind the back face (includes the circle end at the top). Apply pressure along the full length of the back to join back underside to tab face. AT THE SAME TIME push the two corner edges to force the tab cut edge fully back into the perforation corner. 

Continue working and holding until dried and secure.


Next, prepare the HANDLE. Fold vertical perforations as mountain folds. Fold front circle top perforations in mountain fold (inner) and valley fold as shown. Fold triangle lower end in mountain fold. Fold tabs inward.


Apply adhesive to full length of tab.


Fold into tube shape and position tab under opposite edge. Use a long tool like this knitting needle inserted inside the handle to help assist gluing process. Rigid needle offers fingers a way to apply pressure along the tab-to-edge seam.


Apply adhesive to tabs at triangle end. Fold end over, align end edges with perforation edges and adjust to help trapezoid end shape form correctly.


It may help to insert the flat eraser end of a new pencil into the handle to help apply pressure to triangle end tabs as glue dries. Move around to the three tabs as needed to apply pressure.


Insert shaft pointed end into top of handle tube and out through triangle hole at lower end. Push all the way through until top hole shapes of shaft and handle line up.


Adjust the shaft circle end, then apply adhesive to backside and glue in place.


Apply adhesive to backside of handle front circle end AND to angled edge tabs of sides. Fold into position and apply pressure until glue holds.


Shaft points end will insert into blade channel as shown.  Find the small perforations on each of the three faces of the shaft that will indicate the gluing area. Apply glue below these small marks, then insert into the channel, adjust to square shaft with blade top edges. Hold in place until secure.


Next, prepare and attach the decorative GRIP. Fold on all perforations in mountain folds.

Wrap the grip around the handle with cutouts aligned on top and side edges, seam and tab coming together at the back side edge. Center the grip top-to-bottom on the handle front face so that approx. 1/4" of the handle is visible above and below grip.


Apply adhesive to tab, then position and apply pressure along edges WHILE AT THE SAME TIME pushing side corners inward to snug the grip around handle. Hold until secure.


 Finally, prepare and attach the decorative BAND. Fold at the center perforation in a mountain fold. Next, fold at each of the three short perforations in mountain folds.

With fold edge downward, wrap band around shaft below handle. Begin to insert end tab into opposite end between band layers. Apply adhesive to tab, then complete the insertion and hold until secure.


Slide band down a bit, then apply adhesive just below handle. Re-position band and hold in place until secure.


DONE!