Thursday, December 19, 2013

Snowflake 3D Box Construction Tips


Now available from SnapDragon Snippets
through the America online store is this
"3d snowflake box".
Download the file and then use it as a "winter" treats box,
or as a dimensional object for your shelf or cubby,
or use the lid alone as an element in a winter wreath,
or a dangler between letters on a "WINTER" banner or swag.
Be creative: glue rhinestone jewels where the
circle punches are cut (crystal, blue, light blue, or a combination).

Step 1:  Identify and cut the parts needed to create the box.

As top row are the two LID boxing strips (with built-in rim reinforcement) and lid "star".
As bottom row are the two BASE boxing strips and base "star" (very slightly smaller).
Shown also is the decorative snowflake shape for the LID.

Step 2.  Follow the illustrated construction steps for the "Sun Flower 3d Tutorial" to prepare, attach and join boxing strips to LID and BASE shapes.

Step 3. Apply glue to the snowflake shape backside and attach, centered, to the LID face.

Step 4. Slide the LID over the BASE to finish the box. NOTE that the LID fits quite snugly over the BASE.

Saturday, December 14, 2013

Pinecone & Star Mini Quilt: Terial Magic Prep for Cutting Fabric


This tutorial will show the construction steps for this mini quilt,
including applique layering and stitching, star block shape creation on screen 
in the Silhouette software, fabric prep to cut using the fusing alternative
liquid spray called "Terial Magic", block construction, final rinsing, etc.


1. Prepare the pinecone layered appliques from the "pinecone a6 card" design download. Scale the design to fit as desired within the 5" seamlines square of the block used for this project. 

NOTE that I have traced the seamline squares with temp marker on one panel with sufficient cutting/handling space between, then fuse the shapes and leave the panel larger for easier handling.


2. Position and fuse the base constrast layer and the semi-cirOver edge the applique raw edges with a blanket stitch or zigzag stitch.


3. Position and fuse the next layer (holly leaves), then the third layer (ribbon base long shape), then the fourth (ribbon knot) one by one, completing the over edge stitching for each layer individually with less interference from subsequent layers.


Trim the block sizes 1/4" beyond the temp marked lines, so that the cut block size is 5.5" x 5.5".


4. Prepare the fabric to cut the patchwork shapes with the Silhouette digital cutting tool. Follow product instructions  to spray, partially dry, and press the fabric in shape sizes that will allow the color A and color B patches to be cut.

Here I am spraying for good saturation.


Here I have folded the fabric into multi layers and am squeezing the layers to distribute the liquid thoroughly.


Here I am pressing the fabric that has been allowed to air dry to approx. 80" dry state.
5. Here is the screen shot that shows how I have created squares and rectangle patches for my block (design may be available later as download).
Cut: (8) red squares 1.375", (1) red square 2.25", (4) background squares 1.375", (4) background rectangles 1.375" x 2.25", (2) background side strips 1.25" x 4", (2) background top & bottom strips 1.25" x 5.5"

6. Load the appropriate fabric on a cutting mat into the Silhouette, then cut the shapes from color A (red for star, for example) and color B (background).


Here you can see the patches removal. Sometimes the corners will need to be clipped for final cut.

Here you can see the cut patches in their approximate positions to create the block.


7. Trace a diagonal .5mm pencil line on the back sides of all the small red squares. This is a stitching line.


8. a) Position small square on background rectangle end with line oriented as shown. b) Stitch 'on' line, press triangles to corner. c) Trim allow. to 1/4". d) Repeat for second square.

This process completed one "flying geese" (FG) unit.


9. Join FG units to opposite sides of large red center square; press toward center.

10. Join background squares to ends of remaining 2 FG units; press toward center.

11, Join side and center columns; press seams outward.

12. Join side, then top & bottom rectangle strips in order; press each seam outward as it is completed.

Complete two blocks for the project shown.


Here you can see the block from the backside to verify seam pressing direction, if desired.

(NOTE: working with the cut patches that are still stiffened with the Terial Magic spray solution makes patchwork feel even more precise than usual.)


13. When block is complete, place it in a bath of clear room temp water to soak out the spray. Soak for 30-40 minutes, then allow to air dry, then press. The fabric "hand" will return to 98% of its original softness.
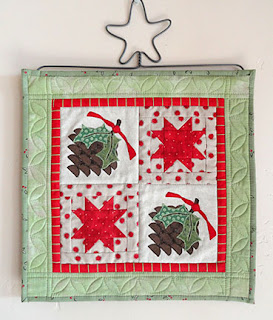


14. Join the pine cone and star blocks into rows, then join rows. Press seams flat. Add narrow accent borders (cut 1" wide in this project) and outer borders (cut 2" side in this project); press outward.

15. Layer and quilt as desired. This project was machine quilted using a home domestic machine and walking foot. Prepare and apply binding. Add a fabric sleeve to the upper backside that is attached in the binding seam before it is finished, if desired. The mini quilt is pictures here with a decorative Ackfeld Wire star hanger rod inserted through the sleeve on the back.

Watch for more tutorials for patchwork using the Silhouette cutting system and Terial Magic Spray.


Fabric Gifts Using Cut Shapes: Group 2


Group 2 projects include (clockwise from back left):
holly wreath stocking, pod jar wreath cuff, pinecone and star mini quilt,
cookies for santa plate vinyl, canning jar topper,
holly cluster pillowcase, ribbon & holly mesh travel bag.
Three of these projects were created using "fusible" appliques
from the "christmas basic shapes" cut file available
from SnapDragon Snippets through
the Silhouette America online store.
The other four use additional cut designs that will be listed
with the specific notes for that project.


The wreath stocking tutorial and info can be viewed in a separate blog post.


The pinecone and star mini quilt tutorial for applique and patch cutting with the Silhouette electronic tool can be found here.


Separate information for the mason canning jar lid creation can be found on this separate post.


PROJECT 1: Pillowcase Band
1. Purchase small yardages of "body", "band", and "accent" insert fabrics, cut and apply holly leaf, pinecone and ribbon streamer shapes into a "spray" shaped cluster on the center of the front band, then construct the case.

(This is a miniaturized version, so if the scales seem unreal that is because the case is a child's size.)


2. Cut the pieces:
body - 28" x width of 44" fabric
band - 10" x width of fabric
accent - 1 1/2" x width of fabric

(Seam allowances are 1/4". Find a "how to" link here.)

You can see the approx. location of the applique on the FOLDED band (folded on the left side in this image, but UNFOLDED top to bottom so you can see the crease).
3. Follow the other link's instructions, or modify as shown here:
Press accent strip in half lengthwise, then align and pin raw edges of strip along band. Layer body top edge with face sides together, as shown, then stitch this seam. 

Press all allowances toward body. Serge or zigzag over edge the raw edges.


4. From the front side, topstitch neatly on body next to accent strip seam through all layers.


5. Fold assembly with face sides together and align bottom and side raw edges. Also make sure that the band fold edges are exactly aligned at the opening. Pin if necessary, then stitch seam. Finish raw edge by serging or zigzag stitching. Turn face side out and press flat.

To keep inside seam raw edges of peeking out, top-stitch tack an inch or so near the opening, stitching through all layers and backstitching, or repeating the length of the stitching.
PROJECT 2: Plastic Mesh Travel Bag
Great for traveling to hold makeup, toiletries, first aid kit, snacks and more.

For this Christmas gift, a bright green fabric was chosen, then an easily "detachable" embellishment panel of cut appliques on double-layered wool felt with oversize center button is "tacked" in place with two decorative end star buttons.


1. Purchase a roll (or co-op this with friends) of screen door replacement plastic mesh, then select a fabric scrap for the banding, and obtain a nylon coil zipper at least 12" long.

Cut the bands: (1/4" seam allow. included)
top band - 3" x 13"
bottom band - 5.5" x 13"
mesh - 20.5" x 13"


2. Fold  the fabric rectangles in half lengthwise with the face sides out. Align raw edges of each with mesh ends, pin an stitch 1/4" seam. Over edge or serge the raw seam. Press fabric strips away from mesh (take care with hot iron to test that it won't melt the mesh).


3. Topstitch neatly on the fabric band next to the seam.


4. Pin fabric fold edge along one side of closed zipper, with end of strip approx. 1/2" beyond metal zipper "stop" as shown. It is okay if your zipper top ends extend past the strip ends opposite. They will be tacked and trimmed in the next step.

Top stitch neatly next to fold. Repeat for opposite side.


5. Open zipper slightly at top, align fabric strip ends, then zipgzag a bar tack across the zipper teeth to secure, approx. 1/2" from fabric ends.


6. Fold the bag with face sides inward.; make sure the zipper is slightly unzipped. Arrange the top mesh fold to be approx. 1" from the top band (narrower) seam; crease by hand or lightly press.

7. Pin and stitch the side seams on each side of bag. Finish the raw edges as before (serge or zigzag)
.
8. Prepare the fusible applique design on an oversize scrap of wool felt, working within a 2.5" x 9-10" design area. When fusing and/or edge stitching is complete, trace an appropriately-sized rectangle around the design with temp marking tool. Layer with second scrap piece of felt, then neatly topstitch ON the marked line. Trim 1/16" beyond stitching. Attach center button or other embellishments as desired.

Pin panel in place centered on lower band, then attach buttons through all layers.
 PROJECT 3. Decorative Pod Cylinder
1. Obtain a glass cylinder or recycle from second hand store. (Mine was a flourist's roses vase.)


2. Select a body scrap and trim strips/lining scrap. You will also need approx. 1.34 yards of decorative (sheer) ribbon, appliques of choice, small buttons for berry accents.

3. Determine your cut sizes to fit your cylinder's height and circumference. For mine, the center panel was cut about 3.5" tall, and .5" shorter than my tape measured around the jar. (You will want a tying knot gap between back edges when complete.)
The bands/lining combination rectangle was cut center panel height plus 4" (provides approx. .75" bands on top and bottom with 1/4" seam allowances.

4. Join center panel to one edge of band/lining piece. Press seam back toward center panel. Press 1/4" seam allow. back on both ends.

Now bring band and center panel edges together and complete seam. Press toward center panel as before. Turn face side out.

Press the cuff flat with equal widths of band on either side of center panel. 

5. Cut ribbon into four equal lengths (approx. 12" long each). Insert ends of ribbon pairs between cuff layers, pin in place. Pin remainder of pressed fold edges together, then neatly topstitch through all layers. Take care to secure ribbon against the tying stress it will need to withstand.


6. Place the cuff on your cylinder and tie ribbon ends at the back, as shown. If the cuff seems prone to slipping down, consider securing the front invisibly in place with a strip or two of double-stick tape placed behind and below the cuff edges.

Fill your cylinder with pods, nuts in the shell, small shiny ornaments, potpourri, or other interesting contents.


HOPE THESE PROJECTS
OFFER SOME IDEAS
FOR CHRISTMAS GIFTING!

Dimensional Holly Wreath Projects

 Available soon from SnapDragon Snippets
through the Silhouette America online store
is a dimensional holly leaf wreath quilt block design
that was used to create the unique holiday pillow seen here.
The wreath cut shapes were used to trace and prepare
hand-appliqued (edge seam allowances turned under)
wreath and heart, which were stitched to the
black print base block.
The leaf shape was traced on doubled fabric rectangles
placed face sides together. Layers were machine stitched
with shortened stitches all around. Turning slit cut in back layer,
turned and pressed, then positioned and topstitched along the
curved edge and up the center almost to the tip.
Complete the pillow with accent borders of choice.


Use the basic stocking body shapes from SnapDragon Snippets
through the Silhouette America online store.
Adjust the wreath size, if desired, then prepare the applique
shapes as described above, or as fusible machine appliques.
Add border "checker" panels and contrast cuff and toe
as shown, and paired leaf shapes with heart for the cuff.
Review stocking completion steps in a separate blog.


Wednesday, December 11, 2013

Dove Peace Banner Inspiration

Now available from SnapDragon Snippets
through the Silhouette America online store
is a complex or simpler peace dove design like the one pictured here.
This banner was created with fusible applique shapes
in a complex design upon which the
"dove & peace multicut for paper" design.
This closeup shows more detail about how many
applique pieces and shapes compose the life-like dove.
For this applique, the fabric shapes includes a narrow extension added
to the edge of the "feather" shape over which
the adjacent shape could lap for better integrity of the whole.

Perhaps you will download and use this shape to create
something wonderful and unique.
Perfect for a Christmas season decoration,
or a wonderful sentiment or "blessing" any time.

Saturday, December 7, 2013

Angels Applique Quilt Inspiration

Here's a fun applique quilt project for Christmas.
The angel applique design used in this three-block "frieze" quilt
will soon be available as a cut file from SnapDragon Snippets
through the Silhouette America online store.


The cut file is "angel folk art applique quilt block".
It is sized in the original to fit on a block approx. 6" wide x 9" tall..
There are a few cut file differences to this project's block design. 
These include an echo base shape that
includes an eyelet-style lace skirt edge.
The wing shape includes swirl designs,
and the apron shape extends higher than the hands.
This wall quilt has substituted a simple rectangle "halo" shape,
and in place of layered hearts there are 3d wood star "buttons" at center front
that have drilled holes and red yarn ties.
Alternative straight edge shapes are included in the file
so that this style design is possible to recreate.

I have also used this design for a pillow for the holiday season.
Find a design application that suits you best,
Then plan, size, and cut your fusible applique shapes.
Position, press-to-fuse, and over-edge stitch
for heirloom decor projects you can use for 
years to come.