
Twelve
shaped-edge ‘petals’ are curled, then each
is rolled into a cone using guide
symbols.
(Recommended to use print paper weight for rolled cones;
since this
style paper stock is often single sided,
two-part stencil can be used to ‘ink’
on a plaid pattern
to backsides of petal shapes.)
Cones are arranged on the
circular base using
‘rays’ guide marks (hand traced between dashes).
Center
offset circles trio adds decoration to
the front to hide cone tips.
Use as card
decoration, gift tag and more.
Measures approx. 6.25” diam. when fully assembled.


Sized to coordinate as a front decoration on
the
“Pennant 3D Pocket”.
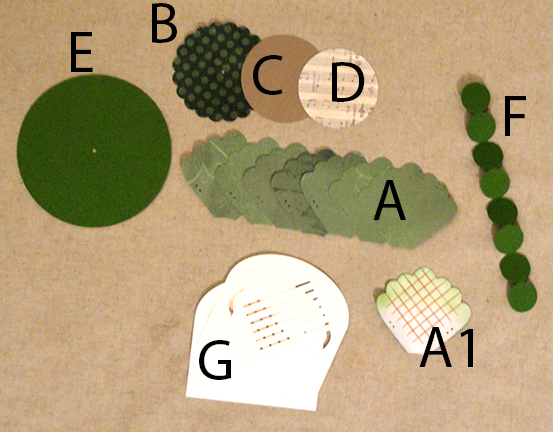
ASSEMBLY: 1. Identify and cut the shapes:
A cone petals (12)
A1 petal shows backside stencil plaid and distress coloring
B-D scallop and plain circle array
E circle base with guide dash marks
F platform circles platform
G left stripe and right stripe stencils for
adding plaid (see A1 petal)

 . . . position the petal to be stenciled under the stencil shape
so that . . .

 3. Use a dauber and distress ink to fill in the stripe
openings under which the petal shape lies.
The ink will end up on the stencil, of course, but
the important inking is what ends up on the petal.
Due to the nature of distress ink, the pattern will be light.

 5. Repeat the steps for the left stripes, positioning of the stencil
and petal side scallops as before, with petal behind,
securing and inking through the stencil.


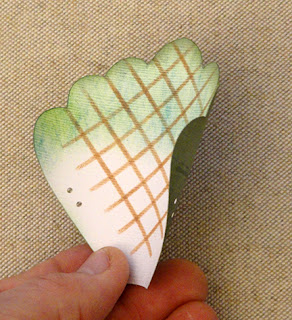
 This is the appearance of the prepared petal.

 . . . and line up the two guide holes as shown in
this completed cone. Use a toothpick tip or stylus
to help line them both up if necessary.
 It may be helpful to insert a narrow rod-like tool such as
this paint brush shaft behind the seam area to provide
a rigid "press-against" surface while securing the seam.


 12. Apply a bead of quick-grab liquid adhesive along
the center-underside of the petal, ending approx.
2/3rds from scalloped edge . . .


 13. Place the second cone opposite the first,
and then the next pair at the right-angle positions
to assist in layout and fitting the remainder in place.
Then continue to position and fit a pair of cones
between the original four, until . . .


 15. Bend the platform circles shape in accordion style
so that the circles will stack, then . . .
 . . . apply a dollop of hot-melt glue at the center
between each layer in order to give some added
height to the stack -- sort of like gluing an actual bead
between the layers.
 The aim is to create a stack that is 3/8" or so tall.


A cone petals (12)
A1 petal shows backside stencil plaid and distress coloring
B-D scallop and plain circle array
E circle base with guide dash marks
F platform circles platform
G left stripe and right stripe stencils for
adding plaid (see A1 petal)
These stenciling steps 2-7 are optional, intended as a way
to add patterning to the lighter weight "printed paper"
that is recommended for the curled and rolled cones.
2. Identify the lowest side scallop on each side of
the petal shape, then . . .

so that . . .

. . . those side scallop edges align with the extensions
at the sides of the stencil as precisely as possible
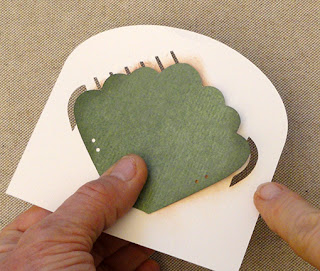
on both sides. Hold in place while placing FRONT side
down on work surface, and securing stencil in place.

openings under which the petal shape lies.
The ink will end up on the stencil, of course, but
the important inking is what ends up on the petal.
Due to the nature of distress ink, the pattern will be light.

4. To get a sense of how much inking has been transferred,
release the anchor temp tape on one side an carefully roll back
the stencil. If it satisfies, remove the stencil for next shape.

and petal side scallops as before, with petal behind,
securing and inking through the stencil.

6. Carefully peel back the stencil to check for success,
then remove the stencil.

Here is one stencil-completed petal.
Repeat for the other eleven petals.

7. The petals in this project have some additional distressing
and coloring added, to give the illusion that the paper
has pattern/design on both sides.

8. Add some curl to the petal shapes by using a rod-shaped
tool such as this 1/4 to 5/16" wooden dowel section,
holding the paper shape firmly between dowel and thumb
while pulling the shape over the tool, somewhat like
curling ribbon. Add most curl to the sides, and radiate
the curling action from the narrow bottom to fan across
the wider scalloped edge.


9. Apply liquid adhesive to the underside of the petal
along the right edge in the approximate margin shown
in this image by the red dash line, then . . .

. . . form the petal into a cone with the adhesive-applied
right side overlapping the left . . .

this completed cone. Use a toothpick tip or stylus
to help line them both up if necessary.

this paint brush shaft behind the seam area to provide
a rigid "press-against" surface while securing the seam.

NOTE also that the tip opening should end up being
rather tight like the paintbrush shaft circumference.

Here is the finished cone petal.
10. Repeat to form all 12 petals in the same manner.

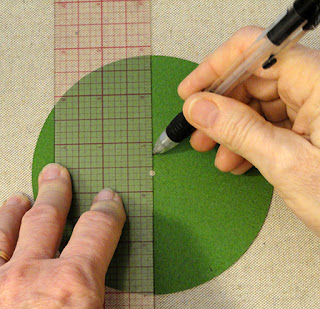
11. Prepare the base circle by identifying the guidemark
hash cuts around the outer edge that mark off
the twelve center position lines of each petal.

Make these more visible by laying a straight edge across
two opposite marks while intersecting the center opening.
Repeat for 6 total bisecting lines all around the circle.

the center-underside of the petal, ending approx.
2/3rds from scalloped edge . . .

. . . then position the glue-applied underside along
the first selected drawn guide line . . .

. . . with the tip placed at the center dashed guideline,
and secure in place until secure.

and then the next pair at the right-angle positions
to assist in layout and fitting the remainder in place.
Then continue to position and fit a pair of cones
between the original four, until . . .

. . . all of the cones are in place radiating out from
the center in regular fashion.

14. Since the shape of the cones at the outer scalloped
end may be tall and leaving gaps between cones,
gentle apply pressure to "flatten" them all at the same rate . . .

. . . slightly so that the cones touch, while being cautious
NOT to cause permanent creases or bends.
If desired, a carefully-placed dab of adhesive can be
added where cones touch at sides may assist,
but likely will be unnecessary.

so that the circles will stack, then . . .

between each layer in order to give some added
height to the stack -- sort of like gluing an actual bead
between the layers.


16. Assemble the center scallop and plain circles
into a unit by centering and gluing together.
17. Position the platform unit at the center of
the cone array and glue underside edges in place,
then position and attach the scallop and plain circles
assembly, centered, over the cones.

Here is the completed rolled cones rosette.

The pleated shamrock rosette can be added to the cone
rosette in place of the scallop and plain circle unit,
as desired. This "super rosette" is sized to fit the front
of the pocket pennant project also.

No comments:
Post a Comment