
Stylized
miniature hat box has shaped sides with segmented
sides/bottom boxing panels that
join along edges
for a unique gift container.

Tote is sized specifically to fit
the “Scallop Brim 3D Hat Ease Card” to create
Suitable for
many other uses as well.
Side-to-side handle grip fits replica end brackets
joined
to boxing of hull with mini brads so that it can
pivot back and out of
the way.

A disc slide-over latch helps close the top flap.
Other details include
boxing segment offset overlays,
front and back pointed straps with punch dot
detail
for brads or nailheads, offset rim accents, layered disc ID tag.
Add
blossom buds and leaves to coordinate with Easel Card,
or as unrelated
embellishment as desired.
Measures approx. 6.125” wide x 5.25” tall x
1.75”
deep (closed, excluding handle).
ASSEMBLY: 1. Identify and cut the shapes:
A box front with accent rim at edges
B front box upper reinforcement panel
C box back D back box upper reinforcement panel
E & F boxing strips G boxing bottom center overlay panel
H "foot" build up shapes (2 pairs of 8)
I boxing accent overlays (2 with punch hole, 8 solid)
J front accent straps (2) K top flap
(not shown: flap accent - see Step 5)
L latch stem circles (6) and top disc (3)
M handle strip N handle accent
O handle end brackets for layering (2 pairs of 2)
P luggage tag: 2 main shape,
2 for front & back rim accents


 c) layer and glue the latch mechanism small stem circles
into a stack of 7;
d) layer and glue the disc circles into a stack of 3;


 8. Align and join the boxing strip ends by overlapping
the straight edge (left) over the tab to perforation line (right).

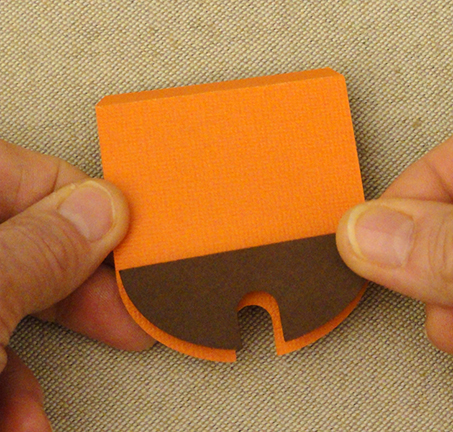
 10. Position and attach each "foot" stack into
the panel recess (press under a weight if desired).

 12. Bend the boxing up into position to align the next
segment with the next edge of the front panel, align and join.


 15. Repeat steps 11-15 to join the back panel
to the boxing strips.
 16. Bend each of the end flaps back and glue to
the inside of the boxing strip.


 . . . bend the end under, apply glue away from the bracket
slot, and glue to the backside of the handle.
Repeat for the opposite handle end.


 . . . into the interior, then repositioning the handle.


A box front with accent rim at edges
B front box upper reinforcement panel
C box back D back box upper reinforcement panel
E & F boxing strips G boxing bottom center overlay panel
H "foot" build up shapes (2 pairs of 8)
I boxing accent overlays (2 with punch hole, 8 solid)
J front accent straps (2) K top flap
(not shown: flap accent - see Step 5)
L latch stem circles (6) and top disc (3)
M handle strip N handle accent
O handle end brackets for layering (2 pairs of 2)
P luggage tag: 2 main shape,
2 for front & back rim accents

2. Prepare the shapes that need to be layered and glued,
and allowed to dry before assembly.
a) layer and glue the "foot" rectangles into two stacks of 6 each;

b) layer and glue the handle brackets into two pairs of 2 each;

into a stack of 7;
d) layer and glue the disc circles into a stack of 3;

e) layer the luggage tag discs and glue together,
then position and attach the rim rings, one onto
front and one onto back.

3. Layer and attach the front panel rim accent onto
the front panel. Position and attach the strap shapes
over the front with bottom edges and punch holes aligned.
NOTE it may be helpful for this and other shapes in
the preceding step to place glued-up shapes under
a heavy flat weight until fully dry, to prevent curling or warping.

4. Position and attach the front upper reinforcement
panel behind the front panel. Repeat for the back panel.

5. Prepare the top latch flap by bending back on
both perforation lines. Position and attach the flap
tip accent shape.
6. Prepare the boxing shapes by bending back on
all perforation lines for panels and tabs.
7. Position and attach the accent shapes over each
segment, with punched accents at end positions,
centered within the defined segment panels.

the straight edge (left) over the tab to perforation line (right).

9. Position the bottom overlay reinforcement over
the corresponding bottom panel of boxing, and glue in place.

the panel recess (press under a weight if desired).

11. Position the boxing strip with the bottom panel
along the front panel bottom edge, align ends,
then join the seam by overlapping straight edge (left)
over the boxing flange (right).

segment with the next edge of the front panel, align and join.

13. Continue in the same manner to align and join each
of the boxing segments to the corresponding straight edge
of the front panel until all are joined.

14. Repeat the joining process on the other half of
the boxing strip and front panel edge.

to the boxing strips.

the inside of the boxing strip.

17. Position the top flap's flange tab along the top edge
of the back panel, then overlay back's top straight edge
over the flap's flange to perf line, adjust, and glue in place.

18. Use a mini brad to position and attach the latch stem stack
and the top disc and glue together. Then . . .

. . . insert brad into front upper punch circle,
and attach in place.
The latch flap functions by sliding under the top discs
and around the step.

19. Prepare the handle strip by adding curl to
the middle portion between the end dash guides
(positioning guides for the accent shape).
Also add curl to the accent strip overlay.
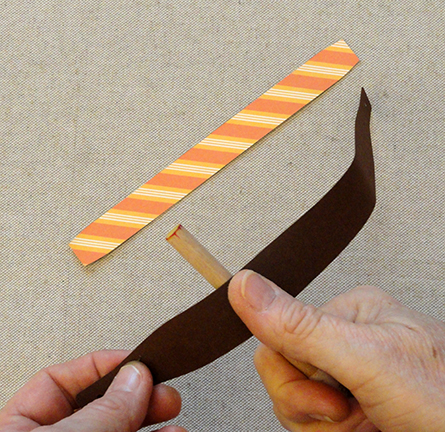
20. Position and attach the accent strip over
the handle strip, centered, with ends at guide dash cuts.

21. Thread the handle end through the bracket stack
from front to back, then . . .

slot, and glue to the backside of the handle.
Repeat for the opposite handle end.

22. Position the end bracket over the side boxing with
punch holes aligned, and attach with mini brad ONLY.
The brackets need to pivot freely so that the card or
other contents can be added or removed.
Also add accent mini brads to the handle ends, and . . .

. . . to the front accent straps at punch holes.
23. Decide where to attach the luggage tab.
For the sample project, a 4" ball chain was threaded
through the punch hole, then an attachment hole
was added . . .

. . . near the top of the front panel, as shown here.

24. Use the round hat box container for the easel hat card
by rotating the handle back out of the way, and sliding
the closed card . . .


Here is the completed hat box, with purchased floral
accents added onto the luggage tag (also affixed
in place with a couple of foam squares.

No comments:
Post a Comment