NOTE: The hat easel card and the tote are purchased separately.

Round card has layered under-lid panel that
bends
to prop up the “attached” stubby bowler style 3D hat.
(Build the bowler’s
crown by joining and shaping
wedges on two halves, then inserting through
the brim
ring, adding brim rim.)
Attach the double layer sentiment panel with
“Leprechaun Wishes” and shamrock to provide
the “stop” for the easel mechanism.

Decorate with included hat band, tiny bow shapes.
Add blossom
buds and leaves as desired for
this extra special card suitable for many
giving
occasions, particularly St. Patrick’s Day –
or substitute the sentiment word
cuts from
“Arch Down Curve Sentiments Quartet” to
customize for birthday,
Valentine’s Day, Father’s Day,
get well, appreciation and more.
Card measures
approx. 5” x 5” x 1.5” tall when closed.

This specialty tote is designed to hold
“Hat
3D Bowler Easel Card” design,
but can also be used separately.
Arch handles have
mini shamrock end “brackets”
that attach with mini brads.
Measures approx. 5.3”
wide x 8.3” tall x 1.625” deep.
NOTE that Tote container assembly will begin in Step 25.
HAT CARD ASSEMBLY: 1. Identify and cut the shapes:
A card base (two welded circles with perforation line)
B card front whole circle
C card back whole circle
D & E interior offset accent shapes
F front offset accent shape
G 'stop' plaque (2 layers)
H & I 'stop' plaque decoration "Leprechaun Wishes"
& shamrock with center circle punch
J hat crown dome wedges (2)
K hat brim base L hat brim rim half (2)
M hat band N hat bow O hat bow knot

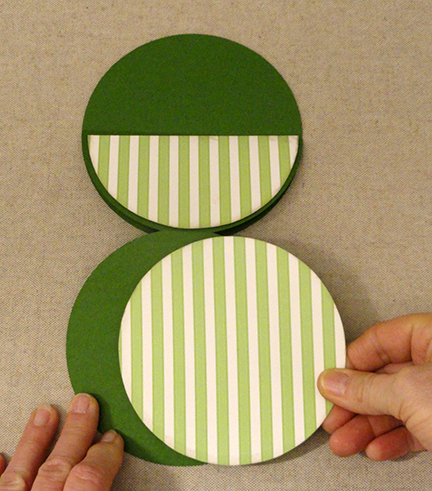
 3. Position the card front whole circle over the base
(base should be folded flat with bottom of mechanism
half-circle folded upward) and align all circle outer edges . . .
 . . . then glue together where the mechanism half circle
and the card front whole circle overlap each other.

 5. Open the card to position and attach the interior whole circle
offset accent shape over the interior card back circle shape
in similar manner, and the half circle shape above on
the mechanism portion, with straight edge aligned
along the perforation fold.

 8. Position and attach the 'stop' plaque assembly
centered along the bottom of the interior panel,
with a slight 1/4" offset margin.

 To close the card, return the top panel back to lay
 9. Prepare the create the hat crown by bending
back on all the crown wedge perforation lines,
except bend the bottom tabs forward.
10. Prepare the brim by positioning and attaching the rim full circle
ring -- or the half circle half rings -- on the top of the brim circle
(with octagon cutout) so that the outer edges align.
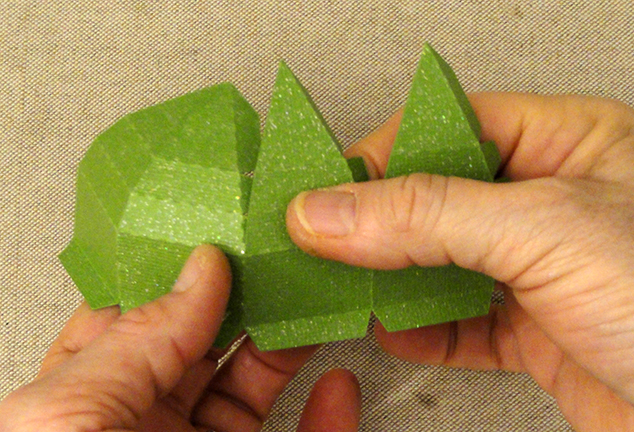
 11. Complete the first segment of the first wedge seam
by bending the two adjacent mid edges back slightly
so that the straight edge of the one will overlap the wedge
tab of the other to align at the perforation line,
and glue in place.
 12. Continue the process for the next higher seam segments . . .
 . . . as well as the top (tip) segments to complete seam.
 13. Repeat Steps 11-12 for each of the next two wedge
seams across the first crown shape, then complete
the second crown shape in same manner.


 Apply fingertip pressure all around on the eight angles . . .
 . . . to ensure that the tabs attach securely to
the underside of the brim.


 19. Prepare the hat bow by adding curl to the center
of each half where the loop portion is widest.
NOTE that because the backside of the printed pattern
paper weight that is recommended for the bow is white,
the model project has had the back "white" side
colored with distress ink.
 20. Bend (but avoid folding flat unless that look is preferred)
to bring the first end behind the bow shape center, then . . .
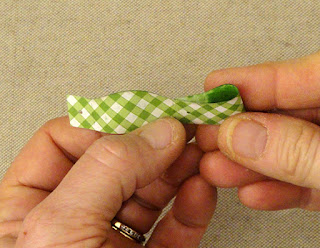 . . . repeat for the second end, to align all three
circle guide marks, and glue the layers in place.
 21. Position and attach the knot shape over the center front.


 24. Attach final embellishments of stud or brad to bow,
purchased flowers, buds or bracts, etc. to crown at band.
 TOTE GIFT CONTAINER FOR BOWLER HAT EASEL CARD
25. Identify and cut the shapes for the Tote:
A & B main hull front/side and back/side shapes
C front & back top accents D front & back rim accents
E side top accents F side rim accents
G handle base with offset accent (2 sets)
H shamrock disc base and offset inner accent circles
I shamrocks for discs (4)

 28. Position and join the first side seam by overlapping
the straight side seam over the adjacent flange tab.

 NOTE that the hull can still be flattened at this point
in the assembly so that fingertip pressure can be
applied along the length of the seam to secure.

 31. Prepare the handles by attaching the accent inner
shapes over the fronts of the handle bases.
32. Prepare the four discs by layering and attaching
circle accents over bases, then position and attach
the shamrock accents in the center.
 33. Locate the guide marks on each handle shape
toward the ends, then . . .
 . . . apply glue below the dash marks, position a handle
over the front of the tote hull, center, and move the handle
downward until the dash guides align at the scallop edge.
Apply pressure to firmly attach in place.
Repeat for the other tote front and handle.

 The tote assembly is complete at this point.


A card base (two welded circles with perforation line)
B card front whole circle
C card back whole circle
D & E interior offset accent shapes
F front offset accent shape
G 'stop' plaque (2 layers)
H & I 'stop' plaque decoration "Leprechaun Wishes"
& shamrock with center circle punch
J hat crown dome wedges (2)
K hat brim base L hat brim rim half (2)
M hat band N hat bow O hat bow knot

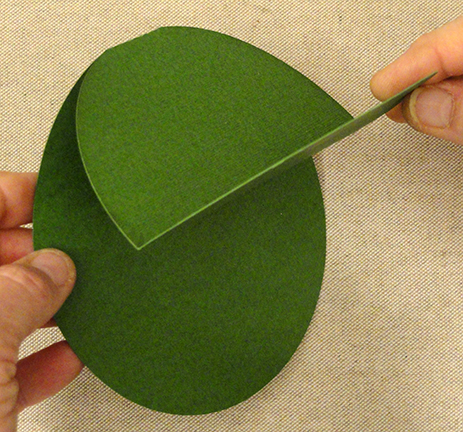
2. Prepare the card base by bending forward between the two
top-welded circles, then bend back (valley fold) along
the crosswise hemisphere perforation line.
This forms the "mechanism" that will allow the card to
fold flat, then stand up into easel configuration.
(base should be folded flat with bottom of mechanism
half-circle folded upward) and align all circle outer edges . . .

and the card front whole circle overlap each other.

4. Position and attach the front offset circle accent shape
onto the card front whole circle, with equal offset margin
all around.

offset accent shape over the interior card back circle shape
in similar manner, and the half circle shape above on
the mechanism portion, with straight edge aligned
along the perforation fold.
6. Position and attach the 'Leprechaun Wishes' word cuts
and the shamrock and center circle punch onto the front layer
of the two-layer 'stop' plaque.
7. Position and attach the top layer assembly over
the duplicate bottom layer. Making the 'stop' plaque
as a two-layer shape will help the easel stand up.

centered along the bottom of the interior panel,
with a slight 1/4" offset margin.

To make the easel configuration work, push the top/front
panel back and allow the bottom edge to rest up
against the top of the plaque.

on top of the base and folded mechanism.

back on all the crown wedge perforation lines,
except bend the bottom tabs forward.
10. Prepare the brim by positioning and attaching the rim full circle
ring -- or the half circle half rings -- on the top of the brim circle
(with octagon cutout) so that the outer edges align.

by bending the two adjacent mid edges back slightly
so that the straight edge of the one will overlap the wedge
tab of the other to align at the perforation line,
and glue in place.


seams across the first crown shape, then complete
the second crown shape in same manner.
14. Position the two halves so that the straight edge
of one will overlap the adjacent tab of the other as shown . . .

. . . then join the two halves of the seam across top only.
NOTE that it will be necessary to depress the dome shape
in order to allow the seam to present as a straight line for joining.
Join the two portions of the seam, taking care to force
the two edges together to eliminate the center 'hole'.
Allow the seam to dry until secure.

15. Align and complete the three remaining segments
of both side seams as was done previously in steps 11-12
working from dome down to the brim edge.

16. Make sure the dome bottom edge tabs are all bent
outward, then apply glue to the tab's face (upward surface),
slide the brim assembly over the top of the dome,
and work downward to seat over the tabs.


the underside of the brim.

17. Prepare the hat band by bending slightly back
at all 7 perforation lines.

18. Position and attach to hat crown base so that each
segment aligns with one wedge section of crown,
and perforation lines match up. Ends should come together
at one perf line corner; trim any extra at ends.

of each half where the loop portion is widest.
NOTE that because the backside of the printed pattern
paper weight that is recommended for the bow is white,
the model project has had the back "white" side
colored with distress ink.

to bring the first end behind the bow shape center, then . . .

circle guide marks, and glue the layers in place.


22. Position and attach the bow over the selected
segment of the hat band, with bottom straight edges aligned.

23. Position (centered) hat over the card front panel
with bow arranged on the left (as you face it) side,
and attach in place.

purchased flowers, buds or bracts, etc. to crown at band.

25. Identify and cut the shapes for the Tote:
A & B main hull front/side and back/side shapes
C front & back top accents D front & back rim accents
E side top accents F side rim accents
G handle base with offset accent (2 sets)
H shamrock disc base and offset inner accent circles
I shamrocks for discs (4)

26. Prepare the hull main shapes by bending back
on all perforation lines for panels and flange tabs.
27. Position and attach the large accents and rim accents.

the straight side seam over the adjacent flange tab.

29. Complete the second side seam by forming the hull
into a tube to align this seam as in step 28.

in the assembly so that fingertip pressure can be
applied along the length of the seam to secure.

30. Adjust the tote into its dimensional rectangular
shape, fold the bottom flange tabs inward,
bend the bottom panel in, adjust the shape so
that the edges and perforation lines align, and join.
(It may be necessary to reach inside from the top
opening to apply pressure along these seams.)

shapes over the fronts of the handle bases.
32. Prepare the four discs by layering and attaching
circle accents over bases, then position and attach
the shamrock accents in the center.

toward the ends, then . . .

over the front of the tote hull, center, and move the handle
downward until the dash guides align at the scallop edge.
Apply pressure to firmly attach in place.
Repeat for the other tote front and handle.

34. Position each disc, centered over the rounded tip
of each handle end, and glue in place.


35. Embellish the tote at rim accent panel
as shown, to match bowler hat card, or as desired.

Here is the completed easel card and tote ensemble.

Hello,
ReplyDeleteI bought this hat and I haven't one part ??? The part to do the hat, could you send me, please ?
Brigitte
The tote file does NOT come with the hat design. They are purchased separately, in case that is what you are confused about.
DeleteAll needed shapes are included in the cut file. It is complete! Once you have read through the tutorial, compare the shapes that make the hat and you will see that you have all parts. The dimensional dome of the bowler is built from a wedge shape, the brim is a circle with the octagon cutout, etc.
ReplyDeleteHermoso trabajo, Gracias. Me ayudo mucho su explicación.
ReplyDeleteThe bowler hat is so cute. Can I still buy the cut file?
ReplyDeleteYes. It is available through the Silhouette America online store. Search by its design name, or find it in my portfolio under "Designers" (Hearthsewn)
Delete