
Rounded-edge
scallop pleat strips are accordion folded,
joined into a ring, then assembled
into a rosette
with glued-on stabilizer circles.
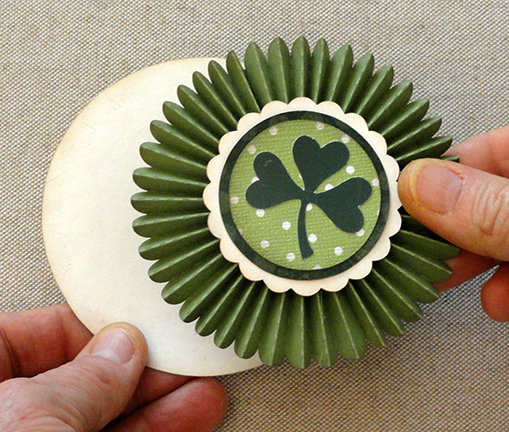
Add front offset circles pair
with scalloped circle base
and shamrock accent (hides the guide center circle).
Mount on a plain or hang tag base circle.
Measures approx. 3.6” diameter.

ASSEMBLY: 1. Identify and cut the shapes:
A ornament base (for extra strength, cut 2;
also included is plain circle shape)
B pleat strips (2) C reinforcement center circles (2)
D & E center accent circles F shamrock decoration
NOT SHOWN: center scallop circle

 . . . bend the next perforation back (mountain fold).
 Continue the alternating folding -- valley then
mountain -- across the strip . . .


 4. Form the strips into a tube and repeat step 3
to join the second seam.
 5. Push out the scallop edge of the ring to flatten
into this shape, then . . .
 . . . push the outer edges inward to compress
the pleats . . .
 . . . into the tightest possible center opening.
6. Do your best to hold that shape until . . .
 . . . a bead of hot-melt glue can be applied around
the center opening edges, then quickly . . .
 . . . position (centered) the first reinforcement circle
over the opening and the glue bead. Before the glue cools . . .


 9. Position and attach the pleated rosette to the ornament
base shape, then position an attach the shamrock
decoration to the center.
 10. Add twine tie for hanging.


Sized to coordinate as the top layer of the
“Scalloped Rolled Cone 3D Rosette” as part of
the Pocket Pennant Banner Project.
the Pocket Pennant Banner Project.

ASSEMBLY: 1. Identify and cut the shapes:
A ornament base (for extra strength, cut 2;
also included is plain circle shape)
B pleat strips (2) C reinforcement center circles (2)
D & E center accent circles F shamrock decoration
NOT SHOWN: center scallop circle

2. Begin folding the pleat strip by bending the end tab
on the right end forward (valley fold), then . . .


mountain -- across the strip . . .

. . . until the complete strip is folded in this accordion style.
Repeat for the second strip.

3. Line up the ends of the two strips so that
the plain edge of the left edge overlaps the end tab
of the right strip, align bottom, and glue the seam.

to join the second seam.

into this shape, then . . .

the pleats . . .

6. Do your best to hold that shape until . . .

the center opening edges, then quickly . . .

over the opening and the glue bead. Before the glue cools . . .

. . . quickly make any adjustments to pleats that
may be needed for a regular and even presentation.

7. Reverse the assembly to apply glue around backside
circle opening, then position and attach the second circle.

8. Assemble center decoration by stacking
and attaching together the plain circles, then . . .

. . . centering and attaching onto the scalloped circle,
and attaching the shamrock to cover the guide hole.

base shape, then position an attach the shamrock
decoration to the center.


NOTE: If the rosette is part of the larger pennant pocket
project, it will be best to use the plain larger base circle
in place of the ornament base. Consider color choice
for best contrast and definition between elements.
Here the rosette has been added as top layer
decoration to the rolled cone rosette, then attached
to the front of the pocket pennant.

No comments:
Post a Comment