
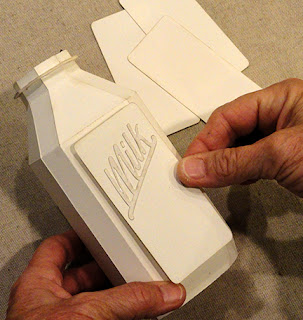
Replicating
a vintage-style glass milk bottle,
this container can function as gift box with
bottom-inserted
inner vessel (collar opening large enough to fit gift card
or
loose treats or gift).

Decorations include plain panel overlays with
“Milk”
word cut, thickened neck ring, inner “circle” lid tab.
Great container as
Twelve Days of Christmas themed giving
for “Eight Maids Milking” – cut file
includes a number 8 tag.
Two bottles fit nicely in specifically designed
“Tote
Gifting Two Pint Jars” separate design
(use tall upright shapes).

x 6.5” tall when fully assembled and
closed.
Coordinates well with “Tag Maid Milking Large”
and “Tag Milk Can”
separate designs.
ASSEMBLY: 1. Identify and cut the shapes:
A main bottle hull B bottle side panels
C bottle neck insert D neck rings for layering (5)
E faux pop tab lid F numeral 8 plus tag base
G "Milk" welded word accent for one side panel
H bottle base vessel shape
I vessel bottom "foot" shapes for layering 5
J vessel top opening collar reinforcement

for thickening so they can be pressed for drying
while other work progresses (align all cut edges
as precisely as possible):
A) layer and stack vessel foot shapes (5)

a flat, heavy object such as this thick book volume,
possibly placing something heavy on top.
 B) layer and stack neck ring shapes;
 C) layer pop top base, accent "ring" and front circle
(center all circles);
 D) layer numeral 8 onto tag base with even
offset margin around edges;

3. Prepare the main bottle hull shape by bending
back on all perforation lines for panels, regular
and wedge tabs, and . . .

. . . forward on neck middle perforation lines
and top/inward end tabs.

NOTE: be sure to define the folds/creases along
wedge tabs by pinching to complete creases
all the way into the corners at ends, as shown.

Here is a closeup of the neck top folding sequence.

Also pop the miniature half circle tabs on four
of the neck extension panels outward as shown.

4. Form the hull shape into a tube to overlap
straight side edge across the side flange tab
to perforation, adjust edges top to bottom
so that end perforation lines align,
and join seam.

NOTE: the symmetry of the hull shape will allow
the seam to be pressed flat on work surface to apply
fingertip pressure along its length to secure.

5. Begin to shape the neck area by bending two panels
inward until the straight side edge can overlap the adjacent
tab to perforation line, and join lower portion of seam.

6. Continue on the same seam to bend, align and
join the top portion of the seam in the same manner.
7. Align and join the two-part seams all around the neck.

8. Form the bottom of bottle shape in the same manner
by bending edges inward to align and join seams
all around.

NOTE for the final two seams, it may be helpful
to bend the final center (wide panel) outward

to more easily apply glue to the wedge tabs,
then bend back into position and join seams.

9. At bottom, bend each of the tabs inward and
glue to the backside of the bottom segments of wall,
forming a rim.

10. At top of neck, bend the rim tabs inward, while
also keeping the inward ledge tabs unattached.

11. Bend neck interior ledge tabs inward at 90 degree
angle, forming a ledge. Apply glue to the upper
surfaces, then insert the reinforcement into the neck
and attach to the tabs all around. Use the opening
to reach inside and pinch the layers together
to securely join all around.

12. Make sure the half-circle tabs on four sides of
neck are bend outward, apply dabs of glue to the upper
surfaces, then slide the neck ring over the neck
to rest on and attach to the half-circle tabs.

13. Position and attach the faux pop tab over
the neck opening.

14. Position and attach the "Milk" welded word accent
to one side panel - don't forget the "jot"
that goes above the 'i'.

15. Position and attach each of the separate side
panels, centered, on each of the bottle's 4 sides.
Sticky tape is the recommended type of adhesive
to use since it may be difficult to attach panels with
liquid adhesive onto the tube form and be able to
keep it from distorting the smooth, rigid walls.
16. Prepare the bottom-insert vessel shape by
bending back on all perforations for panels and tabs.

17. Form the panel into a tube to join the side seam.

NOTE that the vessel shape's symmetry will allow
for it to be pressed flat on work surface - but
take care not to tear the bottom panel connections.

18. Bend the bottom tabs inward, bottom panel
down into position, adjust for edges alignment,
then attach in place . . .

. . . using the finger access opening to reach
finger tips around edge to apply pressure to join.

19. Prepare the vessel's top opening reinforcement
collar by bending all the edge tabs forward.

20. Position the collar over the vessel's opening with
tabs upward, and insert just deep enough that
tab edges align with vessel edge . . .

. . . working all around to adjust and . . .

. . . apply pressure
to attach in place in position described.

21. Apply adhesive to the bottom panel, then
position, centered, onto the foot base, and hold
in place and apply pressure to join securely.

22. Insert gift contents, then close the milk bottle
by inserting the top of vessel into the bottom opening
of the bottle -
NOTE this may be a tight fit - and slide together . . .

. . . until bottle hull rim edge touches vessel base.

Here is the completed milk bottle box.

23. Attach ribbon loop to the numeral 8 tag
for Twelve Days of Christmas gifting, and
hang around the bottle's neck.

No comments:
Post a Comment