
Halloween decoration
imitates cut wood components.
Hour glass-shaped witch body is built as box lid and
base
that fit snugly together, held up by square post
reinforced with .25”
diam. wood dowel inside.

Layered-for-thickness arms, dangling legs and
miniature pumpkin are attached with thick
craft wire twists or “D” rings.
Star
box platform (lid and base) holds post.

Create the figure’s wig by wrapping
twine around
knitting needle or dowel, setting with craft glue "wash",
removing coils and tying into tails, to finally arrange
and attach to
head top, sides and back.
Top off with miniature witch’s hat.
Figure display
measures approx. 4.25” wide x
4.25” deep x 10.75” tall when assembled.
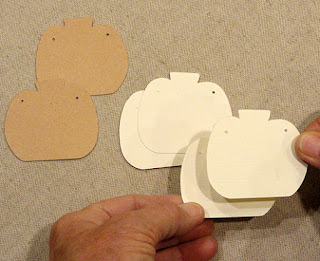
ASSEMBLY: 1. Identify and cut the shapes:
For the star base:
A base lid top panel B lid accent star
C lid boxing short & D lid boxing long strips (2)
E lid & K base collar to stabilize post (4-5 each)
F base star G base star "hollow" foot
H base boxing short & I base boxing long strips (2)
J base interior strut (riser)
L post strip

For the witch figure:
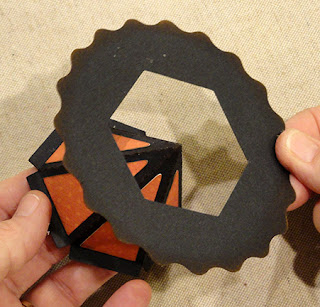
M lid body front panel N lid lower body boxing
O lid head boxing P neck brace
Q base body back panel R base lower body boxing
S base head boxing T base lower center collar (4-5)
U base lower body triangle strut riser (2)
V base wire hole strut riser (4)
W right arm (7-8) and X left arm (7-8) to stack
Y right leg (7-8) and Z left leg (7-8) to stack
AA body front accents overlays:
head, body front, arms, hands, stars to inset,
legs shoes, shoe bands, shoe buttons
BB pumpkin accent shapes: stem, bottom,
middle (with contrast inset circle), top
CC pumpkin base to layer: front, back, interior (6-7)

For hat: DD crown cone
EE crown triangle accent (6)
FF brim with wavy edge
(not shown: opt. crown underlay to hide assembly seam)

2. As preliminary tasks that would allow stacked
and glued-up shapes to be drying,
complete steps 2-8) (which are somewhat out of
order from logical assembly progression):
A) stack and glue together the left set and right set
of arm shapes, taking care as each shape is layered
that ALL cut edges and hole punches are aligned
as precisely as possible, (here and throughout).

On top of each left or right stack, position the upper
arm shape with edges aligned to stack, then
position and attach hand shape.

Once stacked and glued, immediately place under
a heavy flat object such as this thick book (possibly
with something heavy placed on top as well) and
allow the shape to be pressed flat until completely dry.
This may take several hours or overnight. Pressing
will help avoid warping or curling of layered shapes
glued up with liquid adhesive.

B) Prepare the legs in similar fashion to arms,
stacking the duplicated shapes and aligning cut
edges precisely, then press under heavy flat weight
while glue dries completely.

Here is the leg stack with patterned front shape
and shoe shapes.

C) Complete the arms by position and attaching
the upper arm, hand and stars in the arm depressions.
Complete the legs by position and attaching
the patterned front shape, shoe with band and
button on top in positions shown in base shapes.

D) Position as stack and glue together the body base
bottom boxing collars that will help hold post in position,
and press under weight til dry.

E) Layer and attach pumpkin shapes (shown for
sample project . . .
. . . with interior cream and front, back
as kraft tan), aligning cut edges and wire hole
cutouts precisely, then press under weight til dry.

F) Identify the star platform lid front shape by
locating the letter 'F' cut symbol, then . . .

. . . position, centered, the contrast accent star panel
on to, with center post hole cutouts aligned,
and press until dry.

G) Position the hollow star "foot" shape on top of
star base panel, with outer edges slightly offset,
attach, then press until dry.

H) Position and attach the collar shapes for each
of TWO collar stacks that will help reinforce platform
opening to hold post.

Position and attach each collar on the underside of
the star platform LID and BASE main star shapes.
Press under weight until dry.

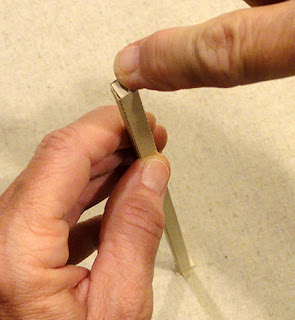
3. Prepare the long post strip shape by carefully
bending back slightly along perforation lines for
narrow panels and long flange, and also end 'cap'.

4. Form the strip into a tube to overlap the straight
long edge across the opposite long flange to
perforation line to join seam.

NOTE that the post shape can be pressed FLAT
in order to apply fingertip pressure up and down
the entire length to ensure that the seam is fully joined.

5. Open the tube shape into its non-flat shape.
Insert .25" diam wood dowel into tube (NOTE that
the post shape in final file version does not include
tabs at top edge as shown in this assembly photo) . . .

. . . and slide fully in so that the lead edge is even
with the end edges of tube (NOTE that in this image
the bottom 'cap' panel is opened and out of the way).

Mark the cut length of dowel with fine tip pencil
at opposite tube end. Remove dowel and cut
to length at mark.

6. Re-insert dowel into tube where adhesive
has been applied inside both ends, and push
fully in so that dowel ends are even with tube
cut edges.
7. Prepare the hat crown shape by bending back
on each of cone panel perforation lines, and
bending forward at bottom edge tabs.

8. Position and attach crown accent triangle shapes
onto front of crown centered within perforation lines,
and with bottom straight edge along bottom tab perf
lines, then press flat until dry.

9. Identify the body/head LID front by locating the 'F'
symbol cut into the panel - set it aside while
the BASE body/head is assembled. Also locate
the dash guidelines roughly opposite the wire holes
for arms and legs on both LID and BASE.

10. Identify the BASE lower and head boxing strips
by locating the tiny hole symbols cut into the center
segments.

Add some back curl to the multi-tab portions on
each side of center of lower boxing strip, using a rod
tool such as this narrow-diameter dowel. Then . . .

. . . bend the 'solid' and ultra-narrow tabs back
all along the strip. (NOTE it is easier to
add curl before the tabs are bent back.

11. Position BASE bottom center edge along corresponding
center portion of the body boxing strip, using
the dash cut guide marks (body) aligned with guide
perf lines on boxing strips to assist centering.
Overlap body edge across 'whole' tab to perf line
and join seam.

12. Shape the first end of boxing strip around
panel edge to line up tab at top of strip exactly
at the end of edge at 'valley' between body and
head and . . .

. . . attach whole tab under body edge. Then
shape the multi-tabs edge to match the body panel
cut edge and glue those tabs in place at edge.

13. Repeat to position, shape and attach the second
boxing side for the BASE.

To assist with seam attachment, place the assembly
face down on flat work surface and use fingertip pressure
around the boxing interior to press tabs flat
and complete attachment.

13. Position the reinforcement post collar on bottom
center boxing strip inside edge, matching post
opening edges as precisely as possible,
and glue in place.

14. Prepare the head boxing strip in similar manner
to body boxing strip, adding curl at multi-tab curve
segment, then bending whole and narrow teeth tabs back.

15. Position appropriate head boxing end tab
behind end of body boxing top end edge
and attach.
16. Position center boxing segment at panel
top center where guide marks indicate, and attach.
Then . . .

. . . form and shape the multi-tab curve portion of
boxing to fit and match the head panel edge
then glue in place.
17. Repeat the process for the second side of head
with boxing, positioning, forming and attaching.

Finally, tuck the end tab behind the body boxing
top edge and glue in place to complete boxing
attachment all around.

18. Prepare the interior supports for the BASE:
A) wire hole three-panel supports - bending back
at vertical perforation lines, and bend top and
bottom tabs forward.

B) triangle side body supports (2) - bend back
at vertical perforations, and bend end tab and
back, edge tab flanges forward.

Form strip into a triangle and join with end tab
overlapping and attaching at opposite end edge.

C) neck bridge - bend all tabs back.
19. Position the neck bridge at narrowest position
with end tab perf lines aligning at bend crease
and attaching there, with bottom flange being
glued to backside of BASE main panel wall.
(Top flange will attach to LID when box is closed, later.)

20. Position and attach the triangle supports on each
side of center body cavity, long edges parallel . . .

. . . taking care that the channel where
the post will be inserted remains free and
clear - demonstrated in this photo where
the post is laid across the center.

21. Form the four wire supports into arcs
then position so they surround the still-open
area below or above each of the wire holes.
(NOTE these will allow wire to be positioned
and "tightened" as much as cardstock will allow.)

22. Complete the LID boxing in same manner
as the BASE boxing was assembled.
23. Position and attach the accent front body shape
over the front of LID, side and bottom edges
matching. Position and attach the head/face accent
above the body accent in similar manner (attach
contrast circle behind face features if LID does not
provide the appropriate contrast for eyes, mouth).
Position and attach star accents in recesses.

24. Prepare to close the LID over the BASE by
applying glue to all the interior support upper tabs
and flanges.

Position the LID over BASE and slide the two
together completely. Spread the LID wall away
from the BASE wall to apply glue between, then . . .

. . . apply pressure all around to join LID to BASE.
If possible, position heavy objects around drying
head/body box edges to apply inward pressure,
especially at neck indentation.

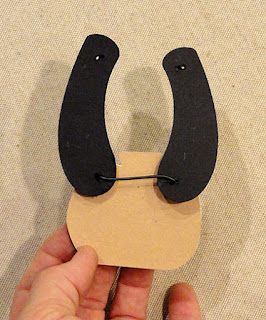
25. Prepare the 'D' rings to attach legs to body by
shaping 16 gauge wire around a wide rod object
like this 1.25" diam. dowel, then further shaping . . .

. . . upper corners with narrower dowel.
Target D ring size is approx. 1" wide x .8" tall -
needs to be tall enough to allow legs to swing,
and wide enough to span body thickness.

Overlap wire ends across center top, then
cut at center.

26. Divide the ring at top to allow threading of
each leg onto ring and slide to bottom center.

27. Thread D ring ends through body wire holes
on front . . .

. . . and back so that cut ends meet invisibly
inside body box.

Legs should dangle free below body bottom panel . . .

. . . as shown here.

28. Assemble the pumpkin accent by layering
the middle contour over the bottom contour . . .

. . . using the bottom contour edges near the stem
to assist with top alignment, with bottom straight
edges even. Position and attach the contrast disc
into the circular depression.

29. Position the face layer over the assembly
and attach. Position and attach stem at top.
Position and attach the pumpkin accent assembly
onto the stacked base shape completed earlier.

30. Prepare a length of wire by bending into a 'U'
shape that matches the width of the pumpkin's
wire holes . . .

. . . then thread a hand onto each arm of wire 'U'
then thread pumpkin onto ends.
Use needle-nose pliers to twist a curl into wire
ends just above surface of pumpkin, then trim
excess ends.

Here is a back view of the arms & pumpkin assembly.
Apply clear nail polish or clear-drying glue to
wire cut ends to make them less sharp.

31. Prepare two lengths of wire with a twisted
curl at one (front) end. Thread straight end
through arm wire hole, then . . .

. . . thread through body wire hole.

Repeat for the second arm.

On back, carefully twist a curl as close to
the back panel as feasible.

32. Prepare to complete the star platform by identifying
the BASE boxing strips with the half-circle "bite" cut outs
at the ends tabs of each.

33. Prepare the boxing strips for LID by bending back
at the shaped tab perforation lines (points), and forward
at the end tabs or center perforation lines (valleys).

34. Join the boxing strips end to end by overlapping
the plain end across the end tab to perforation lines,
ensuring that bottom but edges remain on common
straight line, and complete seams. Leave the final
end seam unattached until later.

35. Begin attaching the LID boxing strip to front
star panel assembly by aligning the plain end at
"valley" in one selected position. Overlap star edge
across flange, adjust and glue in place.

36. Bend the next TWO segments into position along
the next two edges of star, adjust and glue in place.
Continue around remaining star edges, until final
segment, which is positioned in the same motion
as final end tab to complete the perimeter.

37. Complete the star BASE in same manner.
38. Prepare the interior support pentagram strip
by bending back on vertical perf lines, and bending
tabs back. Position and attach inside BASE,
taking care that it seats around post collar.

39. Apply glue to the exposed support tabs,
then fit the LID over the BASE and slide together fully.

40. Prepare twine hair as follows:
A) Tape end of twine to the top of a knitting needle or
equivalent that will produce coils.
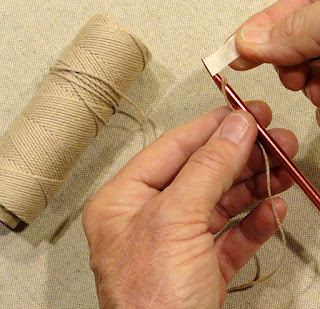
B) wind the twine around the tool in snugly placed
coils and continue to wrap all the way to the bottom.
(NOTE: the model shown uses 5 needle loads of
approx. 8.5" long each.)

C) at the end of the coil, trim the twin end and
attach in place with a second tiny tape strip.

D) Mix a glue wash of 1:1 parts white (clear drying)
craft glue and water. Use a foam or other brush
to paint the wash thoroughly over the entire coil,
soaking the twine. Allow to dry.

E) slide the coils off the needle and . . .

. . . carefully pull the coils apart until separated.
Try NOT to pull the coils any straighter than necessary.

41. Determine the length of the wig over the head shape
and down far enough on each side to create pig tails.
NOTE: for the sample the wig loops spanned
approx. 8" - or 4" on each side of centerline.

42. Arrange the coils in a pile with loop ends in
determined or recommended length wig as shown.
If possible, machine stitch across the center with
matching color thread and tiny stitches. Tea dye
or otherwise modify coils color, if desired.

43. Tie the tails with contrast twine.

Arrange the wig over the head boxing, adjust
and glue in place.

At the head back, scrunch the twine curls inward
toward center to cover the panel, and glue.
If desired, trim the loop ends straight across
at bottom of pig tails, matching length at each side.

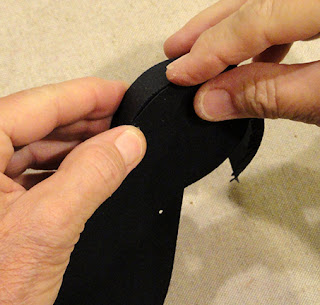
44. Form the hat crown into a cone to overlap straight
edge to overlap flange tab opposite, and join seam.
NOTE it may be helpful to insert a pencil or narrow
rod tool inside the cone behind the seam to
provide a press-against surface.

45. Apply glue to the upward surface of crown
tabs, then slip the brim shape face-down over
crown point and slide down into position . . .
. . . to seat snugly in place at tab perforations.
Press to secure all around. If desired, tie a small
ribbon bow to attach to center front.

46. Test the hat on witch girl's head and curls,
make adjustments as needed, then remove hat
and apply glue on the inside rim of crown.
Re-position hat and hold in position until secure.

47. Prepare for final assembly on platform and post
by using the end of a tool such as this spatula
to press open the lower post opening at bottom
of body LID.

48. Apply glue inside upper and lower post hole openings
of star platform. Insert post bottom end (with 'cap') into
top opening and push down, fishing around until
bottom end finds the bottom collar and push through
until 'cap' is flush with BASE bottom panel edges.
(NOTE: if the post seems steady enough without glue,
the post, platform and witch can be disassembled
for storage.)
49. Locate the front of platform, the star point that
is directly in front of SQUARE post opening,
then slide that face of the post into body post opening . . .

. . . in parallel orientation, so witch faces forward.

Here is the finished witch girl on platform.

No comments:
Post a Comment