
Both versions are created with pleated panels joined
to form the medallion
base with a pair of holes
for twine or ribbon hanger at top.
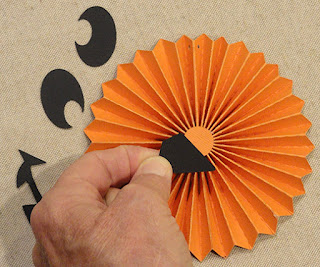
Nose shape covers the assemble center rosette circle,
with eyes above and smile
below.
Add layered leaf with vine to decorate top of Jack O Lantern,
and a layered 'bone' bowtie with
accent brad to decorate bottom of skeleton.
Fun project for kids to hang from
pegs or chandelier,
or add several to a Halloween swag.
Medallion measures
approx. 4.625” diam. assembled.
Companion design to Halloween Crow Rosette.
Follow this LINK to view the assemble of similar
Halloween Crow Rosette ornament design.
ASSEMBLY: 1. Click on the link above to follow
steps 1 (substitute the Jack or Skeleton face shapes,
leaf or bone-tie assemblies), and steps 2-6.
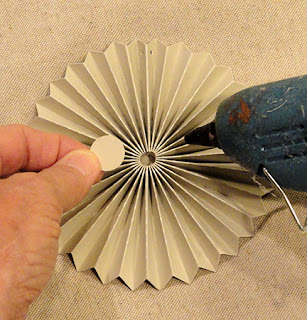
2. Reverse the order of steps 7 & 8, that is, position
and hot-melt glue the larger BACK reinforcing disc in place . . .


Then position, center, and hot melt glue the smaller
FRONT disc over the gathered pleats "hollow".

controlled positioning of center disc, so that the nose
can be positioned to camouflage that construction detail.
(Or place the nose and other features as desired,
with the possibility that center disc remains somewhat visible.)
The same reversal of steps 7 & 8 will provide
similar control for the skeleton ornament, as shown here:

in place, then . . .
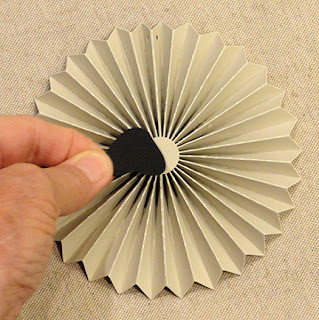
 . . . positioning and gluing the smaller FRONT disc
so that . . .
 . . . the nose can be positioned to cover center disc.
 3. In place of Crow assembly step 9, position
and attach the Pumpkin or Skeleton features
(and respectively, layered leaf and vine . . .

. . . or bone-tie with accent brad).

4. Finish the ornament by stringing heavy twine
of narrow ribbon (approx. 11-12" length) through
the punch holes (sample shows back to front threading),
sliding a painted bead in place
if desired, then tying ribbon or twine ends.
No comments:
Post a Comment