
Oversized
card that doubles as a festive decoration
features pumpkin contours framework
that allows
puffy fabric panel (plus opt. batting shapes)
to plump dimension
from behind.

Rolled paper flowers with leaf pairs accent the front,
with
ribbon, twine or raffia add a hint of autumn flair.
Measures 8” tall x 6.85”
wide when assembled.
ASSEMBLY: 1. Identify and cut the shapes:
A front "contours" shapes with contrast front layer
(4-5 shapes layered for thickness & rigidity)
B backing for front contour layers
C back panel
D template for cutting fabric panel
E retained shapes from A contour cut to
cut center and 2 side pieces of thin batting
F rolled flowers spirals with base containment circles
(3 sets for 3 flowers)
G leaf pairs (3)

layering the cut shapes, one at a time, and gluing
together. Take care to match up all outer and inner
cut edges as precisely as possible.

does, position and attach that front layer to
previously-layered assembly.
 Press the layered and glued-up shape on a flat
work surface with a flat weight on top, such as this
thick book. Consider using another heavy object placed
on top of the book for added weight. Allow pressed
shape to dry thoroughly - this could require several
hours or overnight, and will help minimize or
prevent warping and curling of the layered shape
due to the liquid adhesive used.
 3. Prepare the back panel by bending forward
along the perforation line near stem.
 4. Use the "waste" cutouts from one of the contour
front panels as a template to trim the "puffy"
batting panels: one center, two sides.
 5. Use the fabric template to cut a fabric panel.
NOTE 1: the template can be temporarily held in
position to assist with ease of trimming to size
with a few well-placed dots of glue, then peeled
free when cutting is complete.
NOTE 2: if preferred, substitute textured alternative
media such as burlap-fronted card stock,
corrugated card, etc.; eliminate batting shapes.
 6. Center the fabric layer face-down over the backside
of the layered contour panel and use appropriate
adhesive to attach around outer perimeter margins.
NOTE don't stretch the fabric into place, but allow
some give so that it can puff forward over
the batting panels. The fabric edge should fall
approximately at the center of the contour margins,
as shown.

their corresponding windows in the contour panel,
more easily accomplished by either feeling with
finger tips to compare panel edges to batting edges,
or holding the panel up to a light source
to enable seeing edges to make adjustments.
 8. Apply glue to backside of backing panel at
outer margins to edges, then position over puffy
assembly to enclose fabric and batting edges inside.
Press under a flat weight until thoroughly dry.

9. Prepare rolled flower spiral by carefully adding back
curl along the entire length, using a narrow dowel
or round pencil, and placing paper between tool
and thumb, then drawing it across tool, a bit like
curling ribbon and scissors.

pliers to roll the flower. Grip the middle tip in tweezers,
then . . .
 . . . tightly roll the center as shown (tip may curl
back on itself; this is acceptable).
 Continue to tightly roll the spiral . . .

. . . keeping the bottom
"straight" edges stacked on tweezers as closely
as possible, with the curve of the spiral allowing
the upward layers to flare naturally.


re-tighten the spiral so that base size and shape
compares fairly closely to the bottom disc.

Apply a dab of glue at the final tip, then reposition
and attach in place.

 . . . quickly position and attach the base disc,
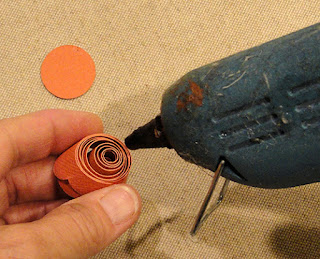
11. Apply quick-grab adhesive such as hot melt glue
shown here to the entire base of rolled flower, then . . .
centered, under the flower's base. Hold in place
until secured.


12. Prepare the leaf shapes by adding back curl
to each leaf.
Also bend the attachment bridge back so that
the bottom tip of one leaf overlaps that of adjacent
leaf; secure with dabs of glue.
Repeat for the other two leaf pair units.
 13. Position leaf base overlapped tips under the edge
of blossom, and attach in place. Repeat for two
remaining flowers.
 14. Position the "card" back panel behind the front
contour assembly, with portion above the perforation
line aligned with matching edges of the front panel
along stem, and glue that portion ONLY in place.
Press with flat weight until secure.
 15. Finish the decoration of the "card" by
adding a raffia cluster behind intended blossoms
position, then placing and attaching each of
the three blossoms with appropriate adhesive.
Trim excess raffia length artistically.
 Here is the completed decoration,
with low-relief fabric puffiness showing through
the contour windows.


No comments:
Post a Comment